How to Accelerate Compost?
Composting transforms kitchen scraps and yard waste into nutrient-rich soil amendment, but waiting months for finished compost tests your patience. Many gardeners wonder if they can speed up the decomposition process without compromising quality. The answer is yes – several proven techniques dramatically reduce composting time from months to weeks.
The Science Behind Fast Composting
Composting happens when beneficial microorganisms break down organic materials through aerobic decomposition. These tiny workers need specific conditions to thrive and multiply rapidly. Temperature, moisture, oxygen, and the right carbon-to-nitrogen ratio create the perfect environment for accelerated breakdown.
Thermophilic bacteria drive the hottest phase of composting, reaching temperatures between 140-160°F. These heat-loving organisms work fastest when all their needs are met. Cold composting relies on mesophilic bacteria that work at lower temperatures but take much longer to complete the job.
Hot composting methods produce finished compost in 4-8 weeks compared to 6-12 months for passive cold composting. The key lies in maintaining optimal conditions that keep these beneficial bacteria working at peak efficiency.
Master the Carbon-to-Nitrogen Ratio
The foundation of rapid composting starts with balancing brown and green materials correctly. Carbon-rich browns provide energy while nitrogen-rich greens supply protein for bacterial growth. The ideal ratio sits around 30:1 carbon to nitrogen, though slight variations work fine.
Brown materials include dried leaves, shredded paper, cardboard, sawdust, and straw. These materials resist decomposition on their own but provide essential structure and carbon when combined with nitrogen sources.
Green materials encompass fresh grass clippings, vegetable scraps, coffee grounds, and fresh manure. These nitrogen-rich ingredients activate bacterial growth but can create smelly, anaerobic conditions when used alone.
Layer browns and greens in roughly equal volumes, keeping in mind that browns typically weigh less than greens. A good rule of thumb involves using three parts brown materials to one part green materials by volume. This approach accounts for the difference in density between the two material types.
Avoid common ratio mistakes that slow decomposition. Too much carbon creates a pile that barely heats up and breaks down slowly. Excess nitrogen produces foul odors, attracts pests, and creates slimy conditions that exclude oxygen.
Size and Preparation Matter
Particle size directly impacts decomposition speed because smaller pieces provide more surface area for bacterial action. Chop kitchen scraps into 1-2 inch pieces before adding them to your pile. Shred or chop larger items like corn stalks, thick stems, and branches.
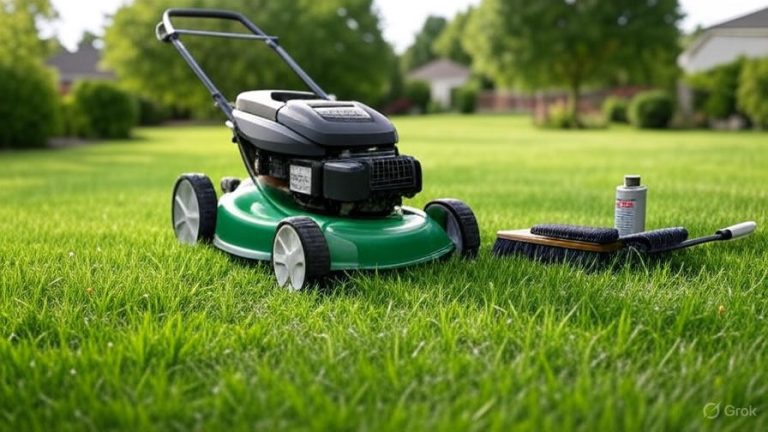
A leaf shredder or lawn mower works perfectly for breaking down fall leaves. Run over leaves several times until they’re roughly chopped but not powdered. Whole leaves mat together and shed water, while overly fine particles compact and exclude air.
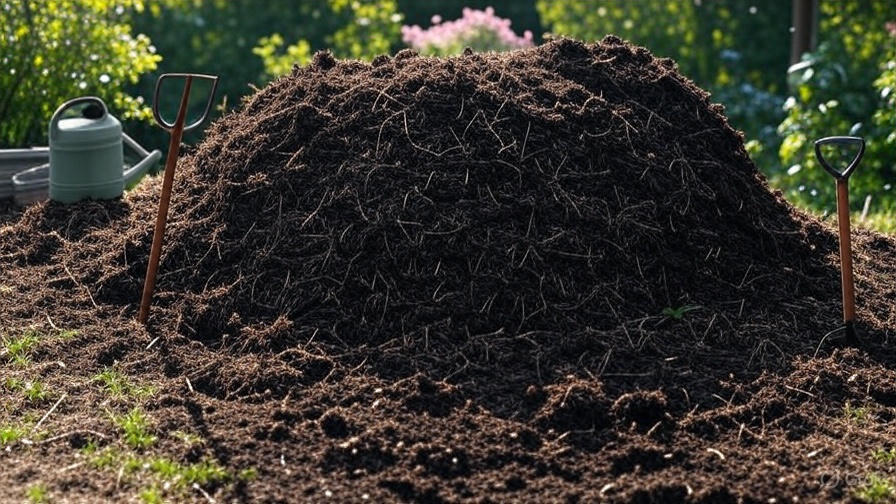
Pile size affects heating and moisture retention. Build your compost pile at least 3 feet wide, 3 feet deep, and 3 feet tall to generate sufficient heat. Larger piles retain heat better but become harder to turn and manage. Most home composters find a 4x4x4 foot pile ideal for rapid decomposition.
Consider using a tumbler composter for ultimate convenience and speed. These enclosed systems make turning effortless while maintaining proper moisture and temperature. Quality tumblers produce finished compost in 6-8 weeks with minimal effort.
Temperature Control for Maximum Speed
Heat drives fast decomposition, so monitoring pile temperature helps you maintain optimal conditions. Insert a long-stemmed thermometer 12-18 inches into the center of your pile to track internal temperature.
Properly built piles heat up within 24-48 hours, reaching 140-160°F at the center. This thermophilic phase lasts 2-3 weeks when conditions remain optimal. Temperatures above 160°F kill beneficial bacteria, while temperatures below 100°F indicate problems with your pile.
Turn your pile when temperatures drop below 100°F or after maintaining peak heat for several days. Turning brings fresh materials into the hot center while moving partially decomposed materials to cooler outer areas. This process restarts heating and ensures even decomposition throughout the pile.
Insulate your pile during cold weather using tarps, straw bales, or commercial compost covers. Cold temperatures don’t stop decomposition entirely but dramatically slow the process. Maintaining warmth during winter keeps bacterial activity high.
Moisture Management Techniques
Proper moisture content keeps bacterial populations thriving while preventing anaerobic conditions. Your compost pile should feel like a wrung-out sponge – moist but not dripping wet. Most piles need 40-60% moisture content for optimal decomposition.
Test moisture by grabbing a handful of compost and squeezing gently. A few drops of water should appear, but the material shouldn’t drip steadily. Dry materials crumble and fall apart, while overly wet compost feels slimy and may smell bad.
Add water during pile construction if materials seem dry. Spray each layer lightly with a hose or watering can as you build. Dry materials like shredded paper and sawdust absorb significant amounts of water before reaching proper moisture levels.
Cover your pile during heavy rains to prevent waterlogging. A tarp or piece of plywood keeps excess moisture out while allowing air circulation around the edges. Remove covers during dry periods to allow natural moisture from rainfall.
Improve drainage in wet climates by building piles on slightly elevated ground or adding coarse materials like small twigs to the base. These materials create air pockets that prevent waterlogging while supporting beneficial bacteria.
Oxygen Supply and Turning Schedule
Aerobic bacteria work much faster than anaerobic organisms, making oxygen supply crucial for rapid composting. Regular turning introduces fresh air while preventing compaction that blocks airflow.
Turn your pile every 3-5 days during active composting for maximum speed. Use a pitchfork or compost turning tool to move materials from outside to inside and vice versa. This process should take 10-15 minutes for a typical home compost pile.
Build air channels into new piles using a post or broomstick. Poke holes throughout the pile, then wiggle the tool to create permanent air passages. Remove the tool after building each layer, leaving hollow tubes that provide continuous aeration.
Consider passive aeration systems for less work. PVC pipes with holes drilled along their length can be placed vertically in piles to provide constant airflow. These systems reduce turning frequency while maintaining aerobic conditions.
Watch for signs of poor aeration like bad smells, slimy textures, or lack of heating. These symptoms indicate anaerobic conditions that dramatically slow decomposition. Immediate turning and possibly adding dry carbon materials can restore proper conditions.
Accelerating Agents and Additives
Commercial compost activators contain concentrated bacteria and enzymes that jump-start decomposition. These products work best when added to new piles along with proper ratios of carbon and nitrogen materials. Follow package directions for application rates.
Garden soil contains billions of beneficial microorganisms that naturally inoculate compost piles. Add a few shovelfuls of soil to new piles, especially if you’re starting with all fresh materials. Existing compost works even better than soil for bacterial inoculation.
Finished compost from previous batches provides the perfect starter culture. Mix 10-20% finished compost into new piles to establish bacterial populations immediately. This technique often reduces composting time by 1-2 weeks.
Natural nitrogen boosters like coffee grounds, fresh grass clippings, or diluted urine can speed up slow piles. These materials provide quick-release nitrogen that feeds bacterial populations during active phases. Use sparingly to avoid creating imbalanced piles.
Avoid chemical fertilizers or lime in compost piles. These additives can kill beneficial bacteria or create pH conditions that slow decomposition. Stick with organic materials and natural amendments for best results.
Troubleshooting Common Problems
Slow decomposition usually indicates problems with ratios, moisture, or aeration. Check your pile’s temperature and moisture level first. Cold, dry piles need more nitrogen and water. Hot, smelly piles typically have too much nitrogen and insufficient carbon or oxygen.
Pest problems often stem from improper materials or ratios. Avoid meat, dairy, oils, and pet waste that attract unwanted visitors. Bury fresh scraps under brown materials and maintain proper carbon-to-nitrogen ratios to discourage pests naturally.
Foul odors indicate anaerobic conditions from too much moisture, insufficient aeration, or excess nitrogen. Turn the pile immediately and add dry carbon materials like shredded paper or sawdust. Proper ratios and regular turning prevent most odor problems.
Piles that won’t heat up lack sufficient nitrogen, moisture, or size. Add fresh grass clippings, vegetable scraps, or other green materials. Ensure adequate moisture and rebuild the pile if it’s smaller than 3x3x3 feet.
Fungal growth appears normal during composting and actually helps break down woody materials. White, thread-like fungal networks indicate healthy decomposition. Remove any colorful or slimy growth that might indicate problems.
Seasonal Composting Strategies
Summer heat accelerates decomposition but requires careful moisture management. Check piles more frequently during hot weather and water as needed. Shade compost piles in extremely hot climates to prevent overheating and moisture loss.
Fall provides ideal composting conditions with abundant leaves and moderate temperatures. Collect and shred leaves for winter use as brown materials. Build large piles in fall to maintain heat through winter months.
Winter composting continues in mild climates but slows dramatically in freezing conditions. Insulate active piles with straw, leaves, or tarps. Consider indoor worm composting or bokashi fermentation during coldest months.
Spring cleanup provides fresh materials to restart dormant winter piles. Mix new green materials with partially decomposed compost to jump-start bacterial activity. This season offers perfect conditions for starting new fast-composting projects.
Harvesting and Using Finished Compost
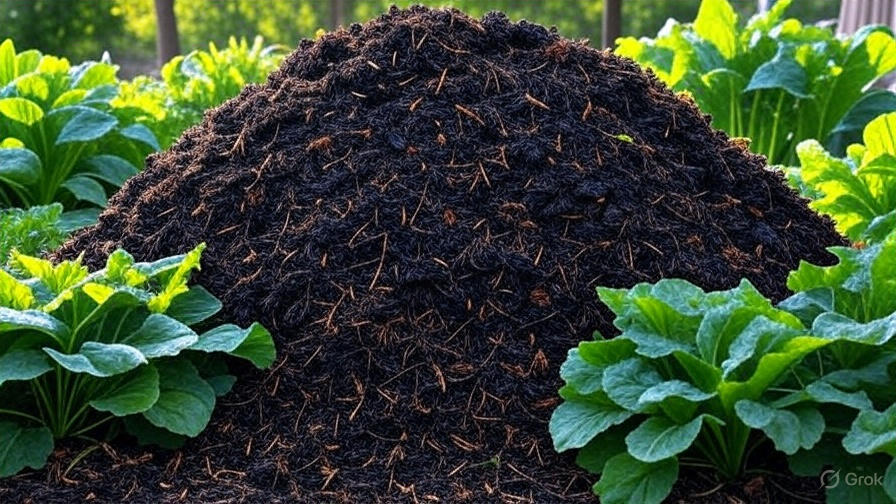
Finished compost looks dark, crumbly, and smells earthy rather than rotting. Individual materials become unrecognizable as they transform into rich humus. The pile should have cooled to ambient temperature and stopped producing heat.
Screen finished compost through 1/2-inch hardware cloth to remove large uncomposted pieces. Return screenings to active piles for further decomposition. Most home composters achieve 70-80% finished product in fast composting systems.
Use fresh compost immediately for best results. Compost continues changing even after screening, so apply it to gardens within a few weeks of harvesting. Store finished compost in covered bins if you can’t use it immediately.
Apply compost as soil amendment, mulch, or potting mix component. Work 2-4 inches of compost into vegetable garden beds before planting. Use thinner layers around trees and perennials as top-dressing mulch.
Test compost maturity by germinating seeds in pure compost. Immature compost may inhibit seed germination or plant growth. Properly finished compost supports healthy plant growth without additional fertilization.
Advanced Techniques for Speed
Berkeley method hot composting produces finished compost in just 18 days through intensive management. This technique requires turning piles every 2-3 days and maintaining perfect ratios, moisture, and aeration. Most gardeners find this approach too labor-intensive for regular use.
Three-bin systems allow continuous composting with one bin filling, one actively composting, and one finishing or curing. This approach provides steady compost production while maintaining fast decomposition in active bins.
Worm composting (vermicomposting) produces finished compost in 2-3 months through earthworm action. Red worms consume organic matter and produce nutrient-rich castings. This method works year-round indoors and handles kitchen scraps efficiently.
Bokashi fermentation pre-treats organic matter using beneficial microorganisms before traditional composting. This Japanese technique speeds up final composting while allowing normally prohibited materials like meat scraps and dairy products.
Conclusion
Accelerating compost production requires attention to basic principles rather than expensive equipment or complicated techniques. Balance carbon and nitrogen materials, maintain proper moisture and temperature, provide adequate aeration, and turn regularly. These fundamental practices transform your organic waste into finished compost in just 4-8 weeks.
Success comes from consistent management and understanding what your compost pile needs. Monitor temperature and moisture levels, adjust ratios when problems arise, and maintain regular turning schedules. These efforts reward you with rich, finished compost much faster than passive methods.
Start your fast composting journey with proper pile construction using the right ratios of browns and greens. Build adequate size for heat generation, maintain moisture like a wrung-out sponge, and turn every 3-5 days during active phases. These techniques consistently produce finished compost in less than two months.
Remember that some variation in timing is normal based on materials used, weather conditions, and management consistency. Focus on providing optimal conditions rather than rushing the process. Quality compost takes time even with acceleration techniques, but proper methods dramatically reduce waiting periods while producing superior results for your garden.