How to Care for Hydrangeas?
Hydrangeas transform any garden into a stunning display of color and texture. These magnificent flowering shrubs captivate gardeners with their massive blooms and impressive foliage. You can enjoy these spectacular plants in your own backyard when you learn the proper care techniques.
Many gardeners feel intimidated by hydrangea care, but these resilient plants actually thrive with simple, consistent attention. The key lies in understanding their basic needs and providing the right environment for growth. Once you master these fundamentals, your hydrangeas will reward you with breathtaking displays year after year.
Understanding Different Hydrangea Varieties
Before diving into care instructions, you need to identify which type of hydrangea graces your garden. Each variety has distinct characteristics and care requirements that affect everything from pruning schedules to winter protection needs.
Bigleaf Hydrangeas (Hydrangea macrophylla) produce the classic mophead and lacecap flowers that most people recognize. These popular varieties bloom on old wood, which means they form next year’s flower buds on current year’s growth. Their flower colors change based on soil pH levels, creating stunning pink, blue, or purple displays.
Panicle Hydrangeas (Hydrangea paniculata) develop cone-shaped flower clusters that start white and gradually turn pink or red as they mature. These hardy shrubs bloom on new wood, making them more forgiving when it comes to pruning timing. They tolerate cold temperatures better than other varieties.
Smooth Hydrangeas (Hydrangea arborescens) feature rounded white flower heads that appear on new wood each season. The popular ‘Annabelle’ cultivar belongs to this group. These native North American plants handle cold weather exceptionally well and recover quickly from harsh winters.
Oakleaf Hydrangeas (Hydrangea quercifolia) stand out with their distinctive oak-shaped leaves and elongated white flower panicles. Their foliage provides spectacular fall color, ranging from deep red to bronze. These shrubs prefer slightly more shade than other varieties.
Climbing Hydrangeas (Hydrangea petiolaris) scale walls, fences, and trees with their vigorous growth habit. They produce flat-topped white flower clusters and attractive heart-shaped leaves. These vines take several years to establish but create stunning vertical displays once mature.
Soil Requirements and pH Management
Soil preparation forms the foundation of successful hydrangea cultivation. These shrubs demand well-draining soil that retains adequate moisture without becoming waterlogged. Heavy clay soils often cause root rot, while sandy soils drain too quickly and stress the plants during dry periods.
The ideal soil composition contains equal parts garden soil, compost, and peat moss or leaf mold. This mixture provides excellent drainage while maintaining the moisture-retaining properties hydrangeas require. Test your soil drainage by digging a hole one foot deep and filling it with water. The water should drain within 24 hours for optimal results.
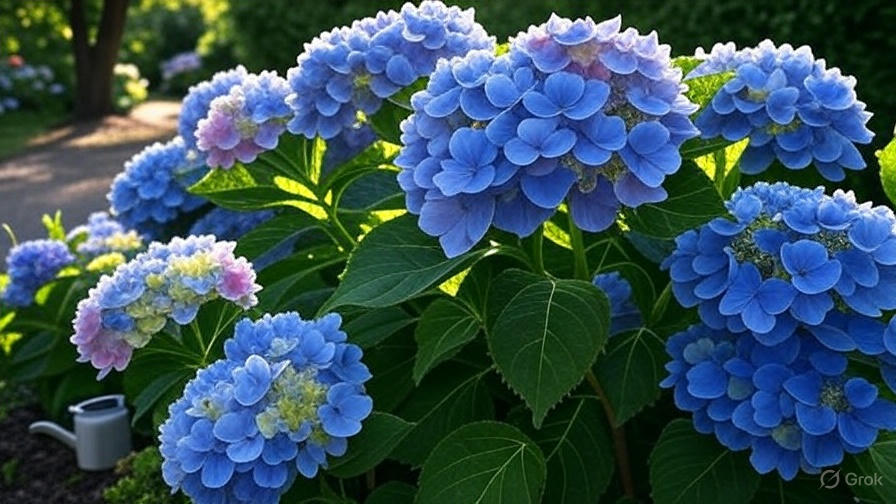
Soil pH dramatically affects flower color in bigleaf hydrangeas, creating one of gardening’s most fascinating phenomena. Acidic soils (pH 5.0-6.0) produce blue flowers, while alkaline soils (pH 7.0-8.0) create pink blooms. Neutral pH levels (6.0-7.0) often result in purple flowers or mixed colors on the same plant.
You can modify soil pH to achieve desired flower colors, but changes take time and patience. To lower pH for blue flowers, add sulfur, aluminum sulfate, or organic matter like pine needles and coffee grounds. Raise pH for pink flowers by incorporating lime, wood ash, or bone meal into the soil around your plants.
Regular soil testing helps you monitor pH levels and make necessary adjustments. Test your soil every two to three years using either a digital pH meter or soil test strips. Spring provides the best timing for pH modifications, allowing the changes to take effect before the growing season begins.
Organic matter enrichment benefits all hydrangea varieties regardless of their pH preferences. Work compost, aged manure, or leaf mold into the planting area each spring. This organic material improves soil structure, increases nutrient availability, and supports beneficial microorganisms that promote healthy root development.
Planting Location and Spacing
Site selection plays a crucial role in hydrangea success. Most varieties prefer morning sun with afternoon shade, particularly in hot climates where intense afternoon heat can stress the plants. In cooler regions, hydrangeas tolerate more direct sunlight throughout the day.
Panicle hydrangeas handle full sun better than other varieties, while oakleaf hydrangeas thrive in partial to full shade conditions. Bigleaf and smooth hydrangeas perform best with four to six hours of morning sunlight followed by filtered afternoon shade.
Wind protection prevents damage to large flower heads and reduces moisture loss from leaves. Plant hydrangeas near fences, buildings, or other shrubs that provide natural windbreaks. Avoid planting in areas where strong winds funnel between structures or across open spaces.
Proper spacing allows air circulation around plants, reducing disease problems and promoting healthy growth. Space most hydrangea varieties four to six feet apart, measuring from center to center. Climbing hydrangeas need adequate support structures and should be planted at least three feet from walls to allow for proper air circulation.
Consider mature plant size when selecting planting locations. Bigleaf hydrangeas typically reach four to six feet in height and width, while panicle varieties can grow eight to twelve feet tall. Oakleaf hydrangeas spread four to eight feet wide, and smooth hydrangeas often reach similar dimensions.
Drainage assessment becomes critical in low-lying areas where water accumulates after heavy rains. Hydrangeas cannot tolerate standing water around their roots, which quickly leads to root rot and plant death. If your chosen location has drainage issues, consider creating raised beds or planting berms to improve water movement.
Watering Techniques and Schedules
Consistent moisture management keeps hydrangeas healthy and promotes abundant flowering. These plants have relatively shallow root systems that dry out quickly during hot weather. Deep, infrequent watering encourages roots to grow deeper into the soil, creating more drought-resistant plants.
Water hydrangeas early in the morning to reduce evaporation and allow plants to absorb moisture before the heat of the day. Avoid watering late in the evening, as wet foliage overnight can promote fungal diseases. Direct water at the soil level rather than spraying leaves and flowers.
Apply approximately one inch of water per week, including rainfall. Use a rain gauge or small container to measure the amount of water your plants receive. During hot, dry periods, increase watering frequency but maintain the same depth of application.
Drip irrigation systems provide excellent water distribution for hydrangeas. These systems deliver water slowly and directly to the root zone, minimizing waste and reducing disease problems. Install emitters every 12 to 18 inches around each plant for even coverage.
Soaker hoses offer another efficient watering method. Lay the hoses in serpentine patterns around your hydrangeas and cover them with mulch for a neat appearance. Run soaker hoses for 30 to 45 minutes to deliver adequate moisture to the root zone.
Signs of water stress include wilted leaves during morning hours, brown leaf edges, and reduced flower size. Overwatering symptoms include yellowing leaves, musty soil odors, and stunted growth. Adjust your watering schedule based on these visual cues and local weather conditions.
Container-grown hydrangeas require more frequent watering than garden-planted specimens. Check container soil daily during hot weather and water when the top inch feels dry. Ensure containers have adequate drainage holes to prevent waterlogged conditions.
Fertilization and Nutrient Management
Balanced nutrition supports vigorous hydrangea growth and spectacular flowering displays. These heavy feeders benefit from regular fertilization throughout the growing season. Start with a soil test to determine existing nutrient levels and avoid over-fertilizing with unnecessary elements.
Apply a balanced fertilizer (10-10-10 or 12-12-12) in early spring as new growth emerges. Granular fertilizers provide slow-release nutrition that feeds plants over several months. Follow package directions for application rates based on plant size and age.
Organic fertilizers like compost, aged manure, and fish emulsion provide gentle, long-lasting nutrition. These materials improve soil structure while feeding plants, creating better growing conditions overall. Apply organic fertilizers every four to six weeks during the growing season.
Avoid high-nitrogen fertilizers that promote excessive foliage growth at the expense of flower production. Too much nitrogen can also make plants more susceptible to diseases and reduce their cold hardiness. Balanced formulations provide optimal nutrition for healthy growth and abundant blooms.
Phosphorus supports root development and flower formation. Bone meal and rock phosphate provide natural sources of this essential nutrient. Apply phosphorus-rich fertilizers in early spring and again in mid-summer to support continuous blooming.
Potassium helps plants resist diseases and withstand environmental stress. Wood ash, kelp meal, and potassium sulfate supply this important nutrient. Be cautious with wood ash applications, as they can raise soil pH significantly.
Micronutrients like iron, magnesium, and manganese prevent common deficiency symptoms. Epsom salt (magnesium sulfate) applied monthly during the growing season helps prevent yellowing between leaf veins. Iron supplements prevent chlorosis in alkaline soils.
Stop fertilizing six to eight weeks before your first expected frost date. Late-season fertilization can stimulate new growth that won’t have time to harden off before winter, making plants more susceptible to cold damage.
Pruning Guidelines for Different Varieties
Proper pruning timing and techniques vary significantly among hydrangea types. The key lies in understanding when each variety forms its flower buds and adjusting your pruning schedule accordingly. Incorrect pruning often results in reduced flowering or complete bloom failure.
Bigleaf Hydrangeas require careful timing since they bloom on old wood. Prune these varieties immediately after flowering ends, typically in late summer or early fall. Remove spent flower heads just above the first set of healthy leaves. Avoid heavy pruning, as this removes next year’s flower buds.
Dead-heading spent blooms on bigleaf hydrangeas can extend the flowering period and improve plant appearance. Cut back to the first strong set of leaves below each faded flower cluster. This light pruning encourages the plant to direct energy into bud formation rather than seed production.
Panicle Hydrangeas bloom on new wood, making them much more forgiving when it comes to pruning timing. Prune these varieties in late winter or early spring before new growth begins. You can cut them back severely if needed, as they will still produce flowers on the current season’s growth.
Shape panicle hydrangeas by removing weak, crossing, or damaged branches first. Then reduce the remaining stems by one-third to one-half their length. This heavy pruning promotes larger flower heads and more compact growth habits.
Smooth Hydrangeas also bloom on new wood and tolerate aggressive pruning. Cut these varieties back to 12-18 inches from the ground in late winter. This severe pruning prevents the plants from becoming too large and promotes vigorous new growth with abundant flowers.
Oakleaf Hydrangeas need minimal pruning beyond removing dead or damaged wood. These varieties bloom on old wood and have naturally attractive growth habits. Prune lightly after flowering if size reduction becomes necessary.
Climbing Hydrangeas require little pruning once established. Remove any dead or wayward branches as needed. If size control becomes necessary, prune immediately after flowering to avoid removing next year’s flower buds.
General pruning guidelines apply to all hydrangea varieties. Always use sharp, clean pruning tools to make smooth cuts that heal quickly. Disinfect tools between plants to prevent disease transmission. Remove dead, diseased, or damaged wood whenever you notice it, regardless of the season.
Mulching and Winter Protection
Mulching provides numerous benefits for hydrangeas throughout the year. A three to four-inch layer of organic mulch conserves soil moisture, suppresses weeds, and moderates soil temperature fluctuations. Apply mulch in a donut shape around each plant, keeping it several inches away from the base of the stems.
Organic mulch materials like shredded bark, wood chips, pine needles, or compost work exceptionally well for hydrangeas. These materials decompose slowly, adding organic matter to the soil while providing long-lasting coverage. Avoid using fresh wood chips directly around plants, as they can tie up soil nitrogen during decomposition.
Refresh mulch layers annually in spring as the previous year’s material decomposes. Pull back existing mulch, add a thin layer of compost if desired, then apply fresh mulch on top. This annual renewal maintains proper depth and continues to provide soil benefits.
Winter protection becomes crucial in areas where temperatures drop below the hardiness range for specific hydrangea varieties. Bigleaf hydrangeas are most susceptible to cold damage, while panicle and smooth varieties tolerate much colder conditions.
Create winter protection for tender varieties by building a cylinder of chicken wire or burlap around each plant in late fall. Fill the cylinder with dry leaves, straw, or other insulating materials. This protection prevents rapid temperature fluctuations that can damage flower buds.
In extremely cold regions, consider wrapping entire plants in burlap or frost cloth. Secure the covering loosely to allow some air circulation while providing insulation. Remove winter protection gradually in spring as temperatures begin to warm consistently.
Container-grown hydrangeas need extra winter protection since their roots are more exposed to temperature extremes. Move containers to protected locations like unheated garages or wrap them in insulating materials. Check soil moisture periodically, as containers can dry out even during winter.
Disease Prevention and Treatment
Hydrangeas face several common diseases that can impact their health and flowering performance. Prevention through proper cultural practices proves much more effective than treating established disease problems. Good air circulation, appropriate watering techniques, and proper spacing form the foundation of disease prevention.
Powdery Mildew appears as white, powdery spots on leaves and stems. This fungal disease thrives in humid conditions with poor air circulation. Prevent powdery mildew by spacing plants properly, avoiding overhead watering, and ensuring adequate sunlight reaches the foliage.
Treat powdery mildew with baking soda spray (one tablespoon per gallon of water) applied weekly until symptoms disappear. Neem oil and horticultural oils also provide effective control when applied according to label directions. Remove severely affected leaves to reduce disease pressure.
Leaf Spot Diseases cause brown or black spots on hydrangea foliage. These fungal infections spread through water splash and thrive in wet conditions. Water at soil level rather than on leaves, and remove fallen leaves promptly to break the disease cycle.
Root Rot develops in poorly drained soils where water accumulates around plant roots. Symptoms include wilting despite adequate soil moisture, yellowing leaves, and stunted growth. Improve drainage by amending heavy soils or creating raised planting beds.
Bacterial Wilt causes sudden wilting and death of individual branches or entire plants. This serious disease spreads through pruning tools and insects. Disinfect pruning tools between plants and remove affected plant material immediately.
Regular inspection helps catch disease problems early when treatment proves most effective. Check plants weekly during the growing season, paying particular attention to leaf undersides and stem bases where problems often begin. Remove any diseased plant material and dispose of it in the trash rather than composting.
Fungicide applications can help control severe disease outbreaks, but they work best as preventive measures rather than curative treatments. Apply fungicides according to label directions and rotate between different active ingredients to prevent resistance development.
Common Pest Management
Several insects can damage hydrangeas, but most problems remain manageable with proper identification and timely intervention. Regular monitoring helps detect pest issues before they cause significant damage to your plants.
Aphids cluster on new growth and flower buds, sucking plant juices and causing distorted growth. These small, soft-bodied insects often appear in large colonies during spring and early summer. Beneficial insects like ladybugs and lacewings provide natural control.
Control aphids with strong water sprays that knock them off plants. Insecticidal soap or neem oil applications provide effective treatment for heavy infestations. Apply treatments in early morning or late evening to avoid harming beneficial insects.
Spider Mites cause stippling damage on leaves and may produce fine webbing on foliage. These tiny pests thrive in hot, dry conditions and can multiply rapidly during summer heat waves. Increase humidity around plants with regular misting to discourage mite activity.
Scale Insects attach to stems and leaves, appearing as small brown or white bumps. These pests weaken plants by sucking sap and can be difficult to control once established. Horticultural oil applications in late winter target overwintering scales before they become active.
Japanese Beetles feed on hydrangea foliage, creating characteristic skeleton-like damage patterns. Hand-picking provides effective control for small populations. Pheromone traps can reduce beetle numbers but should be placed away from hydrangeas to avoid attracting more pests to your plants.
Slugs and Snails chew irregular holes in hydrangea leaves, particularly on young plants. These pests are most active during cool, moist conditions. Remove hiding places like boards, stones, and dense vegetation near your plants.
Encourage beneficial insects by planting diverse flowering plants near your hydrangeas. Native plants that bloom throughout the season provide habitat and food sources for predatory insects that help control pest populations naturally.
Propagation Methods
Propagating hydrangeas allows you to expand your collection or share plants with friends and neighbors. Several methods work well for different hydrangea varieties, giving you options based on your skills and available materials.
Stem Cuttings provide the most reliable propagation method for most hydrangea varieties. Take cuttings from healthy, non-flowering shoots in early summer when growth is actively occurring. Cut 4-6 inch sections just below a leaf node and remove the lower leaves.
Dip cutting bases in rooting hormone to encourage faster root development. Insert cuttings into a well-draining potting mix and keep them consistently moist but not waterlogged. Cover with plastic bags or place in a humidity dome to maintain proper moisture levels.
Layering works particularly well for hydrangeas with flexible branches. Bend a low-growing branch to the ground and bury a section in soil while keeping the tip exposed. Secure the buried section with a wire hoop or stone. Roots typically develop within one growing season.
Division applies to mature hydrangeas that have developed multiple stems from the base. Dig up the entire plant in early spring and carefully separate root sections with attached shoots. Replant divisions immediately and keep them well-watered until established.
Ground Layering creates new plants from branches that naturally touch the ground. Simply cover the branch section with soil and secure it in place. This method requires patience but produces well-rooted plants that transplant easily.
Success rates improve when you take cuttings from healthy, vigorous plants during optimal timing. Early morning provides the best cutting conditions when plant tissues are fully hydrated. Keep cutting tools sharp and clean to prevent damage and disease transmission.
Seasonal Care Calendar
Spring care begins when soil temperatures warm and new growth emerges. Remove winter protection gradually as temperatures stabilize above freezing. Apply balanced fertilizer and refresh mulch layers around established plants. Begin regular watering schedules as growth accelerates.
Inspect plants for winter damage and prune out any dead or damaged wood. This is also the ideal time for dividing overgrown clumps and transplanting hydrangeas to new locations. Complete any major landscape changes before plants break dormancy.
Summer care focuses on consistent watering and monitoring for pest and disease problems. Deep watering during hot periods prevents stress and maintains flowering performance. Dead-head spent blooms on repeat-flowering varieties to encourage continued production.
Apply mid-season fertilizer applications if plant growth appears weak or foliage color seems pale. Monitor soil moisture levels closely during heat waves and adjust watering schedules accordingly. Provide temporary shade for struggling plants during extreme heat events.
Fall preparation involves reducing watering frequency as temperatures cool and plant growth slows. Stop fertilizing six to eight weeks before expected frost dates. Begin collecting materials for winter protection in cold climates.
Complete any necessary pruning tasks based on your hydrangea varieties. Remove fallen leaves to reduce disease problems for the following season. Plant new hydrangeas while soil remains workable but air temperatures have cooled.
Winter care remains minimal for most hydrangea varieties. Check mulch levels and add more if needed to maintain proper depth. Monitor containers for moisture needs, as they can dry out even during cold weather.
Plan next year’s garden improvements during winter months. Order new varieties from catalogs and research companion plants that work well with hydrangeas. Use this quiet season to learn about new care techniques and varieties that might enhance your garden.
Troubleshooting Common Problems
Many hydrangea problems stem from environmental stress or improper care practices. Learning to identify symptoms and their causes helps you address issues quickly and effectively.
No Flowers often frustrates hydrangea growers, particularly with bigleaf varieties. Late spring frosts can damage flower buds, while improper pruning removes next year’s flowering wood. Insufficient sunlight and excessive nitrogen fertilization also reduce flowering.
Wilting Despite Moist Soil indicates root problems, often caused by poor drainage or root rot diseases. Check soil drainage and improve it if necessary. Reduce watering frequency and allow soil to dry slightly between applications.
Brown Leaf Edges typically result from insufficient water, excessive fertilizer, or salt damage from winter road treatments. Increase watering consistency and flush salts from soil with deep irrigation. Avoid fertilizing during drought stress periods.
Small Flowers can indicate insufficient nutrients, drought stress, or plant overcrowding. Apply balanced fertilizer and ensure consistent moisture levels. Divide overcrowded plants to improve air circulation and resource availability.
Yellowing Leaves may signal several different problems including overwatering, nutrient deficiencies, or disease issues. Examine the yellowing pattern and consider recent care practices to identify the most likely cause.
Poor Fall Color in oakleaf hydrangeas often results from excessive shade or late-season fertilization. Ensure plants receive adequate morning sunlight and stop fertilizing by mid-summer to promote proper dormancy preparation.
Creating Stunning Garden Displays
Hydrangeas serve as excellent focal points in garden designs, but they also work beautifully in mixed plantings with complementary species. Their large, showy blooms provide spectacular displays when combined with plants that offer contrasting textures and forms.
Companion plants should share similar growing requirements while providing visual interest throughout the season. Hostas make excellent partners, offering attractive foliage that complements hydrangea blooms. Their shade tolerance matches hydrangea preferences, and their varied leaf colors and sizes create textural contrasts.
Ferns provide delicate, lacy textures that highlight the bold forms of hydrangea flowers. These shade-loving plants thrive in the same conditions as most hydrangeas and offer season-long interest through their attractive fronds.
Astilbe flowers bloom earlier than most hydrangeas, extending the flowering season in shaded gardens. Their feathery plumes create beautiful textural contrasts with hydrangea’s rounded or conical flower heads. Both plants prefer moist, well-drained soils and partial shade conditions.
Consider bloom timing when planning hydrangea displays. Early-flowering varieties like oakleaf hydrangeas can be paired with late-season bloomers like panicle hydrangeas to extend the display period. This succession planting ensures continuous color throughout the growing season.
Mass plantings of single varieties create dramatic impact in large spaces. Three to five plants of the same variety planted in triangular or curved patterns provide stunning focal points. Vary plant spacing slightly to create more natural-looking groupings.
Color coordination enhances the overall garden design. Blue hydrangeas pair beautifully with yellow or white companions, while pink varieties complement purple or burgundy foliage plants. White hydrangeas work with any color scheme and brighten shadier garden areas.
Conclusion
Successful hydrangea cultivation rewards gardeners with spectacular displays that enhance any landscape design. These remarkable plants offer diverse forms, colors, and textures that adapt to various garden styles and growing conditions. With proper care and attention to their specific needs, hydrangeas will provide years of blooming beauty.
Remember that patience plays a key role in hydrangea success. Newly planted specimens often take a full season to establish, and some varieties require several years to reach their full flowering potential. Consistent care practices and proper variety selection for your specific conditions will ensure the best results.
The investment in learning proper hydrangea care pays dividends through decades of garden enjoyment. These long-lived shrubs increase in beauty and impact as they mature, becoming cherished features that define garden spaces and create lasting memories. Start with one or two varieties that suit your growing conditions, then expand your collection as your experience and confidence grow.
Your hydrangeas will become the envy of neighbors and the pride of your garden when you apply these proven care techniques. Take time to observe your plants throughout the seasons, learning their individual needs and responses to your care. This hands-on experience will make you a confident hydrangea gardener who enjoys success season after season.