How to Restring a Weed Eater?
Your weed eater just ran out of trimmer line in the middle of cutting grass around your fence. The frustration builds up because you know the job should take another ten minutes, but now you need to figure out how to reload that spool. Don’t worry – restringing a string trimmer is actually easier than most people think.
I’ve helped dozens of neighbors and friends learn this simple skill. After reading this guide, you’ll be able to restring your weed eater in less than five minutes. Let’s get your trimmer back to cutting shape.
Why Your Trimmer Line Breaks So Often
Before we jump into the restringing process, you should know why that cutting line keeps breaking. String trimmers use rotating nylon line instead of metal blades. This line spins at incredibly high speeds to cut through grass, weeds, and light brush.
The line wears down naturally through friction. When you bump your trimmer head against concrete, rocks, or tree bark, the line takes a beating. Hot weather makes the line brittle. Old line sitting in your garage for two years loses its flexibility and snaps easily.
You can’t avoid replacing the line – it’s just part of owning a weed eater. The good news is that once you learn the right technique, the whole process becomes second nature.
Tools and Materials You Need
Getting the right supplies makes this job much simpler. Here’s what you need before starting:
Replacement trimmer line – This comes in different thicknesses (diameter). Most homeowner models use 0.065-inch to 0.095-inch line. Check your owner’s manual or the old spool for the correct size. Using line that’s too thick can damage your trimmer motor.
Work gloves – These protect your hands from cuts and splinters when handling the spool and line.
Clean rag – You’ll want to wipe dirt and grass clippings off the trimmer head before working on it.
Scissors or wire cutters – Sharp cutting tools help you trim the line to the right length.
That’s really all you need. Some people like to have their owner’s manual handy, but most restringing jobs follow the same basic pattern.
Safety First: Preparing Your Weed Eater
Never work on a running trimmer. This sounds obvious, but accidents happen when people get careless. Turn off your gas-powered weed eater and let it cool down for at least five minutes. The engine and cutting head get extremely hot during use.
For electric or battery-powered models, remove the battery or unplug the power cord. Even with the trigger released, an electric motor can accidentally start if something bumps the switch.
Set your trimmer on a flat surface like a workbench or clean driveway. You’ll drop small parts if you try to work while standing and holding the tool. Trust me on this – I’ve spent too much time searching grass for springs and caps that fell during a restring job.
Wear your safety glasses. Small pieces of old line sometimes fly off when you open the trimmer head. Bits of dirt and debris can also fall into your face.
Types of Trimmer Heads You Might Have
Weed eaters come with different head designs. Knowing which type you have will help you follow the right steps.
Bump feed heads let you release more line by tapping the bottom of the head on the ground while trimming. These are the most common type for homeowner models. The spool sits inside a cover that you need to remove for reloading.
Fixed line heads don’t have an automatic feed system. You manually adjust the line length by stopping the trimmer and pulling out more line. These heads often have simpler designs with fewer parts.
Automatic feed heads release line as needed without any tapping. Centrifugal force and internal mechanisms control the line release. These heads are typically found on professional-grade equipment.
Pre-wound spool systems use replaceable spools that come already loaded with line. You simply pop out the empty spool and snap in a new one. No winding required. This is the easiest option but costs more over time.
Look at your trimmer head closely. Most have labels or markings that tell you the brand and model number. This information helps you find replacement parts if needed.

How to Remove the Trimmer Head Cover
The cover protects the spool and keeps the line from tangling. Every brand designs their covers slightly differently, but the removal process follows similar patterns.
Look for tabs, arrows, or markings on the outer cover. Many heads have two tabs on opposite sides. Press these tabs inward while pulling the cover away from the trimmer. Some covers twist off – look for arrows indicating the unlock direction.
Other models have a center button or knob. Press and hold this button while twisting the cover counterclockwise. The cover should release after a quarter or half turn.
If the cover seems stuck, don’t force it. Grass clippings and dirt often build up in the threads or locking mechanisms. Spray some WD-40 around the edges and let it sit for a few minutes. Try again with steady pressure.
Keep track of all the parts as you remove them. Some trimmer heads have springs, retaining caps, or small washers that need to go back in the correct order. I like to set parts on a clean cloth in the order I removed them.
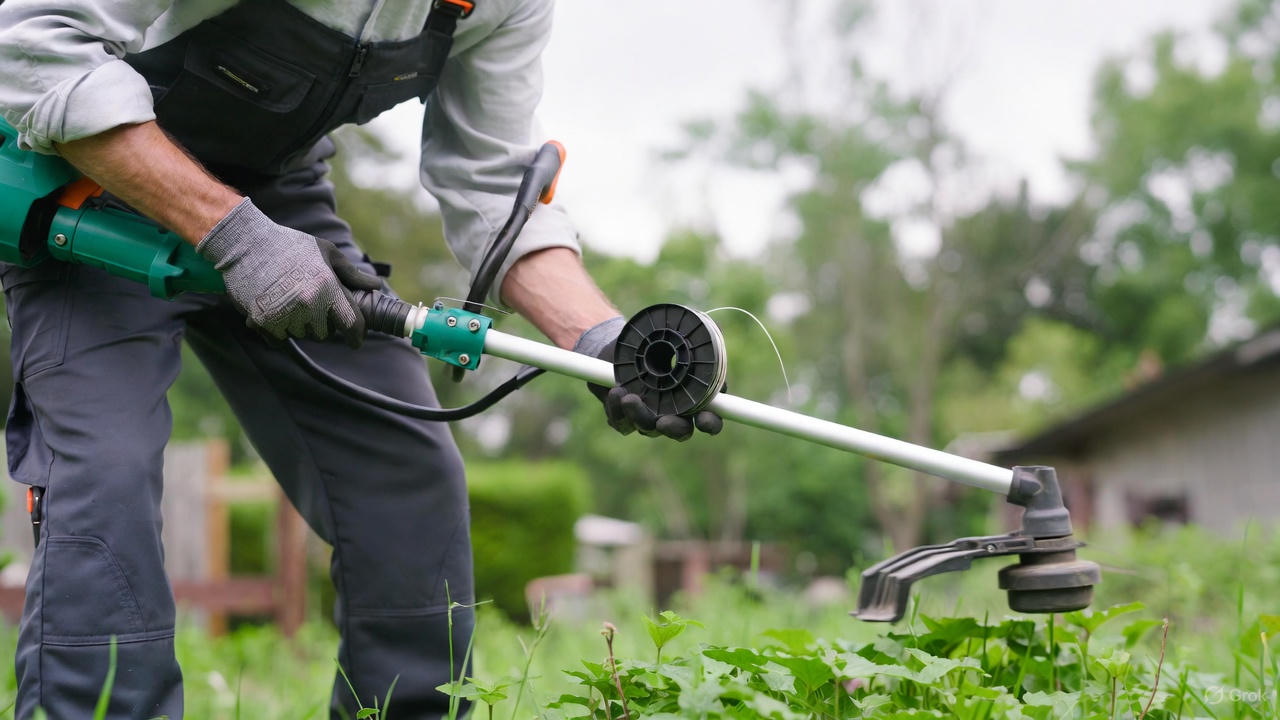
Taking Out the Old Spool
Once the cover is off, you’ll see the spool sitting on the drive shaft. The spool is the round disc that holds the wound line. Pull the spool straight up and off the shaft. It should slide off easily.
Empty spools are obviously easy to identify – you’ll see just a small stub of line or nothing at all. But even if you have some line left, take this opportunity to replace it with fresh line. Old line that’s been sitting wound up on the spool can develop memory – it wants to stay coiled instead of extending straight. This causes feeding problems.
Remove any remaining old line from the spool. Most spools have a slot or notch where the line ends tuck in to hold them in place. Pull the line out of these notches and unwrap it completely.
Clean the spool with your rag. Grass juice and dirt build up in the line channels over time. Wipe down the inside of the trimmer head housing too. A clean head feeds line more smoothly.
Inspect the spool for cracks or damage. Plastic spools can crack from sun exposure or impacts. A damaged spool won’t hold line properly and should be replaced. New spools are inexpensive and available at hardware stores.
Measuring and Cutting Your New Line
This step prevents frustration later. Using too much line wastes material and makes winding difficult. Too little line means you’ll run out quickly and need to restring again soon.
Most spools need between 15 and 25 feet of line total. Your owner’s manual gives the exact amount, but you can estimate by looking at your spool size. A good rule of thumb is to use enough line to fill the spool to about 1/4 inch below the rim. Overfilling causes tangles and jamming.
For dual-line heads (the most common type), you’ll cut one long piece and wind it so both ends extend from the head. This typically means cutting a piece about 20 feet long. For single-line heads, cut a piece about 10 to 12 feet long.
Use sharp scissors or wire cutters to make clean cuts. Ragged ends can fray and tangle when you try to feed them through the spool holes.
Some trimmer lines have shapes – square, twisted, or serrated edges. These shaped lines cut better than round line, but they must be wound and fed correctly to work properly. Check that you’re winding the line in the direction of the trimmer head’s rotation.
Winding the Line Onto the Spool
This is the step that intimidates most people. But if you follow a simple method, winding becomes easy.
Look at your spool carefully. Most dual-line spools have a center divider that creates two separate chambers. You’ll wind half the line in each chamber. The spool usually has arrows showing which direction to wind. Always follow these arrows – winding the wrong direction causes feeding problems.
Find the center point of your line by folding it in half. Hook this center point into the anchor slot or hole in the center divider. Some spools have a notch, while others have a small hole you thread the line through. This anchor keeps the line from slipping while you wind.
Now wind both ends of the line at the same time, keeping them in their separate chambers. Wind firmly but not too tight. Keep the line wraps neat and level – don’t let the line pile up on one side or cross over itself. Crossed lines will jam when you try to feed them out later.
Wind slowly and carefully. Rushing this step leads to tangles. I usually wind while watching TV or listening to music – it’s actually kind of relaxing once you get into a rhythm.
Leave about 6 inches of line unwound on each end. You’ll need this excess to feed through the trimmer head eyelets.
Threading the Line Through the Head
Your spool is now wound with fresh line. But before you put everything back together, you need to thread those line ends through the head housing.
Look at your trimmer head housing (the part still attached to the trimmer). You’ll see two small holes or eyelets on opposite sides. These are where the line comes out during use.
Take one line end from the spool and thread it through one of the eyelets. Pull it through until you have about 6 inches sticking out. Thread the other line end through the opposite eyelet and pull it through the same length.
Some spool designs have temporary line holders – little slots on the outer edge of the spool. You can tuck the line ends into these slots to keep them from unwinding while you reassemble the head. This trick makes the next steps much easier.
Make sure both line ends are pulled to the same length. Uneven lines cause imbalanced spinning and poor cutting performance. Hold the trimmer head up and eyeball the line lengths to check they match.
Reassembling the Trimmer Head
Now you’re ready to put everything back together. Place the wound spool back onto the drive shaft. It should sit flat and spin freely when you twist it. Some spools have a specific orientation with tabs or notches that align with features on the drive shaft. Make sure these align correctly.
If your trimmer head has a spring, place it over the spool now. The spring provides tension for bump-feed systems. Not all models have springs, so don’t worry if you didn’t find one during disassembly.
Line up the cover with the housing base. If you tucked the line ends into those temporary holder slots, pull them out now so they stick through the eyelets as the cover goes on. Press or twist the cover into place following the reverse of how you removed it.
The cover should snap or thread on firmly. If it feels loose or wobbly, take it off and try again. A loose cover will fly off during use and could cause injury.
Give both line ends a gentle pull. They should extend freely from the head with slight resistance. If the line won’t pull out, you might have wound it the wrong direction or it’s crossed inside the spool.
Trimming the Line to the Right Length
You don’t want those line ends dragging on the ground or wrapping around the trimmer shaft. They need to be the right length for safe, efficient cutting.
Most manufacturers recommend line ends between 4 and 6 inches long. Hold your trimmer up at cutting height and check the line length. For bump-feed heads, you want the lines just long enough to reach the outer edge of the guard or deflector shield.
Use your scissors or cutters to trim both lines to the same length. Cut straight across, not at an angle. Angled cuts make the line whip around unevenly.
Some people worry about cutting the line too short. Don’t stress about this – bump-feed heads will release more line during use. Just get them approximately the right length now.
Testing Your Newly Restrung Trimmer
Before you head back to your yard work, test the restrung head to make sure everything works correctly.
For gas trimmers, start the engine and let it warm up for about 30 seconds. For battery or electric models, reconnect the power source. Keep the trimmer off the ground and away from any objects.
Squeeze the trigger slowly to get the head spinning. Listen for any unusual sounds – grinding, clicking, or rattling might indicate a problem with how you assembled the head. The trimmer should sound smooth and normal.
For bump-feed heads, tap the bottom of the head gently on the ground while the engine is running. You should see a bit more line release from both sides. If line doesn’t feed out, you might have wound it too tight or in the wrong direction.
Check that both line ends are spinning at the same speed. If one side looks longer or is spinning differently, stop the trimmer and adjust the lengths to match.
Run the trimmer for about 30 seconds to make sure everything stays together. Watch for line tangling or the cover coming loose. If everything looks and sounds good, you’re ready to get back to trimming.
Common Problems and Quick Fixes
Even experienced users run into issues occasionally. Here are the most frequent problems and how to solve them.
Line won’t feed out: This usually means you wound the line backward or too tight. Take the spool back out and rewind it, making sure to follow the direction arrows. Wind with moderate tension – not loose, but not stretched tight.
Line keeps breaking during use: You might be using line that’s too thin for your trimmer or the job you’re doing. Heavy weeds and thick brush need thicker line. Also check if your line has gotten old and brittle. Replace it with fresh line.
Line tangles on the spool: This happens when you wind unevenly or let the line cross over itself. The fix is to rewind more carefully, keeping neat, level wraps. Take your time during the winding process.
Cover won’t stay on: Dirt or debris in the locking mechanism often causes this. Clean the cover and housing threads thoroughly. Check that any locking tabs or threads aren’t broken or stripped. You might need a replacement cover.
Too much line feeds out: Your bump-feed spring might be weak or broken. Some heads have adjustable tension settings – consult your manual to tighten the feed mechanism. You can also try winding the line slightly tighter on the spool.
One line is longer than the other: Stop and trim the longer line to match the shorter one. Keeping them even gives you the best cutting performance and prevents the trimmer from vibrating.
Maintenance Tips to Make Line Last Longer
You can extend the life of your trimmer line and reduce how often you need to restring by following some simple practices.
Avoid hitting hard objects. Every time your line smacks into concrete, rocks, or metal, it takes damage. Trim carefully around sidewalks, driveways, and fences. Angle the trimmer head to keep the line away from hard surfaces when possible.
Store your trimmer line properly. Keep spare line in a cool, dry place away from direct sunlight. UV rays break down nylon and make it brittle. Some people store their line in a sealed bag with a damp sponge to keep it flexible.
Use the right line for your work. Light trimming around flower beds needs thinner line. Cutting thick weeds along a fence line needs heavier line. Match your line diameter to the job.
Keep your trimmer head clean. After each use, wipe grass clippings and debris off the head. Built-up crud prevents the line from feeding smoothly and wears down the line faster.
Don’t let the line get too short before replacing it. Running your trimmer with very short line stubs stresses the motor and wears out the head mechanism. Restring when you have about 2 to 3 inches of line left.
Trim at the right speed. Running your trimmer at full throttle constantly wastes line and fuel. Use only enough power for the job at hand. Your trimmer will thank you with longer line life and better performance.
When to Replace Parts Instead of Just Line
Sometimes restringing isn’t enough. Trimmer heads and spools wear out over time. Here’s how to tell when you need new parts.
Cracks in the spool mean it’s time for a replacement. Even small cracks can cause the spool to break completely during use, sending pieces flying. Don’t risk it – new spools cost just a few dollars.
If your bump-feed mechanism stops working, the problem might be a worn spring or damaged internal parts. You can buy rebuild kits for most popular trimmer models. These kits include the spring, spool, and other small parts that wear out.
Stripped threads on the cover or housing base won’t hold the cover securely. You’ll need to replace the damaged part. Sometimes you can buy just the cover, but you might need to replace the entire head assembly.
Worn or damaged eyelets (the holes where line feeds through) cause the line to break constantly. The line rubs against the eyelet edges and weakens. Most trimmer heads have replaceable eyelet inserts that you can change without buying a whole new head.
If you’re spending more time fighting with your trimmer head than cutting grass, it might be time to upgrade to a better head design. After-market trimmer heads often offer easier loading and more reliable feeding than factory heads.
Alternate Method: Using Pre-Wound Replacement Spools
Not everyone wants to wind line onto a spool. Pre-wound replacement spools offer a faster option.
These spools come already loaded with line from the factory. When your line runs out, you simply remove the empty spool and snap in a fresh pre-wound one. The whole process takes about 30 seconds.
Pop off your trimmer head cover the same way as described earlier. Lift out the empty spool. Drop in the new pre-wound spool. Make sure it sits flat on the drive shaft. Thread the line ends through the eyelets. Replace the cover. Done.
The downside is cost. Pre-wound spools typically cost two to three times more than bulk line. But many people think the convenience is worth the extra money. You’re paying for time savings and the guarantee that the line is wound correctly.
Pre-wound spools work great if you only trim occasionally or you struggle with the winding process. They also make perfect sense for commercial landscapers who need to reload quickly between jobs.
Make sure you buy pre-wound spools that fit your specific trimmer model. Check the brand, model number, and line diameter to ensure compatibility.
Wrapping Up Your Restringing Project
You just learned a valuable skill that will save you time and money for years to come. Restringing your weed eater really is this straightforward once you understand the process.
The key points to remember are measuring your line correctly, winding it in the right direction with neat wraps, threading it through the eyelets properly, and reassembling everything securely. Take your time on your first few attempts. Speed comes with practice.
Keep extra line in your garage or shed so you’re always ready for a quick restring. Many people keep a pre-wound spare spool handy as well for emergency situations.
Now get back out there and finish that trimming job. Your yard is waiting, and you’ve got the knowledge to keep your weed eater running strong all season long. The satisfaction of doing this maintenance yourself beats calling a repair shop any day of the week.