How to Use a Roundup Sprayer?
Weeds pop up everywhere. They creep through your driveway cracks, take over your flower beds, and choke out the grass you worked so hard to grow. If you’ve picked up a bottle of Roundup and a sprayer but you’re not sure where to start, don’t worry. This guide walks you through everything step by step, using plain words so you can get it right the first time.
In this article
Roundup is one of the most popular weed killers on the market. It works by soaking into the leaves and roots of a plant, then shutting down the plant’s ability to grow. Once it’s inside the plant, there’s no coming back. But like any tool, it only works well when you use it the right way. Spray too little, and the weeds bounce back. Spray too much, and you waste product or hurt nearby plants you actually want to keep.
Let’s break down exactly how to use a Roundup sprayer, from the very first step of gearing up to the final step of cleaning your equipment.
What You’ll Need Before You Start
Before you even open the bottle, gather your supplies. Having everything ready saves time and keeps the job neat.
Here’s a quick list of what you need:
- A Roundup product (concentrate or ready-to-use)
- A sprayer (pump sprayer, backpack sprayer, or a spray attachment if you bought the ready-to-use version)
- Gloves
- Safety goggles
- Long sleeves and pants
- Closed-toe shoes
- A funnel (for mixing concentrate)
- Water (if you’re diluting concentrate)
- A stirring stick or something similar
Roundup comes in two main forms: ready-to-use bottles that already have a sprayer nozzle attached, and concentrate that you mix with water yourself. If you’re new to this, the ready-to-use version is easier since there’s no mixing involved. But if you have a big yard or a lot of weeds to tackle, the concentrate paired with a pump sprayer saves money in the long run.
Step 1: Read the Label First
This step gets skipped more often than it should. Every Roundup product has slightly different mixing ratios, application rates, and safety warnings printed right on the label. Some formulas are stronger than others, and some are made for specific jobs like poison ivy removal or grass and weed control around edges.
Take two minutes to read through the label before doing anything else. It tells you exactly how much product to use per gallon of water, how much area that mix covers, and how long to wait before it rains or before pets and kids can go back into the area.
Step 2: Pick the Right Day and Time
Weather plays a bigger role than most people think. Spraying weed killer on a windy day sends the mist drifting onto flowers, vegetables, or grass you don’t want to kill. A light breeze is fine, but skip spraying on days with strong gusts.
Rain is another factor. If rain is expected within a few hours after you spray, the product can wash away before it has time to soak in. Aim for a dry day with little to no wind, and check the forecast the night before.
Temperature matters too. Roundup works best in warm weather, generally above 40 degrees Fahrenheit. Extremely hot days above 90 degrees can cause the liquid to evaporate too fast, so early morning or early evening tends to work better during summer.
Step 3: Suit Up With Protective Gear
Even though Roundup is a common household product, it’s still a chemical, and direct contact with skin or eyes can cause irritation. Before mixing or spraying, put on:
- Gloves that cover your wrists
- Safety goggles or glasses
- Long sleeves and long pants
- Closed shoes, not sandals
This isn’t about being overly cautious. It’s a quick habit that protects your skin and eyes from splashes, especially during the mixing stage when the concentrate is at its strongest.
Step 4: Mix the Solution (If Using Concentrate)
If you bought a ready-to-use bottle, skip ahead to the next step. If you have a concentrate, here’s how to mix it properly.
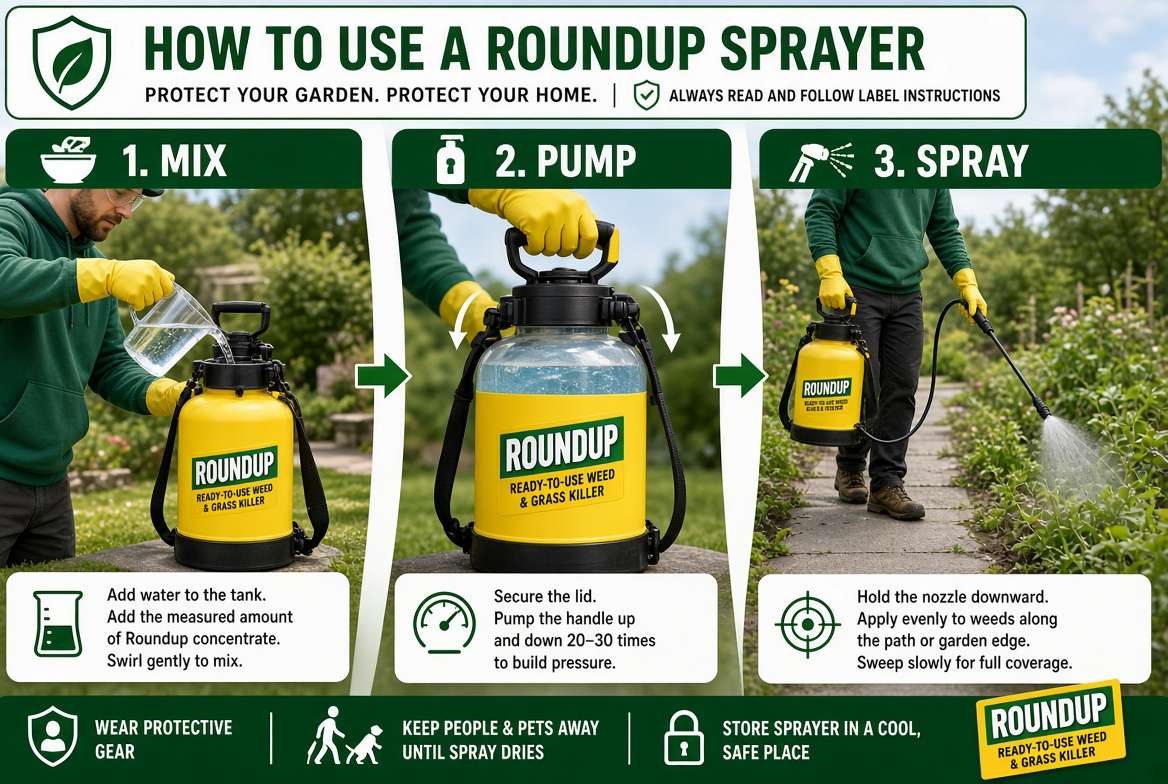
- Check the label for the exact ratio. Most Roundup concentrates ask for something like 1.5 to 6 ounces per gallon of water, depending on the type of weeds and how tough they are.
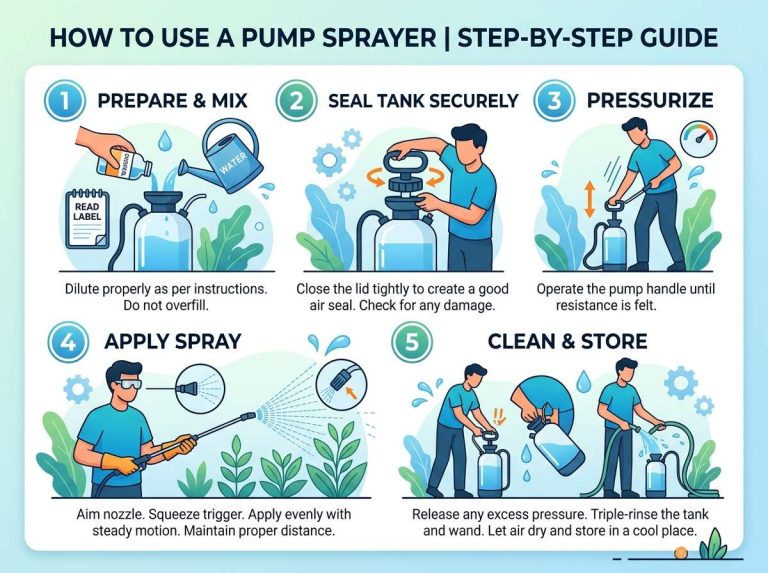
- Fill your sprayer tank about halfway with clean water first.
- Add the measured amount of Roundup concentrate.
- Fill the rest of the tank with water, leaving a little space at the top.
- Close the lid tightly and gently swirl or shake the sprayer to mix everything evenly. Avoid violent shaking since it can cause foaming or splashing.
A common mistake is adding water after the concentrate, which sometimes causes clumping or uneven mixing. Water first, then concentrate, then more water works better.
Step 5: Pump Up the Sprayer
If you’re using a pump sprayer, this next part builds the pressure needed to push the liquid through the nozzle.
Locate the pump handle on top of the sprayer and start pumping. Most sprayers need somewhere between 15 and 30 pumps to build enough pressure for a steady stream. You’ll feel the resistance increase as pressure builds inside the tank. Stop once it feels firm and hard to push further. Pumping too much can strain the seals, so stop as soon as you feel solid resistance.
Battery-powered sprayers skip this step entirely since the pressure comes from a small motor instead of manual pumping.
Step 6: Adjust the Nozzle Setting
Most sprayer nozzles let you switch between a fine mist and a stream, and sometimes a few settings in between. For weed control, a fine mist usually works best since it covers the leaf surface evenly without running off onto the soil below.
A stream setting is handy for reaching tall weeds or spraying under bushes where you need more distance and less spread. Test the nozzle on a patch of grass or bare ground first so you get a feel for the spray pattern before aiming at your actual target weeds.
Step 7: Start Spraying
Now for the main event. Walk slowly and hold the nozzle about 12 to 18 inches above the weeds. Squeeze the trigger and move your arm in a steady side-to-side motion, coating the leaves evenly.
Here are a few tips that make a real difference:
- Spray until the leaves look wet but not dripping. Dripping means wasted product running off onto the ground.
- Cover the entire leaf surface, including the underside if you can reach it, since leaves absorb the chemical faster than stems.
- Work from a distance close enough to hit your target but far enough to avoid drift onto nearby plants.
- Move steadily instead of stopping and starting, which helps avoid uneven coverage or oversaturation in one spot.
If you’re dealing with a large area like a driveway lined with weeds or an overgrown patch, break it into smaller sections. This keeps your coverage consistent instead of rushing through the whole area at once.
Step 8: Avoid Spraying Near Plants You Want to Keep
Roundup doesn’t tell the difference between a dandelion and your prized tomato plant. It kills almost any plant it touches, so keep a safe distance from flowers, vegetables, shrubs, and grass you actually care about.
A few ways to protect nearby plants:
- Use a piece of cardboard or a plastic shield to block spray drift near garden edges.
- Spray on a calm day with no wind, as mentioned earlier.
- Lower the nozzle closer to the target weed to reduce the spray radius.
- Consider a foam applicator or targeted gel version of Roundup for tricky spots close to garden beds.
Step 9: Let It Sit
Once you finish spraying, resist the urge to water the area or let sprinklers run over it right away. Roundup needs time to travel from the leaf surface down into the roots. Most labels recommend waiting at least a few hours, though some suggest a full day for the best results, especially on tougher weeds like crabgrass or ivy.
Keep pets and kids away from the treated area until the spray dries completely, which usually takes about 30 minutes to a couple of hours depending on humidity and temperature.
Step 10: Check Your Results
Don’t expect instant results. Roundup takes time to work its way through the plant. Small weeds often start wilting within a day or two, while tougher, woody weeds can take a week or more to fully die off.
Come back after a few days and check on your progress. Weeds that are turning yellow or brown are on their way out. If some spots still look green and healthy after a week or so, a second light application might be needed, but always follow the label’s guidance on how often you can reapply.
Step 11: Clean Your Sprayer
This step gets overlooked all the time, but it matters a lot for keeping your sprayer working well over time.
After you finish spraying:
- Empty any leftover mixture safely, following your local disposal guidelines. Never pour it down a drain or onto soil where you grow food.
- Rinse the tank with clean water.
- Pump the clean water through the nozzle a few times to flush out any leftover chemical residue.
- Wipe down the outside of the sprayer with a damp cloth.
- Store it somewhere dry, away from direct sunlight and extreme heat.
Cleaning your sprayer after every use prevents clogging and buildup, which extends the life of your equipment and keeps it ready for the next round of weeds.
Common Mistakes to Avoid
A few small errors can make a big difference in how well your spraying session turns out. Here are the most common ones beginners run into:
Spraying on a windy day. Drift ruins nearby plants and wastes product that never reaches the actual weeds.
Mixing the wrong ratio. Too weak, and the weeds barely notice. Too strong, and you’re wasting money without much extra benefit.
Spraying right before rain. The rain washes it away before it has a chance to absorb into the leaves.
Rushing the job. Fast, sloppy spraying leads to uneven coverage, leaving some weeds untouched.
Skipping protective gear. Direct skin contact with concentrate can cause irritation, so gloves and goggles are worth the extra minute it takes to put them on.
Forgetting to clean the sprayer. Leftover residue clogs nozzles and shortens the life of your equipment.
Tips for Better Results
A few extra habits can boost how well your Roundup application works:
- Trim tall weeds down a bit before spraying so the leaves are more exposed and easier to coat.
- Apply during active growth periods, since weeds soak up the chemical faster when they’re actively growing rather than dormant.
- Avoid mowing the lawn for a couple of days before spraying weeds mixed in with grass, since freshly cut leaves have less surface area to absorb the product.
- Reapply carefully on stubborn weeds like bindweed or poison ivy, since these often need more than one round to fully die back.
- Store unused concentrate in its original container, tightly sealed, away from children and pets.
Final Thoughts
Using a Roundup sprayer isn’t complicated once you break it down into small steps. Gear up, read the label, mix carefully if needed, spray evenly, and give it time to work. Add in a little patience and some basic safety habits, and you’ll have a weed-free yard or garden bed without much hassle.
Once you get the hang of it, the whole process becomes second nature. A little prep work up front saves you from redoing the job later, and your sprayer will last a lot longer if you rinse it out after every use. Keep these steps handy, and your next round of weed control will go a lot smoother than the first.

Hi, I’m Mary, the founder of GardenCure.com. I’m passionate about creating healthy, beautiful gardens and well-kept lawns. I share practical experience and trusted advice on garden and lawn gear that truly works. With the support of my dedicated research team, our writers produce honest, in-depth reviews using reliable, authentic sources—helping you choose the right tools with confidence for your outdoor space.