
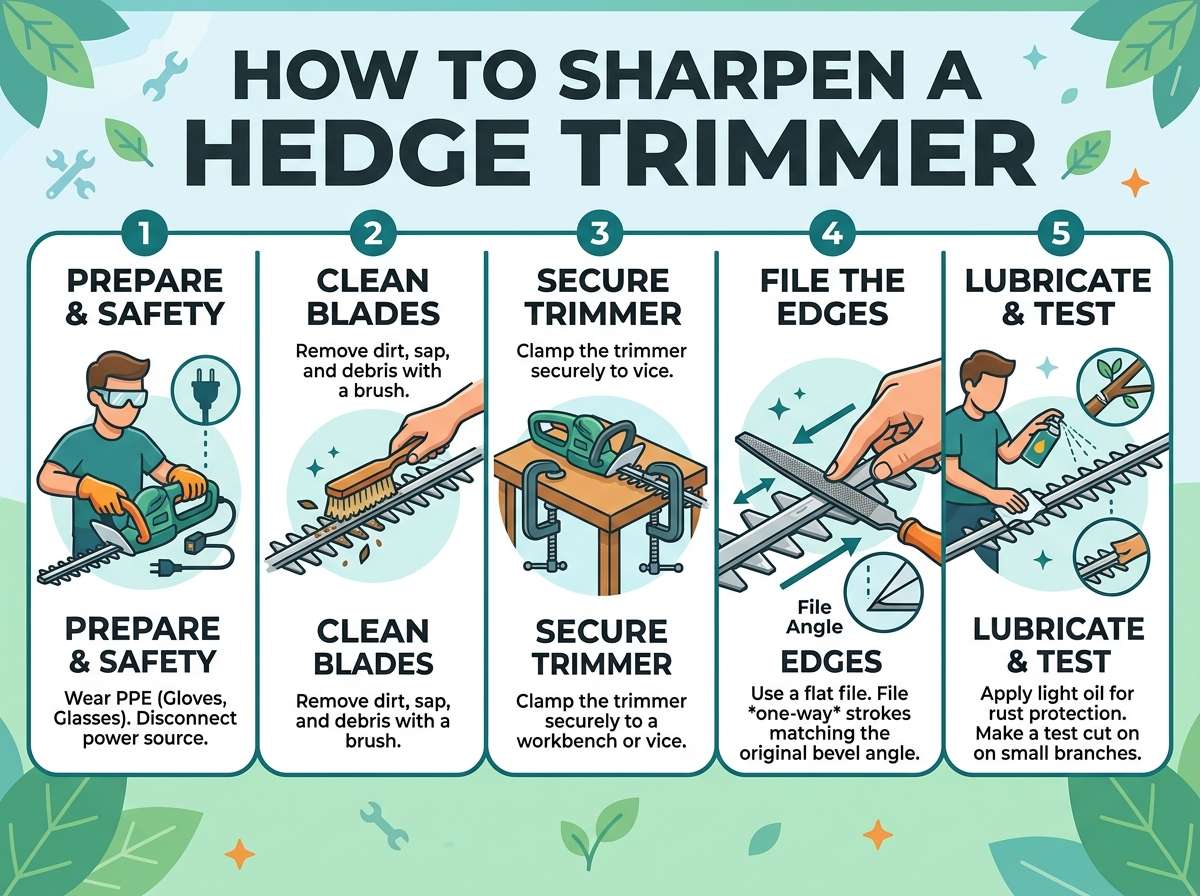
How to Sharpen Hedge Trimmer?
If you’ve been using your hedge trimmer for a while, you might notice it’s not cutting as clean as it used to. The blades feel dull. Your trims look messy. You’re pushing harder just to get through those branches. That’s when you know it’s time to sharpen your hedge trimmer blades. The good news? You don’t need to be a pro to do this. In fact, sharpening your hedge trimmer is one of those maintenance tasks that anyone can learn in an afternoon.
In this article
This guide will walk you through everything you need to know about keeping your hedge trimmer sharp. We’ll talk about why sharp blades matter, what tools you’ll need, and the exact steps to get your trimmer working like new again.
Why Keeping Your Hedge Trimmer Sharp Matters
Before we jump into the how-to, let’s talk about why sharp hedge trimmer blades are so important. A dull blade doesn’t just make your job harder. It actually damages your plants.
When you use a trimmer with dull cutting edges, the blades crush and tear the branch tissue instead of making a clean cut. This damages the plant and leaves it open to disease. You’ll see brown, ragged edges on your branches rather than smooth, clean cuts. That’s a sign your hedge trimmer needs sharpening.
Sharp blades also save you time and energy. You don’t have to push as hard. The trimmer does the work for you. Your arms won’t get as tired. You can finish your hedges faster.
There’s another benefit too. Dull blades wear out your trimmer faster. They make the motor work harder. They stress the engine or battery. When you keep your blades sharp, you extend the life of your entire machine. That saves you money in the long run.
Signs Your Hedge Trimmer Needs Sharpening
How do you know when it’s time to sharpen? Here are the main clues:
The blades leave torn, ragged edges on branches. This is the clearest sign. Look at the freshly cut branches after you trim. If the edges are brown and shredded instead of clean and bright green, your blades are dull.
You have to press down or push harder to cut through branches. Your trimmer should glide through branches with minimal effort. If you’re forcing it, the blades have dulled.
The trimmer pulls or snags on branches. Instead of a smooth cut, the blades catch and snag. This means they’re not sharp enough to bite cleanly through the wood.
The machine vibrates or chatters more than usual. Dull blades can cause excessive vibration because they’re fighting with the branches instead of cutting through them.
You’ve been using the trimmer for extended periods. Even if it seems to be working, regular trimming work will dull blades over time. Plan to sharpen your hedge trimmer after several hours of use.
What You’ll Need to Sharpen Your Hedge Trimmer
Let’s gather your tools and materials. The good news is that you probably won’t need anything fancy. Here’s what works:
A hand file or a metal file. A 10-inch flat file or round file works well. Some people use a triangular file. A bastard-cut file is ideal because it removes metal faster than a fine-cut file. If you want to invest a bit more, you can get files specifically designed for tool sharpening.
Safety gloves. You want thick gloves to protect your hands from both the sharp blade edges and the file. Work gloves or leather gloves are perfect.
Safety glasses. Metal shavings and bits can fly around when you’re filing. Protect your eyes.
A vice or clamp. You need something to hold the trimmer blade steady while you work. A bench vise works great. A clamp also does the job. Some people use a sturdy table with a C-clamp.
A wire brush. This helps clean metal shavings and debris off the blade as you go.
A clean cloth. Use it to wipe down the blade after you finish.
Tape (optional). Masking tape or duct tape can protect the unsharpened edges of the blade so you don’t accidentally file them.
A marker or pen (optional). You can use this to mark the areas you need to sharpen.
Oil or lubricant. After sharpening, a light coat of machine oil keeps the blade from rusting.
Step-by-Step Guide to Sharpening Your Hedge Trimmer Blade
Now let’s get into the actual sharpening process. Follow these steps and you’ll have a sharp blade in no time.
Step 1: Prepare Your Workspace
Find a safe place to work. Your garage or workshop is ideal. Make sure you have good lighting so you can see what you’re doing. Lay out all your tools and materials before you start. This way you won’t have to stop midway to hunt for something.
Put on your safety glasses and gloves. Don’t skip this step. Sharp metal shavings can hurt.
Step 2: Disconnect the Power
This is critical. You don’t want the trimmer to accidentally start while you’re working on the blades. If you have a corded electric trimmer, unplug it from the wall. If you have a battery-powered trimmer, remove the battery completely. For gas-powered models, remove the spark plug. This prevents any accidental starting.
Step 3: Inspect the Blades Closely
Take a good look at your blades. Run your finger carefully along the edge (over your glove) to feel how dull they are. Don’t do this on bare skin. Look for areas that are more damaged than others. You might need to focus your sharpening efforts on these spots.
If your blade is damaged, bent, or has large chips taken out of it, you might need to replace it instead of trying to sharpen it. Minor dulling is fixable with sharpening. Major damage isn’t.
Step 4: Secure the Blade
Mount your hedge trimmer so the blade stays still while you work. A bench vise is perfect. Clamp the trimmer body firmly so the blade won’t move or shift. Make sure the blade is positioned at a comfortable angle for filing. You want easy access to the cutting edge without awkward stretching.
Some people clamp the blade itself. That’s fine, but be gentle. You don’t want to dent the blade with the clamp. Put a piece of wood between the clamp jaw and the blade to distribute pressure.
Step 5: Tape Off the Blade (Optional but Recommended)
If your trimmer blade has non-cutting edges, you can tape them off. This prevents you from accidentally sharpening the wrong edge. Use masking tape along the back edge of the blade. You only want to sharpen the cutting edge.
Step 6: Start Filing
Hold your file at the correct angle. Look at the existing angle of the blade edge. Your file should match that angle. Most hedge trimmer blades have edges that are filed at about 30 to 45 degrees. Aim for the same angle your blade already has.
Push the file forward across the blade edge. Use smooth, even strokes. Don’t press too hard. Let the file do the work. You’re looking for light, consistent pressure.
File along the entire length of the cutting edge. Move from one end to the other. Make sure you’re covering the whole blade uniformly.
Step 7: File Both Sides (If Needed)
Many hedge trimmers have blades that cut on both sides. If yours does, you’ll need to sharpen both edges. Flip the trimmer and repeat the filing process on the other side. Use the same number of strokes on both sides. This keeps the blade balanced.
Step 8: Check Your Progress
Stop and look at your work. You should start to see a bright line along the cutting edge where you’ve removed the dull surface. That bright line is fresh metal. This is your visual cue that you’re sharpening it.
Feel the edge with your glove. It should feel sharper than before. Don’t touch it with bare skin. Sharp blades can cut.
Step 9: Clean Off Metal Shavings
Use your wire brush to clean away all the metal shavings and dust you’ve created. Get both sides of the blade. This helps you see your work clearly and prevents metal dust from getting into the trimmer mechanisms.
Wipe the blade with your clean cloth.
Step 10: Test the Sharpness
Once you think you’re done, do a test cut if possible. Take some thin twigs and see how the blade handles them. If it cuts clean and easy, you’re done. If you still see tearing or crushing, go back and do a few more file strokes.
Step 11: Lubricate the Blade
Once you’re satisfied with the sharpness, apply a light coat of machine oil or lubricant to the blade. This prevents rust and keeps everything moving smoothly. Don’t overdo it. You just need a thin coating.
Step 12: Reconnect Power and Test
Plug your trimmer back in or reinstall the battery or spark plug. Do a test run on some branches if you can. Listen to how it sounds. Feel how it cuts. A sharp blade should make quick, easy cuts without much effort.
Using a File Correctly: Tips for Better Results
Filing takes a bit of practice to get right. Here are some tips to help you sharpen like a pro:
Use consistent pressure. Don’t press harder on some strokes and lighter on others. Steady, even pressure gives you the best results.
File in one direction. Always push the file in the same direction. Usually people push away from themselves. This is more natural and gives better control.
Match the original angle. Look at the blade carefully. The previous sharpening has already set the angle. Match that angle when you file. If you create a different angle, the blade won’t cut as well.
Don’t saw back and forth. Some people try to file like they’re using a saw, going back and forth. That doesn’t work well. Always push in one direction and then lift the file to return for the next stroke.
Take your time. Sharpening isn’t a race. Slow, steady strokes are better than quick, hard ones. You’re more likely to maintain the correct angle when you work slowly.
Step back and check. Every few strokes, stop and look at what you’ve done. Make sure you’re making progress and keeping the angle correct.
Different Filing Tools and Methods
While a hand file is the most common approach, there are other options:
Electric sharpeners. Powered tool sharpeners can do the job faster. They’re great if you sharpen your trimmer frequently. These machines have a grinding wheel that sharpens the blade. They’re more expensive, but they save time.
Sharpening stones. Some people use whetstones, which are the same stones used for sharpening kitchen knives. They work, but they’re slower than files. They’re better for very fine finishing work.
Specialized hedge trimmer sharpening tools. You can buy sharpening blocks or guides specifically made for hedge trimmer blades. These hold the file at the correct angle automatically. They remove the guesswork and are great for beginners.
Professional sharpening services. If you don’t want to do it yourself, you can take your trimmer to a local shop. They have the equipment and experience to sharpen your blade perfectly. It costs money, but it’s quick.
Common Mistakes to Avoid
Here’s what not to do when sharpening your hedge trimmer:
Don’t sharpen unevenly. If one side of the blade gets more sharpening than the other, the trimmer won’t cut straight. Keep your strokes even on both sides.
Don’t over-sharpen. You only need to remove enough metal to reveal a sharp edge. Over-filing removes too much material and weakens the blade.
Don’t skip safety gear. Metal shavings are tiny and sharp. Flying debris can hurt your eyes or hands. Always wear gloves and safety glasses.
Don’t change the angle drastically. If you file at a completely different angle than the original, the blade won’t work right. Stay true to the angle that’s already there.
Don’t sharpen a bent or damaged blade. If your blade is bent or has chunks missing, sharpening won’t help. Replace it instead.
Don’t forget to disconnect the power. This is the most important safety step. Always remove the battery, unplug, or pull the spark plug before touching the blades.
How Often Should You Sharpen Your Hedge Trimmer?
The answer depends on how often you use it and what you’re cutting. If you trim your hedges every week during growing season, sharpen your blade every 4 to 6 weeks. If you only trim once or twice a year, you might only need to sharpen once a year.
Cutting tough, woody branches dulls the blade faster than cutting soft, tender growth. If you’re cutting a lot of thick branches, you’ll sharpen more often.
Hard materials like very thick wood or dead wood dull blades quickly. If you’re trimming a lot of this, check your blade more frequently.
The best approach is simple: sharpen whenever you notice the signs of dullness. Don’t wait for a scheduled time. Sharpen when your trimmer needs it. This keeps your tool working at peak performance.
Maintenance Beyond Sharpening
Keeping your hedge trimmer sharp is just one part of maintenance. Here are other things you should do:
Clean the blades after each use. Trim residue and sap build up on the blade. This can dull it faster and promote rust. Wipe the blade clean after every trimming session.
Store it properly. Keep your trimmer in a dry place. Moisture causes rust. If possible, store it indoors rather than in a damp garage or shed.
Oil the blades regularly. A light coat of machine oil after each use prevents rust and keeps everything moving smoothly.
Check for damage. Inspect your blades regularly for bent spots, cracks, or chips. Catch problems early before they get worse.
Tighten loose parts. Vibration can loosen bolts and fasteners over time. Check that everything is tight.
Follow the manual. Your trimmer’s manual has specific maintenance instructions. Follow them.
When to Replace Your Blade
Sometimes sharpening isn’t enough. Your blade might need replacement if:
You’ve sharpened it many times and it’s getting too thin. Metal removed during sharpening eventually makes the blade too thin to work properly.
The blade is cracked or bent. These problems can’t be fixed by sharpening.
The blade is chipped badly. A few small chips can be filed out, but large damage means replacement.
The blade is rusted deeply. Surface rust can be cleaned, but deep pitting means the blade is weakened.
When you need to replace the blade, check your trimmer’s manual for the correct part number. Most blades are held on with bolts or pins that are easy to remove.
Final Thoughts on Hedge Trimmer Sharpening
Sharpening your hedge trimmer is a simple maintenance task that pays big dividends. Sharp blades cut clean, keep your plants healthy, and save you time and effort. Your trimmer lasts longer when the blades are sharp.
The process isn’t complicated. It doesn’t require special training or expensive equipment. Anyone can do it. You just need a file, some safety gear, and a bit of patience.
Start with one blade. Follow the steps we’ve covered. After your first sharpening, you’ll gain confidence. You’ll realize it’s not that hard. Soon you’ll be keeping your hedge trimmer in perfect condition.
Your hedges will thank you. They’ll look better with clean, straight cuts. Your neighbors might even ask how you keep your hedges looking so perfect. The secret? A sharp blade and a little bit of regular maintenance.
Pick up a file. Secure your trimmer. Take a few minutes to sharpen those dull blades. You’ll be amazed at the difference a sharp blade makes. Your hedge trimming work becomes faster, easier, and your plants stay healthier. That’s the power of proper tool maintenance.

Hi, I’m Mary, the founder of GardenCure.com. I’m passionate about creating healthy, beautiful gardens and well-kept lawns. I share practical experience and trusted advice on garden and lawn gear that truly works. With the support of my dedicated research team, our writers produce honest, in-depth reviews using reliable, authentic sources—helping you choose the right tools with confidence for your outdoor space.

One Comment