How to Clean Gardening Gloves?
Gardening gloves take a beating. They dig through dirt, grip thorny stems, soak up water, and rub against rough bark day after day. After a few weeks of hard work, they start to smell weird, feel stiff, and look like they belong in the trash. But before you toss them out, know this: most gardening gloves can be cleaned and brought back to life with just a few simple steps.
In this article
This guide walks you through easy, beginner-friendly methods to clean every type of gardening glove, from cotton and leather to rubber and synthetic blends. No fancy tools needed. Just a sink, some basic supplies, and a little patience.
Why You Should Clean Your Gardening Gloves Often
A lot of gardeners skip this step. They figure gloves are just going to get dirty again anyway, so why bother? Here’s why it actually matters.
Dirty gloves build up bacteria, fungus spores, and plant residue over time. This buildup can irritate your skin, cause bad odors, and even spread plant diseases from one part of your yard to another. If you touch a sick plant with dirty gloves and then handle a healthy one, you risk passing along the problem.
Clean gloves also last much longer. Dirt and grime wear down the fabric fibers or leather surface faster than normal use alone. A little regular care keeps your gloves soft, flexible, and comfortable instead of crusty and stiff.
Plus, let’s be honest, nobody wants to slide their hands into gloves that smell like a compost pile.
Gather Your Supplies First
Before you start, grab these basic items. You probably already have most of them at home.
- Mild dish soap or a gentle laundry detergent
- A soft-bristle brush (an old toothbrush works great)
- A bucket or sink filled with warm water
- White vinegar (for odor and stain removal)
- Baking soda (great for deep cleaning and smell control)
- A clean towel
- Leather conditioner (only if you own leather gloves)
You don’t need anything expensive or hard to find. Most of this sits in your kitchen or laundry room right now.
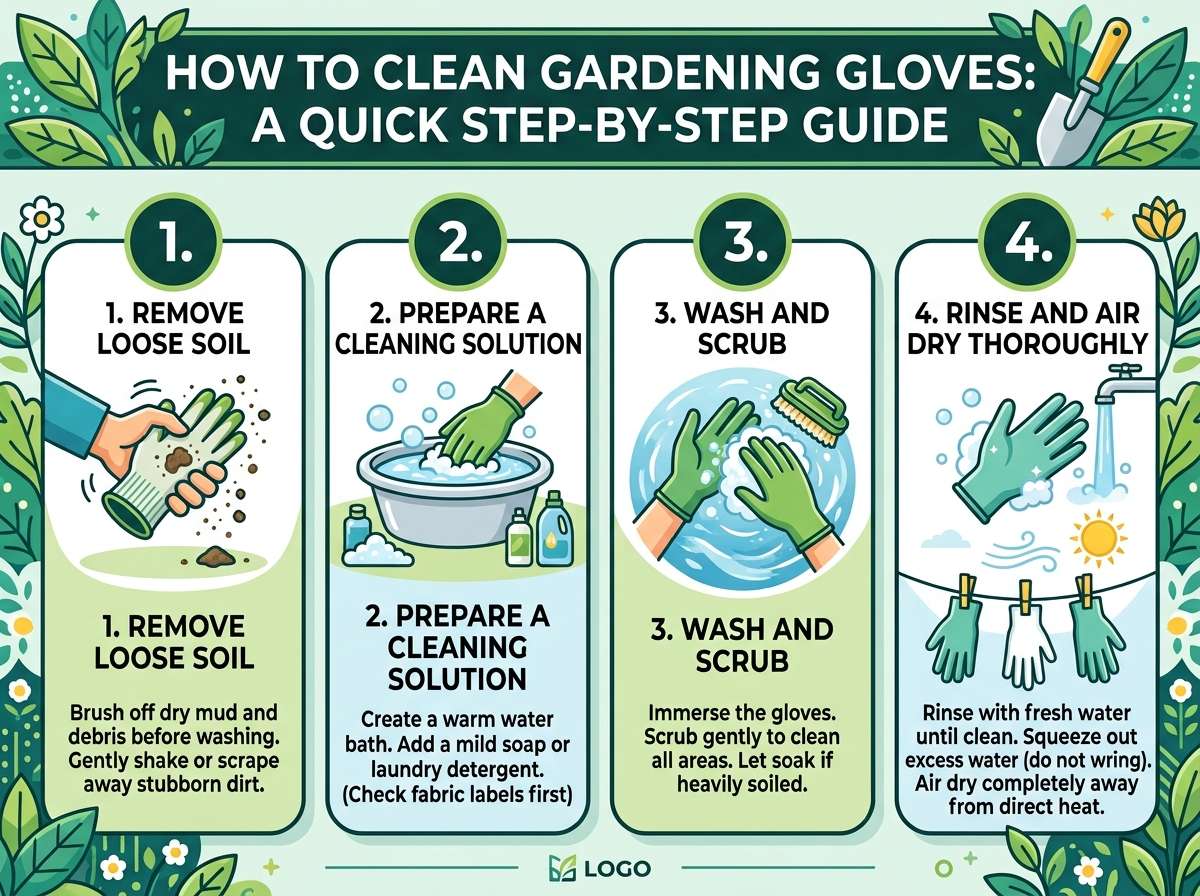
Step 1: Shake Off Loose Dirt First
Before any water touches your gloves, give them a good shake outside. Turn them upside down and tap out any loose soil, leaves, or debris stuck inside. You can also use a dry brush to knock off caked-on dirt from the outer surface.
This small step saves you a lot of trouble later. It stops your sink or wash water from turning into a muddy mess right away, and it keeps the dirt from grinding deeper into the fabric during washing.
Step 2: Check the Glove Material
Not every pair of gardening gloves gets cleaned the same way. The right method depends heavily on what your gloves are made of, so take a second to check the label or just look closely at the material.
Here are the four common types:
Cotton or fabric gloves – Lightweight, breathable, and usually machine washable.
Leather gloves – Durable and tough, but they need gentle hand cleaning to avoid cracking.
Rubber or latex-coated gloves – Great for wet work, and they clean up fast with soap and water.
Synthetic blend gloves – Often a mix of nylon, polyester, or spandex with rubber grip dots. These usually tolerate a light wash cycle.
Knowing your glove type helps you avoid ruining them with the wrong cleaning method. A leather glove tossed into a washing machine, for example, can shrink, stiffen, or crack beyond repair.
Step 3: Clean Cotton and Fabric Gloves
Fabric gloves are the easiest to clean out of all the types.
- Turn the gloves inside out to expose the dirtiest areas.
- Fill a sink or bucket with warm water and add a small squirt of mild dish soap.
- Let the gloves soak for about ten to fifteen minutes.
- Scrub any stubborn dirt spots with a soft brush.
- Rinse thoroughly under running water until the soap is gone.
- Squeeze out excess water gently, without twisting or wringing hard.
- Lay the gloves flat on a towel to air dry.
If your gloves are heavily stained or smell musty, you can also toss them into the washing machine on a gentle, cold-water cycle. Place them inside a mesh laundry bag first to protect the fabric and keep the washer drum clean. Skip the dryer, though. High heat can shrink fabric gloves or melt any rubber grip patterns on the palms. Always let them air dry instead.
Step 4: Clean Leather Gardening Gloves
Leather needs a gentler touch since water and heat can damage the material if you’re not careful.
- Wipe off loose dirt with a dry cloth or soft brush first.
- Mix a small amount of mild soap with lukewarm water.
- Dip a soft cloth into the soapy water and wring out most of the moisture, so it’s just damp, not soaking wet.
- Gently wipe down the leather surface in small circular motions.
- Use a separate damp cloth (soap-free) to wipe away any leftover soap residue.
- Pat the gloves dry with a towel.
- Let them air dry away from direct sunlight or heat sources, since both can cause leather to crack.
Once the leather is fully dry, rub in a small amount of leather conditioner. This step keeps the material soft and flexible, and it also helps prevent future cracking. Skip this step and your leather gloves will eventually turn stiff and brittle, no matter how gently you wash them.
Never soak leather gloves in water. Never toss them in a washing machine or dryer. Both actions can permanently warp the shape and texture of the leather.
Step 5: Clean Rubber and Latex-Coated Gloves
Rubber gloves are the simplest to maintain, and they clean up fast.
- Rinse off surface dirt under running water.
- Add a bit of dish soap to your hands while wearing the gloves and scrub them together like you’re washing your hands.
- Pay extra attention to seams and grip areas where dirt likes to hide.
- Rinse thoroughly until all soap is gone.
- Turn the gloves inside out to let the inside dry fully, since moisture trapped inside can lead to mildew or a musty smell.
- Hang them somewhere with good airflow to dry completely.
For a deeper clean or to remove built-up odor, soak the gloves in a mix of warm water and a splash of white vinegar for about ten minutes before scrubbing. Vinegar naturally breaks down grime and kills odor-causing bacteria without leaving behind a harsh chemical smell.
Step 6: Clean Synthetic Blend Gloves
These gloves usually combine breathable fabric with rubberized grip dots on the palms and fingers. The care routine sits somewhere between fabric and rubber cleaning.
- Shake off loose dirt first.
- Hand wash in warm, soapy water, scrubbing gently with a soft brush.
- Pay close attention to the grip dots, since dirt tends to collect around these raised areas.
- Rinse well under running water.
- Squeeze out extra moisture without twisting.
- Lay flat to dry, away from direct heat.
Many synthetic gloves can handle a gentle machine wash too, as long as you place them in a mesh bag and use cold water. Always skip the dryer for these, since heat can warp or crack the rubber grip coating over time.
How to Remove Tough Stains and Odors
Sometimes soap and water alone won’t cut it, especially if your gloves have soaked up grass stains, sap, or a strong garden smell. Here are a few tricks that work well.
For grass and plant stains: Make a paste using baking soda and a small splash of water. Rub the paste directly onto the stain and let it sit for about fifteen minutes before scrubbing gently and rinsing.
For sap or sticky residue: Rub a small amount of vegetable oil onto the sticky spot first. This loosens the sap so soap and water can finish the job during a regular wash.
For bad odors: Soak the gloves in a mix of one part white vinegar and two parts water for about twenty minutes. This combination kills odor-causing bacteria and neutralizes smells naturally, without leaving a strong vinegar scent behind once dry.
For mildew smell: Sprinkle baking soda inside the gloves and let them sit overnight before shaking it out and washing as usual. Baking soda absorbs moisture and odor at the same time.
These natural remedies work great because they skip harsh chemicals that could irritate your skin or break down glove materials faster.
How to Dry Gardening Gloves Properly
Drying might feel like the least important step, but it actually matters just as much as the cleaning itself. Gloves that don’t dry fully can develop mold, mildew, or a musty smell that’s hard to get rid of later.
Here are a few tips for drying gloves the right way:
- Always air dry instead of using a dryer, unless the manufacturer label specifically says it’s safe.
- Lay gloves flat on a towel or hang them by the cuff so air can move freely inside and outside the glove.
- Turn fabric or synthetic gloves inside out halfway through drying to help the inner lining dry evenly.
- Keep gloves out of direct sunlight, since UV rays can weaken fabric fibers and dry out leather.
- Give gloves at least twenty-four hours to dry fully before storing them away.
If you’re in a rush, a small fan pointed at the gloves speeds up drying without adding heat damage.
How Often Should You Clean Gardening Gloves
There’s no strict rule here, but a general routine works well for most gardeners.
Give your gloves a quick rinse or wipe-down after each heavy use, especially if you’ve been working with wet soil, fertilizer, or pesticides. A deeper clean, using soap and water or the vinegar soak method, works well about once every one to two weeks during active gardening season.
If you notice a strong smell, visible mold spots, or stiff, crusty fabric, that’s your sign to clean them right away rather than waiting for your next scheduled wash.
Gloves used for light tasks like pruning flowers or handling seedlings won’t need cleaning as often as gloves used for heavy digging, mulching, or handling manure and compost.
Tips to Keep Gardening Gloves Cleaner for Longer
A few small habits go a long way toward keeping your gloves fresh between washes.
Store gloves in a dry, ventilated spot instead of a damp shed or a sealed plastic bin. Moisture trapped in storage creates the perfect environment for mold and bad smells.
Keep a second pair on hand for messy tasks like handling compost or digging in wet soil. This way, your main gloves stay cleaner for lighter, everyday garden work.
Rinse gloves briefly under a hose right after tough jobs, even if you don’t have time for a full wash. This quick habit stops dirt from setting deep into the material.
Avoid leaving gloves balled up or crumpled after use. Lay them flat or hang them so they keep their shape and dry evenly.
Rotate between two or three pairs if you garden often. This gives each pair time to dry completely and rest between uses, which helps them last much longer overall.
Common Mistakes to Avoid
A few habits can shorten the life of your gloves fast, so keep these in mind.
Don’t use hot water on leather or rubber gloves, since heat can cause cracking, shrinking, or warping. Don’t scrub too hard with a stiff brush, since this can wear down fabric fibers or scratch leather surfaces. Don’t skip drying time and rush to store gloves while they’re still damp, since this invites mold and odor. Don’t use bleach or harsh chemical cleaners, since these can break down glove materials and irritate your skin during future use.
Simple, gentle care always beats aggressive scrubbing or harsh products when it comes to extending the life of your gardening gear.
Final Thoughts
Clean gardening gloves protect your hands, your plants, and your wallet, since well-cared-for gloves last far longer than neglected ones. A little routine care, paired with the right cleaning method for your specific glove material, keeps them soft, fresh, and ready for every gardening session.
Cotton gloves love a gentle soap soak. Leather gloves need soft wiping and conditioning. Rubber gloves clean up fast with soap and a good scrub. Synthetic blends sit somewhere in between, needing gentle hand washing and careful drying.
Stick to these easy steps, avoid the common mistakes, and your gardening gloves will stay in great shape season after season. Your hands, and your garden, will thank you for it.

Hi, I’m Mary, the founder of GardenCure.com. I’m passionate about creating healthy, beautiful gardens and well-kept lawns. I share practical experience and trusted advice on garden and lawn gear that truly works. With the support of my dedicated research team, our writers produce honest, in-depth reviews using reliable, authentic sources—helping you choose the right tools with confidence for your outdoor space.