How to Cap a Sprinkler Line?
You pulled out an old sprinkler head, or you want to shut down one part of your yard’s irrigation system. Now there’s a pipe sticking out of the ground, and it needs a cap.
In this article
Good news: this is a small job. You don’t need a plumber, and you don’t need fancy tools. Most people finish in under an hour.
In this guide, you’ll learn how to cap a sprinkler line the right way. You’ll see which cap fits each pipe type, how to glue it, and how to test for leaks. You’ll also learn the mistakes that cause trouble later.
Why You Might Need to Cap a Sprinkler Line
People cap sprinkler lines for many reasons. Here are the most common ones:
- You removed a sprinkler head and don’t want a new one there.
- You’re changing your lawn into a garden bed or patio.
- A head broke, and you need to stop the water until you fix it.
- You built a new fence, deck, or shed over the old sprinkler path.
- You want to close off a zone you no longer use.
- You’re getting the system ready for repairs or an upgrade.
Whatever your reason, the goal stays the same. You want a tight seal at the end of the pipe so water stays inside and dirt stays out.
What Happens If You Leave an Open Sprinkler Line
You might think you can just push some dirt over the pipe and call it done. That’s a bad idea.
An open line lets water gush out as soon as you turn the system on. That wastes water and floods your lawn. It can also wash away soil and make a muddy mess.
Dirt and bugs can also get inside the pipe. That debris can clog other sprinkler heads down the line. Over time, it can damage your whole irrigation system.
So a proper cap protects your pipes, your lawn, and your water bill.
Know Your Pipe Type First
Before you buy a cap, look at what kind of pipe you have. Sprinkler systems use a few common types. The cap must match the pipe.
PVC Pipe
PVC is white or cream-colored, stiff, and hard. It’s the most common material for underground sprinkler lines. Most homes use pipe sizes between half an inch and one inch.
Poly Pipe (Polyethylene Tubing)
Poly pipe is black, flexible, and bends easily. You often see it in newer homes and in areas with cold winters. It can bend a bit when the ground freezes.
Flexible Riser or Swing Pipe
This is the bendy tube that connects the main line to the sprinkler head. It often sits right under the head. It’s usually black or gray and has threaded ends.
Galvanized or Metal Pipe
Older homes sometimes have metal pipe. It’s rare in newer systems. If you have it, the job is harder, and you might want to call a pro.
Not sure what you have? Dig a little around the pipe and take a good look. You can also take a small piece to your hardware store and ask for help.
Types of Caps for Sprinkler Lines
Different pipes need different caps. Here’s a quick look at the main kinds.
Slip Cap (PVC)
A slip cap slides over the end of a PVC pipe. You glue it in place with primer and cement. This gives you a strong, permanent seal.
Threaded Cap (PVC)
A threaded cap screws onto a pipe that has threads. It’s great if you might want to use the line again later. You can unscrew it and add a new head.
Compression Cap (Poly Pipe)
A compression cap fits over poly pipe and tightens by hand or with a wrench. It needs no glue. It works well for flexible tubing.
Insert Fitting with Clamp (Poly Pipe)
This is a barbed plug that goes inside the poly pipe. A pinch clamp or ring holds it tight. Many pros use this for a quick fix.
Riser Cap
A riser cap is a small threaded cap made for the top of a riser or nipple. You can use it when you want to cap the line right at ground level.
Tools and Materials You’ll Need
Gather everything first. It saves you trips back to the store.
For a PVC line:
- A PVC slip cap or threaded cap (the right size)
- PVC primer (purple works best, so you can see where you put it)
- PVC cement
- A PVC pipe cutter or a hacksaw
- A small hand shovel or garden trowel
- A clean rag
- Sandpaper or a deburring tool
- A bucket or small cup to scoop water
For a poly line:
- A compression cap or insert plug with a clamp
- A pipe cutter or sharp utility knife
- A screwdriver or pliers
- A small shovel and a rag
A few extra things help too. Keep a pair of gloves, an old towel, and a flashlight nearby. Also keep a few extra caps in case one doesn’t fit.
Step-by-Step: How to Cap a PVC Sprinkler Line
This is the most common job, so let’s start here.
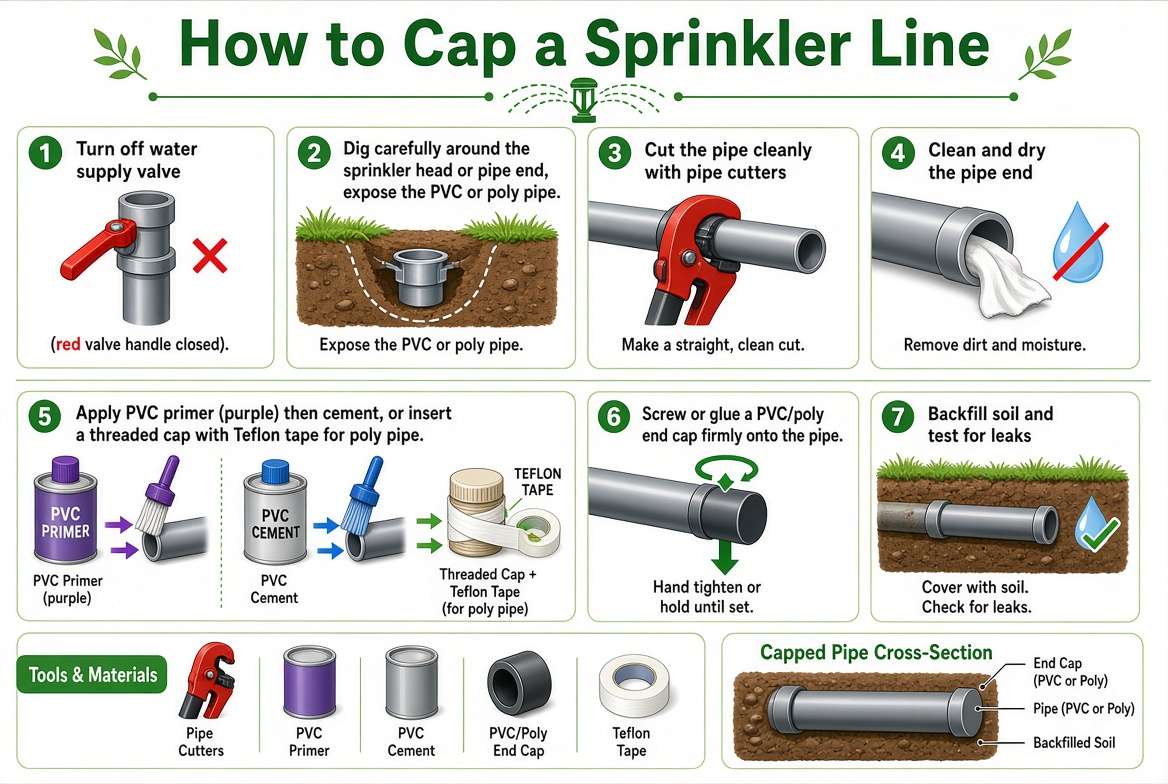
Step 1: Turn Off the Water
First, shut off the water to your sprinkler system. Find the main shutoff valve. It’s often near your water meter, in a valve box, or in your basement or garage.
Then, turn off the sprinkler controller. This keeps the zone from turning on while you work.
Next, run the zone for a few seconds to release pressure. This also clears extra water from the pipe. If water keeps flowing, your shutoff valve isn’t fully closed.
Step 2: Find the Sprinkler Head and Dig Around It
Look for the sprinkler head you want to remove. If it’s already gone, look for the open pipe or a small wet spot in the lawn.
Use your trowel to cut a square around the head. Lift the turf in one piece if you can. You’ll put it back when you finish.
Dig about six to eight inches down. You want enough room to see the pipe and reach it with your hands. Go slow, because pipes can sit close to the surface.
Step 3: Remove the Sprinkler Head
Unscrew the sprinkler head by turning it counterclockwise. If it’s stuck, hold the riser steady with one hand so you don’t twist the pipe underground.
Now look at what’s below. You’ll usually see a flexible riser or a short rigid pipe connected to a tee or an elbow. A tee splits the water into more than one direction. An elbow turns the pipe.
Step 4: Decide Where to Cap
You have two good options here.
Option A: Cap at the riser. Leave the riser and tee in place and screw a threaded cap on top. This is the fastest way. It also lets you add a new head later.
Option B: Cap the line itself. Remove the riser and tee, then glue a slip cap on the pipe. This makes a clean, permanent seal.
If the head sat at the end of the line, you can cap the last piece of pipe. If it sat in the middle of a run, you’ll need to fix the line so water can still reach the heads past it. In that case, use a coupling to join the pipe back together, and don’t use a cap.
Step 5: Cut the Pipe (If You Need To)
If you plan to glue on a slip cap, you need a clean, straight cut. Use a pipe cutter or a hacksaw.
Cut square, not at an angle. A crooked cut makes a weak seal.
After cutting, remove any rough edges. Use sandpaper or a deburring tool to smooth the cut end. Then wipe the pipe clean with a dry rag.
Dirt and water ruin the glue bond. So take the extra minute to dry the pipe well. If water keeps seeping in, use a small cup or sponge to remove it. You can also stuff a rag in the pipe for a moment while you work, but remove it before you glue.
Step 6: Dry Fit the Cap
Before you use any glue, test the cap. Slide it onto the pipe with no cement. It should fit snugly and sit most of the way down.
If the cap feels loose or too tight, you probably have the wrong size. Check the pipe markings. Most pipe has the size printed on the side.
Dry fitting also helps you see how far the cap goes on. Mark that spot with a pencil if you like.
Step 7: Apply Primer and Cement
Now it’s time for the real thing.
First, brush the PVC primer on the outside of the pipe end. Cover the area that will go inside the cap. Then brush a little primer inside the cap too.
Primer cleans the plastic and softens it so the cement bonds better. Don’t skip it. Skipping primer is a top reason for leaks.
Right after the primer, brush PVC cement on the pipe end. Use an even coat. Then add a thin layer inside the cap.
Work fast. PVC cement dries quickly.
Step 8: Push on the Cap and Hold It
Slide the cap onto the pipe with a small twist, about a quarter turn. Push it all the way down until it stops.
Hold it firmly for about 30 seconds. PVC cement can push the cap back off at first, so don’t let go too soon.
Wipe off extra cement with a rag. You should see a small bead of glue all the way around the joint. That’s a good sign.
Step 9: Let It Cure
Give the glue time to set before you turn on the water. Check the can for exact times, because they change with temperature and pipe size.
As a simple rule, wait at least a few hours. Waiting a full day is even safer. Cold, damp weather slows curing, so give it more time then.
Step 10: Turn the Water Back On and Test
Slowly open the main shutoff valve. Don’t blast it open. A slow start lets the pipes fill without a pressure shock.
Next, run the zone from your controller. Walk over to the capped spot and look closely. Watch for drips, bubbles, or wet soil around the cap.
If it stays dry for several minutes, you did it right. Let the system run through a full cycle if you can. That puts the cap under normal pressure.
Step 11: Backfill and Replace the Turf
Once you’re sure there’s no leak, fill the hole with soil. Press it down firmly in layers so it doesn’t sink later.
Then place the turf back on top. Water it lightly to help the grass settle in.
How to Cap a Poly Sprinkler Line
Poly pipe needs a different method. The good news is that it’s often easier, because it needs no glue.
Option 1: Compression Cap
- Turn off the water and release the pressure, as you did above.
- Dig around the pipe and cut it clean with a pipe cutter.
- Slide the compression nut onto the pipe.
- Push the pipe end into the cap body.
- Tighten the nut by hand, then give it a small turn with a wrench.
Don’t over-tighten. Too much force can crack the fitting.
Option 2: Barbed Plug and Clamp
- Cut the pipe square.
- Slide a clamp or ring over the pipe end.
- Push the barbed plug into the pipe. You might need to warm the pipe in your hands to make it easier.
- Slide the clamp over the barbed section.
- Tighten the clamp with pliers or a screwdriver.
Some people fold the poly pipe over and tie it off. That doesn’t work well. The pipe can spring back and leak. A real fitting always works better.
How to Cap a Flexible Riser
Sometimes the easiest path is to cap the riser itself.
Remove the sprinkler head and screw a threaded cap onto the top of the riser. Wrap the threads with plumber’s tape first. Two or three wraps in the direction of the threads are enough.
Hand tighten, then add a quarter turn. That’s all you need.
This method keeps your options open. You can always take off the cap and add a new head later.
Still, the riser sits close to the surface. A mower or a heavy foot can break it. If the spot gets lots of traffic, bury the riser deeper or cap the line below it.
How Deep Should You Bury a Capped Line?
Bury the cap a few inches below the surface at the very least. That keeps it safe from mowers, rakes, and garden tools.
If you live in a cold area, remember frost. Water inside the pipe can freeze and crack the cap. So blow out or drain your system before winter, as you normally would.
Also, mark the spot in some way. Write down where it is, or take a photo. You’ll thank yourself later if you want to reuse the line.
Common Mistakes to Avoid
Many first-timers run into the same problems. Here’s how to dodge them.
Skipping the Primer
PVC primer does real work. Without it, the cement can’t grab the pipe well. The cap might hold for a day and then pop off.
Gluing a Wet Pipe
Water stops glue from bonding. Dry the pipe as best you can before you glue anything.
Using the Wrong Cap Size
A half-inch cap won’t fit a three-quarter-inch pipe. Always check the size on the pipe and match the cap.
Capping the Wrong Spot
If other heads sit past the one you removed, a cap will cut off their water. Check how your lines run before you cap anything. Use a coupling if you need to keep water flowing.
Rushing the Cure Time
Turning on the water too soon can blow the cap off. It might seem fine at first, then fail an hour later. Patience pays off here.
Forgetting to Test
A quick test saves you from a soggy lawn. Always run the zone and check the cap before you fill in the hole.
Over-Tightening Threaded Caps
PVC threads crack more easily than you think. Snug is enough. If you crank it too hard, you can split the fitting.
Troubleshooting: What If the Cap Leaks?
Don’t panic if you see a drip. Here’s what to try.
If a glued cap leaks: Turn off the water and let the pipe dry. Then cut off the cap and the damaged pipe end. Start over with a new cap and fresh primer and cement. You can’t fix a bad glue joint by adding more glue.
If a threaded cap leaks: Unscrew it, clean the threads, and add fresh plumber’s tape. Then tighten it again, but not too hard.
If a compression cap leaks: Check that the pipe end is cut square. Also check that the pipe sits all the way inside. Tighten the nut a little more, or replace the cap if it looks cracked.
If water still seeps out of the pipe: You might have a closed valve that isn’t sealing. Check the zone valve. A worn valve can let a small amount of water through, even when it’s off.
When to Call a Pro
Most people can handle this job. Still, a few cases call for help:
- You can’t find the main shutoff valve.
- Your pipe is old metal or looks badly damaged.
- You keep seeing leaks after two tries.
- The line sits near a gas, electric, or water service line.
- You’re not sure which lines feed which zones.
Calling a pro costs a bit, but it beats digging up your whole yard.
Helpful Tips for a Smooth Job
A few small habits make this project much easier.
- Work on a dry day. Rain fills your hole with water and slows the glue.
- Shut off the water first, always. Don’t skip it, even for a quick job.
- Take a photo of the pipes before you cap. It helps you remember the layout.
- Keep dirt out of the pipe. A little grit can ruin a glue joint.
- Buy a spare cap. They cost very little, and mistakes happen.
- Label your valves. It makes the next job easier.
Should You Cap or Remove the Line Entirely?
Some people ask if they should dig the whole pipe out. In most cases, you don’t have to.
Capping is faster, cheaper, and less messy. It also leaves your options open if you change your mind. Removing a whole run of pipe means lots of digging and a torn-up yard.
But there are times when removal makes sense. If you’re building a patio, pool, or foundation, old pipe in the way can cause trouble. In that case, cap the line at the main branch and remove the unused section.
Quick Checklist
Here’s a fast recap you can follow on the day of the job:
- Turn off the water and the controller.
- Release pressure by running the zone briefly.
- Dig around the sprinkler head.
- Remove the head and riser.
- Cut the pipe square and smooth the edge.
- Dry the pipe and dry fit the cap.
- Apply primer, then cement, and push the cap on.
- Hold for 30 seconds and let it cure.
- Turn the water back on slowly.
- Check for leaks, then backfill.
Frequently Asked Questions
Can I cap a sprinkler line without glue?
Yes. A threaded cap or a compression cap works without glue. Poly pipe fittings also need none. For a PVC slip cap, though, you need primer and cement.
How long does PVC cement take to dry?
It sets in a few minutes, but it needs more time to fully cure. Wait several hours at least before you turn the water on. A full day is the safest choice, especially in cool weather.
Can I use a regular pipe cap from the hardware store?
Yes, as long as it matches your pipe type and size. Buy a cap made for sprinkler or irrigation use, and check the pressure rating.
Will capping one head hurt the other heads?
It shouldn’t, if you cap the right spot. If heads sit past the one you remove, use a coupling to keep the line open. A cap at the wrong spot cuts off water to them.
Can I reuse a capped line later?
Yes. If you used a threaded cap or a compression cap, just remove it and add a new riser and head. A glued cap takes more work, since you have to cut it off first.
How much does it cost to cap a sprinkler line?
The parts are cheap. A cap, primer, and cement usually cost a few dollars each. Hiring a pro costs more, but it can save time if you feel unsure.
Do I need to turn off the whole system?
Yes. Turn off the main water supply and the controller. This keeps you safe and keeps your hole dry.
What if I find water in the pipe while I work?
That’s normal. Some water stays in the line after you shut things off. Scoop it out with a cup or soak it up with a sponge. Then dry the pipe end before you glue.
Final Thoughts
Capping a sprinkler line sounds scary, but it’s one of the easiest yard jobs you can do. You need the right cap, a clean cut, and a little patience.
Start by shutting off the water. Then match your cap to your pipe, dry fit it, and glue or tighten it. Let it cure, test it, and cover it up.
Do it right once, and the cap will last for many years. Your lawn stays dry, your water bill stays low, and your sprinkler system keeps running well.
Now grab your trowel and get started. You’ve got this!

Hi, I’m Mary, the founder of GardenCure.com. I’m passionate about creating healthy, beautiful gardens and well-kept lawns. I share practical experience and trusted advice on garden and lawn gear that truly works. With the support of my dedicated research team, our writers produce honest, in-depth reviews using reliable, authentic sources—helping you choose the right tools with confidence for your outdoor space.