How to Cultivate Peanuts?
Peanuts are fun to grow. The plant looks cute, the flowers are tiny and yellow, and the crop grows underground where you can’t see it.
In this article
You dig up the plants at the end, and you find a pile of fresh pods waiting for you. It feels like finding treasure.
Many people think peanuts only grow on big farms in warm places. That’s not true. With a little planning, you can grow peanuts in a backyard garden, a raised bed, or even a large pot.
This guide shows you how to cultivate peanuts from seed to snack. I keep the steps simple and the words easy, so you can follow along even if you have never grown a single plant.
What Are Peanuts, Really?
Here’s a fun fact to start. A peanut is not a true nut. It’s a legume, which puts it in the same family as beans, peas, and lentils.
People also call it a groundnut, and that name makes sense. The pods grow under the soil, not on branches above it.
The plant grows low and bushy, and it stays about one to two feet tall. It has green leaves that fold at night and open again in the morning.
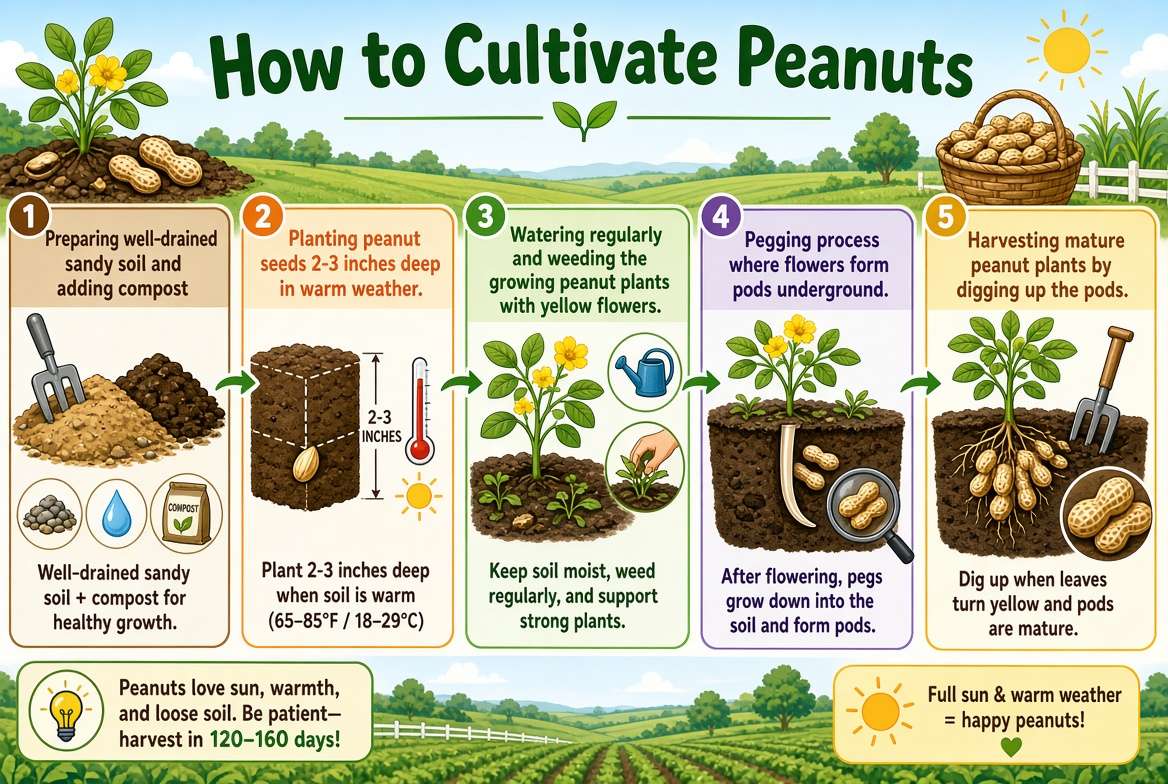
After the plant flowers, something strange happens. The flower drops, and a thin stem called a “peg” grows down into the soil.
The tip of that peg swells into a pod, and inside the pod you’ll find the peanuts. That’s the whole magic trick.
Why Grow Peanuts at Home?
Store-bought peanuts are fine, but homegrown peanuts taste better. They have a fresh, sweet flavor that roasted bags can’t match.
Peanuts also help your garden. Like other legumes, they work with helpful soil bacteria that pull nitrogen from the air and put it in the ground. Because of that, your next crop often grows better in the same spot.
Here are a few more reasons to give them a try:
- They’re cheap to start, since one small bag of seed goes a long way.
- They’re easy to care for once they get going.
- They’re a great project for kids.
- They give you a tasty harvest you can eat raw, boiled, or roasted.
What Peanuts Need to Grow Well
Before you plant anything, know what peanuts like. If you give them the right setup, most of your work is done.
Warm Weather
Peanuts love heat. They need a long, warm growing season with about 100 to 130 frost-free days, and some types need even more.
If your summers are short, don’t give up yet. Pick a fast variety, and start your seeds indoors a few weeks early.
Full Sun
Give your peanuts at least six to eight hours of direct sun each day. More sun means stronger plants and more pods.
Loose, Sandy Soil
This part matters most. Peanut pods need to push through the soil, so the ground must stay loose and crumbly.
Sandy loam works best. Heavy clay is a problem, because it holds water, packs down hard, and makes the pods rot or stay small.
Good Drainage
Peanuts hate wet feet. Soggy soil leads to rot and disease, so make sure water drains away fast after rain.
Pick the Best Peanut Type for Your Garden
Not all peanuts are the same. Four main types grow in home gardens, and each one has its own strengths.
Virginia Peanuts
Virginia peanuts have big pods and large seeds. People often use them for roasting in the shell, and they’re the peanuts you see at ball games.
They need a long season, usually 130 to 150 days. Because of that, they suit warm regions best.
Runner Peanuts
Runner peanuts are the most common type on farms. They have medium-sized seeds and grow in an even, steady way.
Most peanut butter comes from runners. They ripen in about 130 to 150 days as well.
Spanish Peanuts
Spanish peanuts have small, round seeds with a reddish-brown skin. They have a rich, nutty flavor and a high oil content.
They grow fast and ripen in about 100 to 115 days. If you live where summers run short, this is a smart pick.
Valencia Peanuts
Valencia peanuts have three or more small seeds in each pod. They taste very sweet, and people love them boiled or fresh.
They ripen in about 95 to 110 days. That’s quick, so they also work well in cooler areas.
Quick tip: If you’re a beginner in a cool climate, start with Spanish or Valencia. If you live in a warm place with a long season, try Virginia or Runner.
Where to Get Peanut Seeds
Here’s a common mistake. Don’t plant roasted peanuts, because roasting kills the seed and nothing will sprout.
Instead, buy raw, unshelled peanuts. You can find them at garden centers, farm stores, and online seed shops.
Some grocery stores also sell raw peanuts in the shell. These sometimes sprout, but they often have a lower success rate because stores may treat them.
For the best results, buy seed sold for planting. It’s fresh, tested, and ready to grow.
Get the Soil Ready
Good soil gives your peanuts a strong start. Take a little time on this step, and it will pay off at harvest.
Test Your Soil
Peanuts like slightly acidic soil, with a pH between 5.8 and 6.2. You can buy a simple soil test kit at any garden store.
If the pH runs too low, add a bit of garden lime. If it runs too high, mix in some sulfur or peat moss.
Loosen the Ground
Use a garden fork or tiller to break up the soil. Dig down at least eight to twelve inches.
Pull out rocks, roots, and clumps. Smooth soil helps the pegs reach down and form pods.
Add Compost, but Go Easy
A little compost adds nutrients and helps the soil drain. Mix in one to two inches of it before planting.
Don’t add too much nitrogen fertilizer, though. Peanuts make their own nitrogen, so extra feeding gives you lots of leaves and very few pods.
Add Calcium
Peanut pods need calcium to fill out well. Without it, you may get empty shells, which growers call “pops.”
Gypsum is a simple fix, and many gardeners use it. Sprinkle it around the plants when they start to flower, following the label rate.
When to Plant Peanuts
Timing counts. Peanut seeds need warm soil to sprout, and cold ground makes them rot.
Wait until the last frost has passed. Then check your soil, because it should sit at about 65 to 70 degrees Fahrenheit.
A cheap soil thermometer makes this easy. Push it two inches into the ground in the morning and check the reading.
In most areas, that means planting in late spring or early summer. If you’re not sure, ask a local garden center when folks in your area plant beans or tomatoes. Peanuts go in around the same time.
How to Plant Peanuts, Step by Step
Now for the fun part. Follow these steps, and you’ll have seeds in the ground in no time.
Step 1: Shell the Peanuts
Crack the shells open by hand and take out the seeds. Do this right before planting, not days ahead.
Be gentle. Try not to tear the thin reddish skin on each seed, because that skin protects it.
Step 2: Make Your Rows
Dig shallow rows about 24 to 36 inches apart. This gives the plants room to spread and gives you space to walk.
Step 3: Plant the Seeds
Drop each seed about one to two inches deep. Place them four to six inches apart, with the pointy end facing down.
Then cover them with loose soil and pat the ground lightly.
Step 4: Water Gently
Give the soil a light drink right after planting. The ground should feel damp but never soaked.
Step 5: Wait for Sprouts
Seeds usually sprout in one to two weeks. If the soil stays cool, it can take a bit longer.
You’ll see small green shoots pop up, and soon the first leaves will open.
Start Seeds Indoors if Your Season Is Short
Do you live in a cooler spot? You can get a head start indoors.
Plant the seeds in biodegradable pots about three to four weeks before your last frost date. Use light, well-draining potting mix, and keep the pots in a warm, bright place.
When the weather warms up, move the pots outside. Because peanut roots don’t like being disturbed, plant the whole pot in the ground so you don’t harm them.
Growing Peanuts in Containers and Raised Beds
No big garden? No problem. Peanuts grow very well in pots and raised beds.
Container Tips
- Use a pot at least 12 inches deep and wide.
- Fill it with loose potting mix, and add a little sand for drainage.
- Make sure the pot has holes in the bottom.
- Plant three to four seeds in each pot.
Raised Bed Tips
Raised beds are perfect, because the soil stays loose and drains fast. Fill the bed with a mix of garden soil, sand, and compost.
Also, you can space plants a little closer here, since the soil is so soft. Just keep them about six inches apart.
How to Water Peanut Plants
Watering is simple if you follow one rule. Keep the soil evenly damp, but never soggy.
Early Growth
Water lightly but often while the seedlings are small. The top few inches of soil should never dry out completely.
Flowering and Pegging
This stage is the most important. The plants need steady moisture while they flower and while the pegs push down.
If the soil dries out now, the pods may not fill. So water deeply once or twice each week, and more often in hot, dry spells.
Late Season
As harvest gets closer, cut back on water. Dry soil at the end helps the pods mature and makes digging easier.
Pro tip: Water at the base of the plants, not on the leaves. Wet leaves invite disease.
Feeding Your Peanut Plants
Peanuts don’t ask for much food. Since they make their own nitrogen, your main job is to make sure the soil has enough calcium, phosphorus, and potassium.
If your soil test shows low levels, add a balanced, low-nitrogen fertilizer before planting. Then, when the plants begin to flower, add gypsum for calcium.
That’s about all they need. Too much feeding only makes lots of leaves and fewer nuts.
Hilling and Mulching
Here’s a step many beginners skip. Once the plants are about ten to twelve inches tall, pull loose soil up around the base of each plant.
Gardeners call this “hilling.” It gives the pegs a soft place to dig in.
After that, spread a thin layer of straw or dry grass clippings around the plants. Mulch holds in moisture and blocks weeds.
Keep the mulch light, though. A thick layer can trap water and lead to rot.
Keep Weeds Under Control
Weeds steal water, light, and food. Young peanut plants don’t compete well, so pull weeds often in the first few weeks.
Use your hands or a small hoe, and be careful. Once the pegs start to grow, don’t dig deep near the plants. You could snap the pegs and lose pods.
Common Peanut Pests
Peanuts face a few pests, but most are easy to handle.
Squirrels, Birds, and Chipmunks
These critters love fresh peanut seeds. They dig them up right after planting.
To stop them, cover the bed with garden mesh or chicken wire until the seedlings pop up. A few pinwheels or shiny tape can help scare birds away too.
Deer and Rabbits
Deer and rabbits nibble on the leaves. A simple fence keeps them out. Make it about three feet tall for rabbits and much taller for deer.
Insects
Watch for aphids, caterpillars, and spider mites. Check the leaves every few days.
Wash small bugs off with a strong spray of water. If the problem grows, use insecticidal soap, and always follow the label.
Root-Knot Nematodes
These tiny worms live in the soil and attack roots. They cause knots and weak plants.
Crop rotation is your best defense. Don’t plant peanuts in the same spot two seasons in a row.
Common Peanut Diseases
Disease usually shows up when the weather turns wet and humid. Good habits stop most problems.
Leaf Spot
Leaf spot makes brown or black spots on the leaves. In bad cases, the leaves turn yellow and drop off.
To prevent it, give plants plenty of space, water at the base, and rotate your crops. Remove and toss out sick leaves early.
White Mold
White mold, sometimes called southern blight, looks like white fuzzy threads near the base of the plant. It thrives in hot, wet soil.
Good drainage and crop rotation lower the risk. If a plant gets it, pull the plant out and throw it away. Don’t compost it.
Rot
Wet soil can cause the pods and roots to rot. That’s why loose, well-drained ground matters so much.
How to Tell When Peanuts Are Ready to Harvest
Most peanuts take between 100 and 150 days to mature, depending on the type. Patience pays off here, since you can’t see the pods.
Look for these signs:
- The leaves turn yellow, and some start to drop.
- The plant looks tired and starts to slump.
- The days grow cooler, and frost gets closer.
Still not sure? Do a test dig. Pull up one plant and look at the pods.
Mature pods feel full and heavy. The inside of the shell shows dark veins, and the seed skin looks pink or reddish and fills the shell.
If the pods look small or the shells feel empty, wait another week and test again.
Important: Harvest before a hard frost. A freeze can hurt the crop and lower the taste.
How to Harvest Peanuts
Harvest day is the best day. Here’s how to do it well.
Step 1: Loosen the Soil
Wait for a dry day. Then push a garden fork into the soil about six inches away from the plant, and gently lift.
Don’t just yank the plant. The pods hang on thin pegs and can snap off, leaving them buried.
Step 2: Pull the Plants
Lift each plant out with the soil clinging to its roots. Shake off the extra dirt, but leave the pods attached.
Step 3: Check the Ground
Dig around the hole once more with your hands or a small trowel. Some pods always break loose and hide in the soil.
Dry and Cure Your Peanuts
Fresh peanuts hold a lot of water. If you store them wet, they will grow mold, so you need to dry them first.
This drying step is called curing, and it also builds the flavor.
Step 1: Let Them Sit
Hang the plants upside down in a warm, dry, airy place. A porch, shed, or garage works well.
Keep them out of direct rain and out of harsh sun.
Step 2: Wait Two to Three Weeks
Leave the plants until the pods feel dry and rattle when you shake them. The seeds inside should feel firm, not soft.
Step 3: Pick Off the Pods
Pull the pods from the plants by hand. Then spread them in a single layer on a screen or tray for a few more days.
Step 4: Check for Dryness
Crack open a pod, and bend a seed. A dry peanut snaps cleanly. A damp one bends and feels soft.
Store Your Peanuts the Right Way
Store dry peanuts in their shells for the longest life. Keep them in a mesh bag or a cardboard box in a cool, dry spot.
Don’t seal them in plastic while they still hold moisture. Trapped moisture leads to mold.
Shelled peanuts last for a shorter time. Keep them in an airtight jar in the fridge or freezer.
Safety note: Toss any peanut that looks moldy, dark, shriveled, or smells odd. Moldy peanuts can carry harmful toxins.
How to Roast Your Homegrown Peanuts
Roasting takes almost no effort, and the smell alone is worth it.
- Heat your oven to 350 degrees Fahrenheit.
- Spread the peanuts in their shells on a baking sheet.
- Bake for 15 to 20 minutes, and stir them once halfway.
- Let them cool. They keep crisping as they cool down.
Want boiled peanuts instead? Wash fresh, green peanuts, and simmer them in salty water for a few hours until soft. It’s a classic snack in many places.
Common Mistakes to Avoid
Even experienced growers slip up now and then. Here are the mistakes that beginners make most.
- Planting roasted peanuts. They will never sprout.
- Planting too early. Cold soil rots the seed.
- Using heavy clay soil. The pods can’t form well.
- Adding too much nitrogen. You get leaves, not nuts.
- Skipping calcium. You end up with empty shells.
- Letting the soil dry out during pegging. Pods stay small.
- Pulling plants too hard. Pods break off underground.
- Storing peanuts before they dry. Mold takes over fast.
A Simple Peanut Growing Timeline
Here’s a quick view of what to expect from start to finish.
- Weeks before last frost: Start seeds indoors if your season is short.
- After last frost: Plant seeds outside when the soil hits 65 to 70 degrees.
- One to two weeks later: Seeds sprout.
- Three to five weeks: Weed often and hill the soil around plants.
- Six to eight weeks: Flowers appear, and pegs begin to form. Add gypsum.
- Ten to fourteen weeks: Pods grow and fill underground.
- Around 100 to 150 days: Leaves yellow, and it’s time to test dig.
- After harvest: Cure for two to three weeks, then store or roast.
Frequently Asked Questions About Growing Peanuts
Can I grow peanuts from store-bought raw peanuts?
Sometimes you can. Raw, unshelled peanuts from a store may sprout, but seed from a garden supplier gives you a better chance.
How many peanuts does one plant give?
A healthy plant usually gives about 25 to 50 pods. The number depends on the variety, the soil, and the weather.
Do peanuts grow well in pots?
Yes, they do. Use a deep pot with good drainage and loose soil, and give the plant plenty of sun.
Why are my peanut shells empty?
Empty shells often point to low calcium or dry soil during pod filling. Add gypsum at flowering time, and keep the soil evenly damp.
How long do peanuts take to grow?
Most types take 100 to 150 days from planting to harvest. Spanish and Valencia types grow faster than Virginia and Runner types.
Do peanut plants come back every season?
No. Peanuts are annual plants, so you plant new seeds each growing season. Save a few of your best pods to use as seed next time.
Is it safe to eat raw homegrown peanuts?
Cured peanuts that look clean and healthy are usually fine. Still, always throw out any that look moldy or smell bad.
Final Thoughts
Growing peanuts isn’t hard. It takes warm weather, loose soil, steady water, and a little patience.
Start with the right seed for your climate. Plant after the frost is gone, keep the soil damp during flowering, and hill the plants so the pegs can dig in.
Then wait, dig, dry, and enjoy.
There’s nothing quite like pulling a plant from the ground and finding it loaded with pods. Your first harvest will probably hook you for good.
So grab some raw seed, pick a sunny spot, and give it a go. Your garden, and your snack bowl, will thank you.

Hi, I’m Mary, the founder of GardenCure.com. I’m passionate about creating healthy, beautiful gardens and well-kept lawns. I share practical experience and trusted advice on garden and lawn gear that truly works. With the support of my dedicated research team, our writers produce honest, in-depth reviews using reliable, authentic sources—helping you choose the right tools with confidence for your outdoor space.