How to Care for a Peace Lily?
So you’ve got yourself a peace lily, or you’re thinking about getting one. Smart choice! These beautiful plants are perfect for beginners and experienced plant parents alike.
In this article
Peace lilies bring life to any space with their gorgeous white blooms and lush green leaves. The best part? They’re incredibly forgiving and easy to maintain.
Let me walk you through everything you need to know about keeping your peace lily thriving.
What Makes Peace Lilies So Special
Peace lilies are tropical plants that originally come from the rainforests of Central and South America. These stunning beauties belong to the Spathiphyllum genus, and they’ve become super popular houseplants around the world.
You’ll recognize them instantly by their elegant white flowers. Well, here’s a fun fact – those white “petals” aren’t actually flowers. They’re called spathes, and they’re modified leaves. The real flowers are those tiny bumps you see on the spike in the middle.
These plants are champions at purifying indoor air. They help remove toxins like benzene, formaldehyde, and carbon monoxide from your home. NASA even studied them for their air-cleaning abilities!
Peace lilies also communicate with you. They literally tell you when they need water by drooping their leaves. Then they perk right back up after a good drink. It’s pretty amazing to watch.
Finding the Perfect Spot for Your Plant
Light is crucial for your peace lily, but these plants are actually quite flexible.
They naturally grow on the forest floor where tall trees block most of the direct sunlight. This means they’re adapted to low light conditions. Your peace lily will happily survive in a dimly lit corner or a room without many windows.
However, low light and no light are different things. Your plant still needs some natural light to grow and produce those beautiful blooms. A spot near a north-facing window works wonderfully.
East-facing windows are great too because they provide gentle morning sun. The light is softer and won’t scorch the delicate leaves.
You can also place your peace lily a few feet away from a west or south-facing window. Just make sure the direct afternoon sun doesn’t hit the leaves. Those strong rays can cause brown, crispy patches on the foliage.
If your plant stops flowering, it might need more light. Try moving it to a brighter location and watch for new blooms to appear.
Fluorescent lights work well too. Office buildings often have peace lilies thriving under artificial lighting. These plants are super adaptable that way.
Avoid placing your peace lily near heating vents, air conditioners, or drafty doors. Sudden temperature changes stress the plant and cause problems with growth and flowering.
Watering Your Peace Lily the Right Way
Watering is probably the most important part of peace lily care. Get this right, and your plant will flourish.
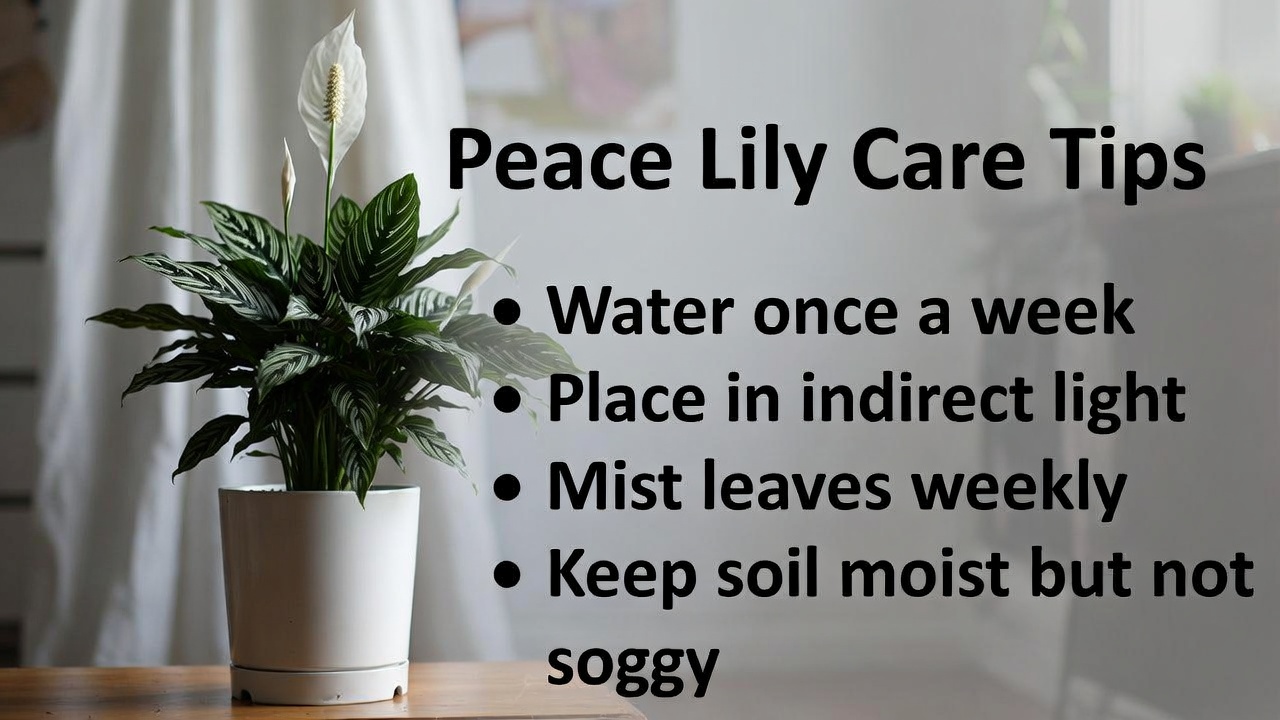
Peace lilies like their soil consistently moist but never waterlogged. Think of a wrung-out sponge – damp but not dripping wet.
Here’s the easiest method: wait until the top inch of soil feels dry to the touch. Stick your finger into the potting mix to check. If it feels dry down to your first knuckle, it’s time to water.
Your peace lily will also tell you when it’s thirsty. The leaves start to droop and look sad. Don’t panic when this happens! Just give your plant a thorough watering, and it’ll bounce back within hours.
Some plant parents wait for the droop before watering. This method works fine, but try not to let your plant wilt too often. Repeated wilting can stress the plant over time.
When you water, do it thoroughly. Pour water until it runs out of the drainage holes at the bottom of the pot. This ensures the entire root system gets hydrated.
Let the excess water drain away completely. Never let your peace lily sit in standing water. This leads to root rot, which can kill your plant.
Empty the saucer or cache pot about 30 minutes after watering. Any water that drains out should be discarded.
During warm months, you might need to water once or twice a week. In cooler seasons, your plant needs less water. Every 10 days might be enough.
The size of your pot matters too. Smaller pots dry out faster than larger ones. A peace lily in a 4-inch pot needs water more often than one in a 10-inch pot.
Room temperature and humidity also affect watering needs. Dry, heated indoor air makes the soil dry out faster.
The Best Water for Your Plant
Peace lilies can be picky about water quality.
Tap water often contains chlorine, fluoride, and other chemicals. These can build up in the soil and cause brown leaf tips.
If you notice brown tips developing, try switching to filtered water. You can also let tap water sit out overnight. This allows some of the chlorine to evaporate.
Rainwater is fantastic for peace lilies. Collect it in a clean bucket and use it for watering. Your plant will love it!
Distilled water works well too, though buying it regularly can get expensive.
Room temperature water is always best. Cold water can shock the roots, while hot water damages them. Let the water sit for a bit before using it if needed.
Soil and Potting Requirements
Peace lilies need well-draining potting soil that retains some moisture.
A standard all-purpose potting mix works perfectly. Look for one that contains peat moss or coconut coir, perlite, and vermiculite.
The peat moss or coir holds moisture, while the perlite and vermiculite improve drainage. This combination gives you that perfect balance.
You can also make your own mix. Combine regular potting soil with perlite and a bit of peat moss. Use about 60% potting soil, 20% perlite, and 20% peat moss.
Some people add orchid bark to the mix. This creates air pockets and improves drainage even more.
Avoid heavy garden soil or clay-based mixes. These hold too much water and suffocate the roots.
Your pot needs drainage holes. This is non-negotiable. Without drainage, excess water has nowhere to go, and root rot becomes almost certain.
Plastic pots, ceramic pots with drainage holes, and terracotta pots all work well. Terracotta is porous and allows the soil to dry out a bit faster. This can be helpful if you tend to overwater.
When and How to Repot
Peace lilies eventually outgrow their pots and need repotting.
You’ll know it’s time when roots start growing out of the drainage holes. The plant might also become top-heavy and tip over easily.
Another sign is when the soil dries out much faster than usual. This means the roots have filled the pot, leaving little room for soil to hold moisture.
Most peace lilies need repotting every 12 to 18 months. Fast-growing plants might need it sooner.
Spring is the ideal time to repot. The plant is entering its active growing season and will recover quickly from any transplant stress.
Pick a new pot that’s only 1-2 inches larger in diameter than the current one. Going too big can lead to overwatering issues.
Here’s how to repot:
Gently remove the plant from its current pot. You might need to squeeze the sides or tap the bottom to loosen it.
Look at the roots. Healthy roots are white or light tan. Dark, mushy, or smelly roots indicate rot. Trim away any damaged roots with clean scissors.
Add fresh potting mix to the bottom of the new pot. Place your peace lily in the center and fill around the sides with more soil.
The plant should sit at the same depth it was in the old pot. Don’t bury it deeper or leave the roots exposed.
Water thoroughly after repotting. This helps settle the soil and removes air pockets.
Your peace lily might look a bit droopy for a few days after repotting. This is normal. It’s just adjusting to its new home.
Fertilizing for Healthy Growth
Peace lilies aren’t heavy feeders, but they do benefit from occasional fertilizing.
A balanced, water-soluble houseplant fertilizer works great. Look for something with equal amounts of nitrogen, phosphorus, and potassium, like a 10-10-10 or 20-20-20 formula.
During the growing season, feed your peace lily once a month. Use the fertilizer at half the strength recommended on the package. Diluting it prevents fertilizer burn.
In fall and winter, your plant grows more slowly. You can reduce feeding to once every two months or stop completely.
Always fertilize after watering, never on dry soil. Fertilizer applied to dry roots can burn them.
If you notice salt buildup on the soil surface (it looks like a white crust), flush the soil with plain water. Run water through the pot for a few minutes to wash away accumulated salts.
Organic fertilizers like compost tea or worm castings work well too. These release nutrients slowly and are gentler on the plant.
Yellow leaves can sometimes indicate too much fertilizer. If this happens, flush the soil and reduce your feeding schedule.
Humidity and Temperature Needs
Remember, peace lilies are tropical plants. They love warmth and humidity.
These plants thrive in temperatures between 65-80°F. They can tolerate slightly cooler temps but don’t like it below 60°F.
Keep your peace lily away from cold drafts in winter. Don’t place it near exterior doors or single-pane windows where cold air seeps in.
Also avoid hot, dry air from heating vents. This can cause brown leaf edges and stress the plant.
Peace lilies appreciate humidity levels around 50% or higher. Most homes, especially in winter, have much drier air.
Here are easy ways to increase humidity:
Mist your plant’s leaves with room temperature water. Do this a few times a week.
Place the pot on a pebble tray. Fill a shallow tray with pebbles and add water until it’s just below the top of the pebbles. Set your pot on top. As the water evaporates, it creates humidity around the plant.
Group your peace lily with other houseplants. Plants naturally release moisture, and grouping them creates a more humid microclimate.
Use a humidifier in the room. This is the most effective method and benefits all your plants.
Keep your peace lily in naturally humid rooms like bathrooms or kitchens. Just make sure these rooms have enough light.
Brown leaf tips often indicate low humidity. If you see this, try boosting the moisture in the air.
Pruning and Maintenance
Regular maintenance keeps your peace lily looking its best.
Remove dead or dying leaves as soon as you notice them. These yellow or brown leaves won’t recover, and removing them helps the plant direct energy to healthy growth.
Cut dead leaves at the base using clean scissors or pruning shears. Make your cut close to the soil line.
Spent flowers should also be removed. Once the white spathe turns green and starts to fade, cut the entire flower stalk down to the base.
This process is called deadheading, and it encourages the plant to produce more blooms.
Dust can accumulate on the large leaves. This blocks light and makes it harder for the plant to photosynthesize.
Wipe the leaves gently with a soft, damp cloth every few weeks. Support the leaf from underneath while you clean to avoid damaging it.
Some people like to give their peace lily a shower. Take it to the bathroom and rinse the leaves with lukewarm water. Let it drain completely before putting it back in its spot.
Clean leaves also look much more attractive and shiny.
If your peace lily gets too large, you can divide it. This gives you multiple plants and rejuvenates the parent plant.
Remove the plant from its pot and gently separate the root ball into sections. Each section should have several leaves and a good portion of roots.
Plant each division in its own pot with fresh soil. Water well and treat them like newly repotted plants.
Getting Your Peace Lily to Bloom
Those beautiful white flowers are what makes peace lilies so attractive.
Peace lilies bloom naturally in spring and can flower sporadically throughout the year. Some plants bloom multiple times annually, while others bloom just once or twice.
Light is the biggest factor in flowering. Plants in too-dark locations often produce plenty of leaves but no flowers.
If your peace lily hasn’t bloomed in a while, try moving it to a brighter spot. Remember, bright indirect light is what you want.
Proper fertilizing also encourages blooming. A fertilizer slightly higher in phosphorus (the middle number) can promote flower production.
Mature plants bloom more readily than young ones. If you just bought a small peace lily, give it time to grow before expecting flowers.
Some varieties bloom more freely than others. Smaller varieties often flower more frequently than larger ones.
Be patient. Sometimes peace lilies just need time to settle in and feel comfortable before they bloom.
Once flowers appear, they can last for weeks. Enjoy them while they’re there!
Common Problems and Solutions
Even easy-care plants like peace lilies can run into issues. Let’s troubleshoot some common problems.
Yellow leaves usually mean overwatering. Check your watering schedule and make sure the pot has good drainage. Let the soil dry out a bit more between waterings.
Older leaves naturally yellow and die as the plant grows. This is normal if it’s just one or two lower leaves.
Brown leaf tips often result from low humidity, fluoride in tap water, or fertilizer salt buildup. Increase humidity, switch to filtered water, and flush the soil occasionally.
Drooping leaves mean your plant is thirsty. Water thoroughly and the leaves should perk up within hours.
If the leaves droop even after watering, you might have root rot from overwatering. Check the roots and repot if needed.
Brown spots on leaves can indicate fungal issues or sunburn. If the spots are crispy and appear on leaves getting direct sun, move the plant to a shadier location.
Soft brown spots might be fungal. Remove affected leaves and improve air circulation around the plant.
No flowers usually means insufficient light. Move your peace lily to a brighter location.
Overfertilizing can also prevent blooming. Too much nitrogen promotes leaf growth at the expense of flowers.
Stunted growth might indicate the plant needs repotting, more fertilizer, or better light.
Check if the plant is rootbound. If roots are circling the pot or coming out of drainage holes, it’s time for a bigger home.
Dealing with Pests
Peace lilies are relatively pest-resistant, but they can still attract unwanted visitors.
Spider mites are tiny pests that create fine webbing on leaves. They thrive in dry conditions.
Spray the plant with water to dislodge them. Wipe leaves with a damp cloth. Increase humidity to prevent future infestations.
Mealybugs look like small white cotton balls on leaves and stems. Remove them with a cotton swab dipped in rubbing alcohol.
You can also spray the plant with insecticidal soap or neem oil.
Scale insects appear as small brown bumps on stems and leaves. They’re harder to spot but can damage your plant.
Scrape them off with your fingernail or a soft brush. Treat with neem oil or insecticidal soap.
Fungus gnats are tiny flying insects that live in moist soil. They’re annoying but usually harmless to the plant.
Let the soil dry out more between waterings. This disrupts their breeding cycle.
Yellow sticky traps catch adult gnats. You can also add a layer of sand on top of the soil.
For any pest problem, isolate the affected plant from your other houseplants. This prevents the pests from spreading.
Treat the plant consistently for several weeks. Most pest treatments need multiple applications to fully eliminate the problem.
Safety Considerations
Here’s something important to know: peace lilies are toxic to pets and humans if ingested.
The plant contains calcium oxalate crystals. These cause intense burning and irritation in the mouth and throat.
Symptoms include drooling, difficulty swallowing, and vomiting. In severe cases, it can cause breathing difficulties.
Keep peace lilies out of reach of children, cats, and dogs. Place them on high shelves or in rooms where pets don’t go.
If someone or a pet chews on the plant, rinse their mouth with water. Don’t induce vomiting. Call poison control or your vet right away.
The good news is that serious poisoning is rare. The burning sensation is so unpleasant that most people and animals don’t consume much of the plant.
Still, it’s better to be safe. If you have curious pets or young children, you might want to choose a non-toxic plant instead.
When handling peace lilies during repotting or pruning, some people experience skin irritation. Wear gloves if you have sensitive skin.
Wash your hands thoroughly after working with your plant.
Different Peace Lily Varieties
Many peace lily varieties exist, ranging from tiny to enormous.
Spathiphyllum wallisii is a compact variety perfect for small spaces. It grows about 12 inches tall and flowers frequently.
Domino has beautiful variegated leaves with white streaks and spots. It grows to medium size and adds extra visual interest.
Sensation is the giant of the peace lily world. It can grow over 6 feet tall with enormous leaves. Perfect if you want a statement plant.
Mauna Loa is a popular medium to large variety. It grows 3-4 feet tall and produces abundant flowers.
Piccolino is another dwarf variety, staying under 12 inches. Great for desks or tight spaces.
Jetty features extra dark green leaves that make the white flowers stand out even more.
All varieties have similar care requirements. The main differences are size and appearance.
Pick a variety based on the space you have available and the look you want.
Propagating Your Peace Lily
Once your peace lily grows large enough, you can create new plants through division.
This is the easiest and most reliable propagation method for peace lilies. You can’t really grow them from cuttings like some other plants.
The best time to divide is during spring repotting.
Remove the plant from its pot and gently shake off excess soil. You’ll see the plant is made up of multiple crowns or clumps.
Each crown has its own set of leaves and roots. Carefully pull these apart with your hands. For stubborn roots, use a clean knife to separate them.
Each division should have at least three leaves and a good root system.
Plant each division in its own pot with fresh soil. Water well and place in a warm spot with bright indirect light.
The new plants might look droopy for a few days. This is normal shock from being divided. Keep the soil moist and be patient.
Within a week or two, the plants should perk up and start growing.
Don’t divide your peace lily too often. Once every few years is plenty. Too-frequent division stresses the plant.
Creating the Perfect Environment
Let’s put all this together to create ideal conditions for your peace lily.
Find a spot with bright, indirect light. Near an east or north-facing window works wonderfully.
Keep the temperature steady between 65-80°F. Avoid cold drafts and heating vents.
Maintain humidity around 50% or higher. Use a humidifier, pebble tray, or regular misting.
Water when the top inch of soil is dry. Use room temperature, filtered water if possible.
Feed monthly during spring and summer with diluted fertilizer. Cut back in fall and winter.
Keep the leaves clean by wiping them every few weeks.
Remove dead leaves and spent flowers promptly.
Repot every 12-18 months or when the plant becomes rootbound.
With these simple steps, your peace lily will reward you with lush foliage and beautiful blooms for years to come.
Final Thoughts on Peace Lily Care
Peace lilies are truly wonderful houseplants. They’re forgiving, beautiful, and bring life to any indoor space.
These plants work well in homes and offices. They tolerate the lower light conditions common in these settings.
You don’t need to be an expert gardener to keep a peace lily happy. Just provide basic care, and your plant will thrive.
The most important things to remember: don’t overwater, provide indirect light, and give your plant some humidity.
Your peace lily will communicate its needs. Drooping leaves mean water me. Brown tips mean more humidity please. No flowers mean I need brighter light.
Listen to your plant, make small adjustments as needed, and you’ll develop a green thumb in no time.
These elegant plants can live for years with proper care. Some peace lilies become family heirlooms, passed down through generations.
Start with one peace lily, master its care, and you’ll soon find yourself wanting more plants. They’re a gateway to the wonderful world of indoor gardening.
Your home will look better, the air will be cleaner, and you’ll have a rewarding hobby that reduces stress and brings joy.
So go ahead and give peace lily care a try. Your new plant friend is waiting to brighten up your space!

Hi, I’m Mary, the founder of GardenCure.com. I’m passionate about creating healthy, beautiful gardens and well-kept lawns. I share practical experience and trusted advice on garden and lawn gear that truly works. With the support of my dedicated research team, our writers produce honest, in-depth reviews using reliable, authentic sources—helping you choose the right tools with confidence for your outdoor space.