How to Change Weed Eater String?
Nobody wants to spend their Saturday afternoon wrestling with their lawn equipment. But here’s the thing—a worn-out weed eater is basically useless. The good news? Changing the string on your weed eater is way easier than you think. In this guide, I’ll walk you through the entire process step by step. By the time you’re done reading, you’ll be able to do this job in just a few minutes.
In this article
Why You Need to Learn This Skill
Let’s start with the basics. Your weed eater string is the part that actually cuts the weeds. It spins at super high speeds and whacks down everything in its path. That’s why it wears out so fast. After a few hours of use, the string becomes frayed, breaks apart, and stops working well.
The string isn’t just a single piece of nylon. Most weed eaters use a thin, durable cord that gets fed from a spool. When it breaks or wears down, you need fresh string. The bad news is you can’t just buy a new weed eater every time this happens. The good news is that changing it costs just a few dollars and takes hardly any time.
Learning to do this yourself saves you money on repairs. You also won’t have to wait to drop it off at a repair shop. Your trimmer will be ready to go whenever you need it.
What You’ll Need Before You Start
Before you dive in, grab these supplies. You don’t need much, and most people already have this stuff lying around:
- Trimmer string – Buy the right size for your weed eater. Check your manual or look at the spool to find out what thickness you need.
- Screwdriver – Usually a Phillips head, but check your specific model.
- Scissors or cutting tool – You’ll need to cut the string to the right length.
- Work surface – A flat table or bench makes this job easier.
- Your weed eater – Obviously.
- Gloves (optional) – These protect your hands from sharp edges.
That’s really it. No fancy tools required.
Understanding Your Weed Eater Spool
The spool is the heart of your string trimmer. It’s the part that holds and dispenses the string. Learning how it works makes the whole job less confusing.
Most weed eaters have a bump-feed or automatic feed system. This means the spool has a spring inside that automatically moves fresh string out when you need it. Some trimmers have a manual feed system where you pull the string out yourself.
Look at your spool closely. You’ll see it has two parts: an upper spool and a lower spool. Some spools have one central part. The design varies depending on your trimmer model. The important thing is that the string wraps around the spool in a specific way.
On the center of the spool, you’ll see a little notch or hole. This is where you start winding your string. This tiny detail matters because if you miss it, your string won’t stay in place.
The spool usually sits inside a trimmer head. This head screws onto the bottom of your trimmer shaft. To access the spool, you need to remove the head first.
How to Remove the Trimmer Head
Okay, let’s get down to work. The first step is taking off the trimmer head so you can access the spool.
Flip your trimmer upside down so the head is facing up. Look for the bolt or fastener holding the head on. On most models, you’ll turn this counterclockwise to loosen it. If it’s a screw, use your screwdriver. If it’s a bolt, you might need a wrench or socket set. Go slow and steady—you don’t want to strip anything.
Once you’ve loosened the bolt or screw all the way, the head should come right off. Set it down carefully on your work surface. Some trimmer heads are plastic and can break if you drop them.
Take a moment to look at the head. You’ll see the spool inside. This is what you’re going to work with next.
Removing the Old Spool
Now it’s time to take out the old spool so you can reload it with fresh string.
Most spools have a small pin or bolt in the center. Look for it. You’ll need to remove this pin to get the spool out. Some pins just pull straight out. Others require you to turn them slightly first. Check your manual if you’re not sure.
Once the center pin is out, the spool should slide right out of the trimmer head. If it’s stuck, don’t force it. Rock it gently side to side until it comes loose. Sometimes spools get sticky from old string and dust.
Pull out the spool and set it on your work surface next to you. Get a good look at it. You’re going to need to know exactly how the old string was wound so you can replicate it with the new string.
Cleaning Out the Old String and Debris
Before you put new string on, clean out all the old stuff. This prevents tangles and makes everything work better.
Look inside the spool. You’ll probably see little bits of broken string, dust, and dried grass. Use your fingers or a small brush to clean it all out. A plastic brush works better than a wire brush because it won’t scratch the spool.
Pay special attention to the area around the center hole. Sometimes lint and string pieces get packed in there. Get it as clean as possible. This takes just a minute and makes a huge difference.
Also clean the trimmer head itself. Wipe out any debris from the inside. A dry cloth works great for this.
Measuring Your String
Now comes the fun part—getting your string ready. You need to cut it to the right length. Cut too short and you’ll run out quickly. Cut too long and it won’t spool properly.
The standard length for most trimmer spools is about 14 to 20 feet. Your manual should tell you the exact length. If you’ve lost your manual, look online for your trimmer model.
Use scissors to cut a piece of string this length from your spool or coil. Make a clean cut. Rough, frayed edges don’t wind as well.
Some people like to cut two pieces instead of one really long piece. This is actually easier for winding. You’d wind two separate shorter strands instead of trying to manage one super long strand. Either way works fine.
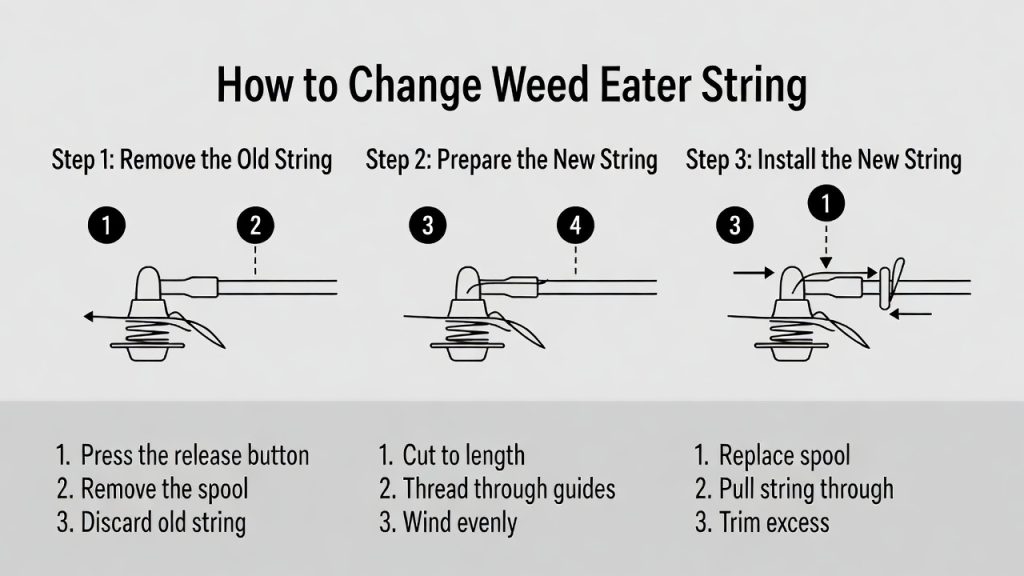
Winding String on the Spool: The Key Technique
Here’s where most people get confused, but it’s actually pretty simple once you understand it.
Start by finding that center notch or hole on the spool. This is your anchor point. You need to wedge the end of your string into this notch and hold it there while you wind.
Push about half an inch of string into the notch. Hold it firmly with one hand. Now, with your other hand, start turning the spool. The direction matters. Most spools wind counterclockwise, but some wind clockwise. Check your spool carefully for any arrows or markings that show you which way to go.
As you turn the spool, the string will wind around it in neat, tight circles. Keep tension on the string with your hand as you wind. This helps keep everything neat and prevents tangles.
Wind the string until it fills the spool almost completely. Leave just a tiny bit of space around the edges. Don’t overstuff it or the string will jam.
Once you’ve wound the first section, you need to wind the second section. But here’s the thing—most spools have two chambers or paths. The string should wind down one path until it’s full, then move to the next chamber and wind in the opposite direction.
This sounds complicated but it’s not. Look at your spool. You’ll see grooves or paths that guide the string. Just follow them. Wind one side full, then flip to the other side and do the same thing.
Getting the String Into Position
Alright, you’ve got your string wound on the spool. Now you need to position it so it feeds correctly into the trimmer head.
Pull out just a little bit of string from the spool. Leave about 6 inches sticking out from each side of the spool. These loose ends are what will do the actual cutting.
Thread these loose ends into the small slots in the trimmer head. These slots are specifically designed to guide the string. Line them up carefully. If the string doesn’t go in smoothly, don’t force it. Sometimes these slots are small and fiddly.
Once the string is in the slots, make sure it sits flat. Any twists or tangles now will cause problems later.
Putting the Spool Back Into the Head
Now you’re ready to reassemble everything. This is basically the reverse of taking it apart.
Carefully slide the spool back into the trimmer head. Make sure it sits properly in the center. The spool should fit snugly but not so tight that it won’t move.
Put that center pin back in. Turn it or press it until you hear a little click. That click means it’s seated properly and locked in place.
Double-check that the string is still in the trimmer head slots. Sometimes it shifts during this step.
Reattaching the Trimmer Head
You’re almost done. Now you just need to screw the head back onto your trimmer.
Align the head so it matches up with the shaft. The threads should line up easily. Start turning the bolt or screw by hand so you don’t strip the threads.
Once it’s hand-tight, use your screwdriver or wrench to tighten it the rest of the way. Don’t crank super hard. Just make it snug and secure.
Give the head a gentle tug to make sure it’s not going to spin off. It should feel solid.
Testing Your Work
Before you take your trimmer back outside, test it to make sure everything works.
Flip the trimmer right side up. Hold it so the head is pointing away from you and toward the ground. Never point it at yourself or anyone else.
If your trimmer is electric, plug it in. If it’s gas-powered, make sure you have fuel and the engine is ready to start.
Start the trimmer on low speed. Listen for any weird sounds. The string should spin smoothly without any grinding, clunking, or rubbing noises.
Let it run for just a few seconds. Check that the string is feeding properly and moving at normal speed. If something sounds wrong, stop immediately and figure out what’s off.
Once you’re confident it sounds right, do a quick test cut on some grass or weeds. This tells you if the string is actually cutting and at what length.
Adjusting the String Length
If your string is too long, it might bump the ground or wrap around things. Too short and it won’t cut efficiently. You can adjust this.
Most trimmers have a little trimmer guard. This is a hard plastic piece that sticks out from the head. It helps you know exactly where to cut.
You can use the trimmer head guard to cut the string to the right length. Start the trimmer and gently guide the spinning string toward the guard. The guard will trim off the excess string automatically. Just let maybe a small amount stick past the guard.
This is called “bumping” the string. Do it carefully and only trim a little bit at a time. It’s easier to trim more than to add string back on.
Common Problems and How to Fix Them
Let’s say something doesn’t feel quite right. Don’t worry. Most issues are easy to fix.
The string isn’t spinning. Check that the spool is actually in the head correctly. Make sure the center pin is fully seated and locked. Sometimes it just needs to be pushed in a bit more firmly.
The string came out of the slots. You need to take the head off again and reposition it. This happens sometimes during reassembly. Just do that part over.
The string keeps breaking. This usually means it’s wound too tight or there’s a knot in it. Try rewinding it with a little less tension. Also check for any rough spots or damage to the string itself.
The trimmer head won’t screw back on. The threads might be misaligned. Take it off and start again, making sure to line up the threads first before turning the screw.
The string is too long and binding up. Use the guard method to trim it down. Go slowly and test as you go.
Tips to Make This Job Even Easier
Here are some tricks that make the whole process smoother:
Take a photo of your trimmer head before you disassemble it. If you forget how something goes back together, you can check your photo.
Always buy a little extra string. You don’t want to run out in the middle of winding.
Some people prefer to work with two shorter pieces of string instead of one long piece. If you find one long piece annoying, try this approach.
Keep your manual handy even if you think you don’t need it. Sometimes a quick reference saves you time.
Mark your string coil with the size you use. When you buy a new coil, you won’t waste time wondering if it’s the right thickness.
If the string keeps coming loose, apply a tiny drop of super glue to the notch where the string anchors. Just a tiny bit. Let it dry completely before winding.
How Often Should You Change Your String?
This depends on how much you use your trimmer. Someone who uses it twice a year won’t need to change it nearly as often as someone who trims weekly.
Most people change their string when it stops cutting well or breaks. But you can get ahead of the curve by changing it at the start of the cutting season. This means you’ll have maximum cutting power all season long.
If you store your trimmer for winter, put fresh string on it right before you put it away. Then you’ll be ready to go when spring rolls around.
Different Trimmer Models: What to Know
While the basic process is the same for all weed eaters, some models have slight variations. Here’s what to know:
Bump-feed trimmers are the most common. You bump the head on the ground to release more string automatically. Just change the string using the method above.
Manual feed trimmers require you to pull the string out yourself. The winding process is the same, but you manually pull out string when needed instead of bumping.
Two-string trimmers use two separate strings instead of one. You wind both the same way, just independently. It’s really just doing the process twice.
Commercial or professional trimmers might have more complex spool designs. Always check the manual for these models because they can be different.
Why This Skill Matters
Taking the time to learn how to change your own trimmer string keeps you independent. You’re not waiting for someone else or spending money at a repair shop. You save time and money.
Beyond that, understanding how your trimmer works makes you better at maintaining it. You’ll notice when something’s not quite right. You’ll know how to care for it properly.
Honestly, this task is a perfect gateway to learning more about your outdoor equipment. Once you can change trimmer string, tackling other simple maintenance jobs gets a lot less intimidating.
Final Thoughts
Changing weed eater string isn’t magic. It’s not complicated. It just takes a little patience and attention to detail. You’ve now got all the information you need to do it yourself.
The first time might take you 15 or 20 minutes because you’re going slowly and being careful. By the third time, you’ll knock it out in five minutes flat. Soon you’ll be the person everyone asks for help because you know how to do this simple job that so many people avoid.
So grab your trimmer, get your supplies ready, and give it a try. You’ve got this. Your trimmer will be cutting like new in no time, and you’ll have saved yourself money and hassle in the process.

Hi, I’m Mary, the founder of GardenCure.com. I’m passionate about creating healthy, beautiful gardens and well-kept lawns. I share practical experience and trusted advice on garden and lawn gear that truly works. With the support of my dedicated research team, our writers produce honest, in-depth reviews using reliable, authentic sources—helping you choose the right tools with confidence for your outdoor space.