How to Clean Push Mower Carburetor?
Your push mower sits in the garage. You grab the handle. You pull the cord. Nothing happens.
In this article
You pull again. Still nothing.
This is the moment most homeowners dread. But here’s the good news: the problem might be simpler than you think. Many times, a dirty carburetor is the culprit. The carburetor is a small part that mixes air and fuel to power your engine. When it gets clogged or dirty, your mower won’t start or run properly.
The best part? You can clean it yourself without spending money at a repair shop. This guide will walk you through every step of the process. You don’t need to be a mechanic. You just need basic tools and some patience.
What Is a Carburetor and Why Does It Matter?
Before you grab your wrench, let’s understand what this part does. A carburetor is a device that sits between your mower’s fuel tank and its engine. Its job is simple but vital. It pulls fuel from the tank and mixes it with air in the right amounts. This mixture then flows into the engine where it gets burned to create power.
Think of it like a chef mixing ingredients. Too much salt and the dish is ruined. Not enough and it tastes bland. A carburetor needs the perfect mix to work right.
Over time, fuel can leave deposits inside the carburetor. Old gas breaks down and forms varnish. Dirt particles get stuck. The tiny openings get blocked. When this happens, your mower has trouble starting. It might run rough or stall out. In bad cases, it won’t start at all.
The good news is that cleaning it solves most of these problems. You’re basically flushing out all the junk that’s been building up inside.
When Should You Clean Your Mower’s Carburetor?
You don’t need to clean your carburetor every time you mow. But certain signs tell you it’s time.
Your mower won’t start. You pull the cord repeatedly and nothing happens. The engine doesn’t even try to turn over.
It starts but runs badly. The engine sputters, coughs, or makes rough sounds. It might run fine for a minute then die.
Black smoke comes from the muffler. This means the fuel mixture is off. Too much fuel and not enough air gets burned.
The engine dies when you stop moving. You have power when the mower is running, but it stalls when you release the throttle.
It hasn’t run in months or longer. Fuel breaks down. If your mower sat all winter, the carburetor probably needs attention.
You left old fuel in the tank. Stale gas is worse than fresh gas. It gums up quickly and needs cleaning.
If you see any of these signs, it’s time to act. The longer you wait, the worse it gets.
Tools and Supplies You’ll Need
Good news: you probably have most of these around the house already.
Basic tools:
- Socket set or wrenches that fit your mower bolts
- Screwdrivers (both Phillips and flathead)
- Pliers
- Wire brush or soft brass brush
- Clean cloth or rags
Cleaning supplies:
- Carburetor cleaner (comes in a spray can)
- Small clean container
- Paper towels
- Gasket scraper (you can use a plastic credit card)
Safety gear:
- Safety glasses
- Work gloves
- A clean, well-lit workspace
Optional but helpful:
- Wire or pipe cleaner to clear small passages
- Gasket maker or RTV sealant
- New gaskets (specific to your mower model)
You can buy carburetor cleaner at any auto parts store, hardware store, or online. It costs just a few dollars. This one product will make the cleaning job so much easier.
Safety First: Prepare Your Mower
Before you do anything, safety matters most.
Disconnect the spark plug. Find the thick black wire attached to your spark plug. Remove it. This prevents the engine from accidentally starting while you work.
Let the mower cool. If you’ve been using it, wait at least thirty minutes. The engine gets hot and you don’t want burns.
Empty the fuel tank. You have options here. You can siphon the old gas out using a pump. You can tip the mower carefully (be careful not to spill fuel everywhere). Or you can drain it through the carburetor bowl drain if it has one. Old fuel is what causes the problem anyway, so replacing it with fresh fuel is smart.
Work on a flat surface. Set your mower on level ground. This makes the job easier and safer.
Have good light. Use a work light, flashlight, or work outside during the day. You need to see what you’re doing clearly.
Keep a fire extinguisher nearby. Carburetor cleaner is flammable. It’s unlikely to catch fire, but it’s smart to be ready.
Steps to Remove Your Mower’s Carburetor
Removing the carburetor is the first big step. This might sound scary but it’s doable.
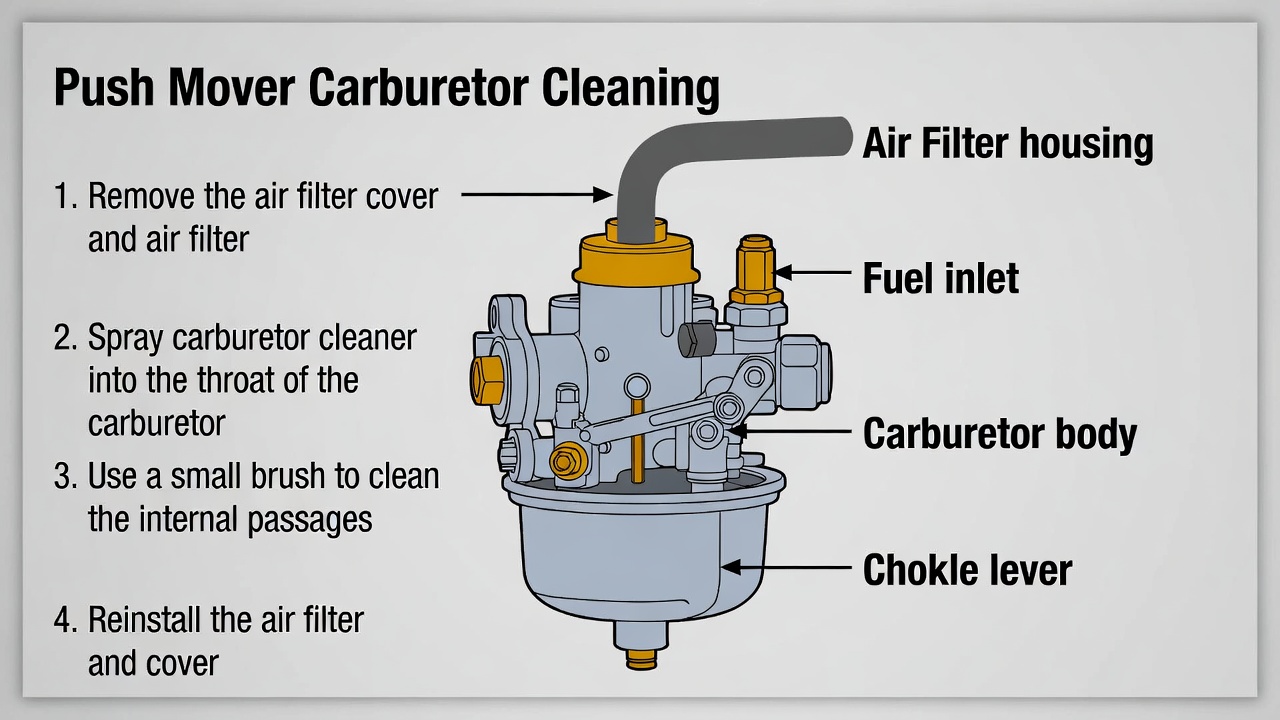
Locate the carburetor. On most push mowers, it sits on top of or near the engine. Look for a hollow metal or plastic piece with fuel lines attached.
Take a photo. Before you disconnect anything, snap a photo with your phone. This helps you remember how things were connected when you reassemble it.
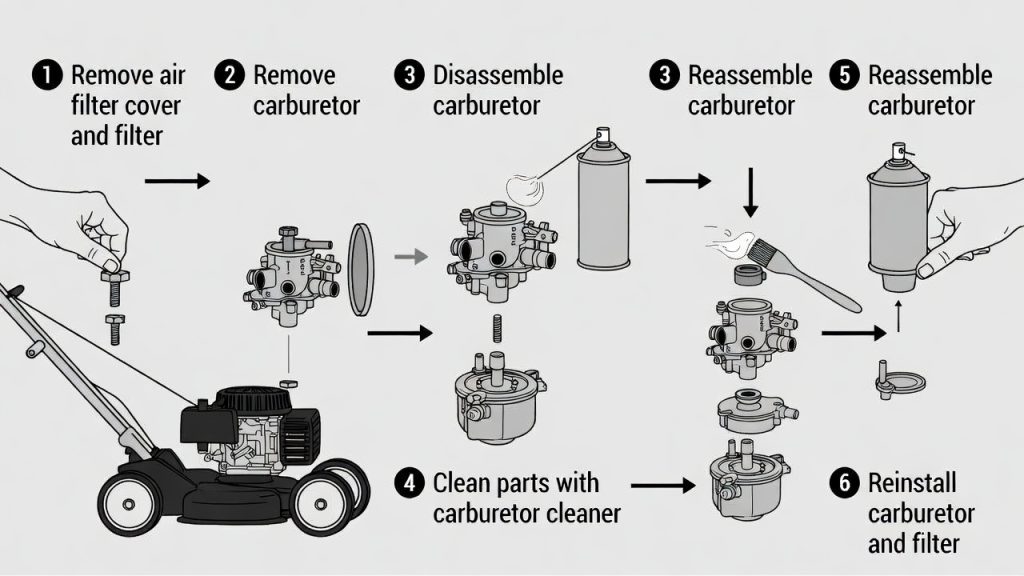
Remove the air filter and cover. Most mowers have an air filter that sits on top of the carburetor or next to it. Remove the bolts or clips holding it on. Lift it away carefully.
Disconnect the fuel line. You’ll see a thin rubber hose running from the fuel tank to the carburetor. Pinch it with a pair of clamps to stop fuel flow. This keeps gas from spilling out. Then slide the clamp holding the hose in place up the hose a bit. Pull the hose off the fuel fitting.
Disconnect the carburetor linkages. The throttle cable or rod connects to the carburetor. This controls how much fuel flows in. Take a photo or write down how it’s connected. Then remove the pin or bolt holding it on.
Remove bolts holding the carburetor. Usually three or four bolts hold the carburetor to the engine. Use the right size wrench or socket. Work slowly. Don’t force anything or you might strip the bolts.
Lift the carburetor away. Pull it straight off. It might stick a little if gaskets are sealed tight. Be gentle. Don’t yank it.
Remove the old gasket. Gaskets are thin rubber or cork pieces that seal connections. Scrape off the old gasket using a plastic scraper or old credit card. Get it clean but don’t scratch the metal underneath.
How to Take Apart the Carburetor
Now you have the carburetor in your hands. The next step is taking it apart so you can clean inside.
Locate the carburetor bowl. This is the fuel storage part that hangs below the main body. It usually has a bolt on the bottom.
Drain any remaining fuel. Unscrew the bowl bolt slowly. Old fuel will drip out. Catch it in a container. Let it all drain completely.
Remove the bowl. Take out the bolt completely. Gently pull the bowl away from the main body.
Remove the float. This is a small metal or plastic piece inside the bowl. It looks like a tiny boat. It floats on the fuel and controls fuel level. It’s usually held by a pin or bracket. Remove this pin carefully. The float should come right out. Don’t lose this piece or the pin.
Inspect the float needle. Attached to the float is a tiny needle that sits in a seat. This needle opens and closes to let fuel in and out. If it looks damaged or stuck, it needs replacement.
Remove the main jets. Jets are small brass parts with holes in them. They look like tiny bolts. Use a very small screwdriver (usually Phillips head) to remove them. These control fuel flow. Count how many you remove and note their location.
Check for other removable parts. Some carburetors have other parts like the idle screw, choke valve, or needle valve. Only remove parts you’re confident about. Take photos as you go. These photos will help you reassemble everything later.
Clean each part. As you remove each piece, set it in a clean container. Keep parts organized. Use a small plastic container or a compartmented box works great for this.
Cleaning the Carburetor Thoroughly
This is where the real magic happens. Cleaning removes all the varnish and deposits.
Use carburetor cleaner spray. Spray it on all parts. Use short bursts. Let the cleaner soak for a minute if the part is really dirty. Use your wire brush to gently scrub away deposits. Don’t scrub so hard you damage soft parts.
Soak stubborn parts. If something is really gunked up, put it in a container of carburetor cleaner and let it soak for thirty minutes to an hour. This dissolves tough varnish.
Clean the small holes and passages. This is crucial. The tiny holes inside the carburetor body are what get blocked. Use a thin wire, pipe cleaner, or even a needle to carefully clear any blockages. Gently poke through holes to dislodge deposits. Spray with cleaner afterward to wash debris out.
Clean the main body. Spray cleaner all over the outside and any visible passages. Use your brush to work it in. Pay special attention to the fuel inlet fitting and the areas around where jets screw in.
Never soak wooden or rubber parts. Some floats have rubber components. Some older carburetors have wooden parts. Don’t soak these in cleaner. Just wipe and spray them gently.
Dry everything completely. Use clean cloth to wipe all parts dry. Let them air dry for several minutes. Any leftover moisture can cause problems.
Inspect for damage. As you clean, look for cracks, broken pieces, or worn spots. If you find damage, you might need to replace that part or the whole carburetor.
Reassemble Your Carburetor
Now comes putting it back together. This is the reverse of taking it apart.
Start with the bowl. Place the gasket back on the bowl. Gaskets seal connections and prevent fuel leaks. If the old gasket is damaged or cracked, use a new one. They’re cheap and prevent future problems.
Install the float and pin. Place the float back in the bowl. The pin goes through the bracket that holds the float. This pin should be aligned properly so the float moves freely. It shouldn’t stick.
Install the float needle. This tiny part is crucial. It sits in a seat and controls fuel flow. Make sure it’s seated properly. It should move smoothly.
Install jets and other small parts. Screw the jets back in. Use your small screwdriver. Don’t over-tighten. They should be snug but not crushed. Tighten them just until they stop, then add a tiny bit more.
Attach the bowl to the body. Line up the bowl with the main carburetor body. The gasket sits between them. Insert the bolt and tighten by hand first. Then use a wrench to snug it down. Tight enough to seal but not so tight you crack something.
Check everything again. Look over the assembly. Make sure all parts are where they should be. Nothing should rattle or move around.
Reinstall the Carburetor on Your Mower
Now it’s time to put the carburetor back on the mower engine.
Prepare the mounting surface. The spot where the carburetor bolts to the engine needs to be clean. Scrape off any old gasket material. Use carburetor cleaner to wipe it down.
Install a new gasket. Use a fresh gasket between the carburetor and the engine. This creates a proper seal. If you’re reusing the old gasket and it looks good, that’s okay. But new is always better.
Position the carburetor. Line it up with the bolt holes on the engine. It should sit straight without forcing.
Insert and tighten bolts. Screw in the bolts by hand first. Make sure they thread smoothly. Then tighten with a wrench. Go around in a pattern, tightening a little bit at a time. This helps the carburetor sit evenly. Don’t over-tighten or you’ll crack it.
Reconnect the throttle linkage. The cable or rod that controls throttle goes back on now. Line it up the way it was in your photo. Install the pin or bolt that holds it on. Make sure it moves freely. Pull on it gently to check.
Reconnect the fuel line. Slide the fuel hose back onto the fuel fitting. Tighten the clamp that holds it. Remove the pinch clamp you used earlier. Fuel should be able to flow now.
Reinstall the air filter. Put the air filter back in place. Bolt it down securely. A loose air filter causes problems.
Reconnect the spark plug. Push the spark plug wire back on. It should click into place.
Add fresh fuel. Fill the tank with clean, fresh gasoline. Old fuel caused the problem in the first place. Don’t repeat the mistake.
Start Your Mower and Test
This is the moment of truth. Does it work?
Prime the carburetor. Many mowers have a choke. Set it to the choke position. This helps with cold starts by enriching the fuel mixture. Some newer mowers have automatic chokes.
Pull the cord. Give it a firm pull. You might need to pull several times. Patience is key.
Listen for signs it’s working. You might hear a weak attempt to start before it catches. Keep pulling.
Let it run. Once it starts, let it idle for a minute. The engine should settle down and run smoothly. It might sound rough at first while fresh fuel cycles through.
Run the mower normally. Push it around a small area. It should respond to throttle changes. It shouldn’t die or stall.
Check for leaks. Look around the carburetor for fuel leaks. A small drip is normal when you first start. But steady leaking means something isn’t sealed right. Tighten bolts or check gaskets if you see leaks.
Problem not solved? If it still won’t start or runs badly, you might have another issue. Sometimes the carburetor isn’t the problem. Spark plug failure or fuel pump issues can cause similar symptoms.
Common Problems and Solutions
Even with good cleaning, sometimes you hit a snag.
Fuel still leaks from the carburetor bowl. The gasket might not be sealing. Turn off fuel flow. Drain the bowl. Tighten the bowl bolt. Try again. If leaking continues, remove the bowl and inspect the gasket. A damaged gasket needs replacement.
Engine still won’t start. This could mean the float needle is stuck in the closed position. Fuel can’t flow to the engine. Remove the carburetor again. Check the float needle. It should move freely. If stuck, soak it in cleaner and try again.
Black smoke from the muffler. Too much fuel and not enough air. This usually means the jets aren’t sized right or the needle valve is stuck open. Black smoke during the first few minutes of running is normal. But if it continues, the carburetor might need professional service.
Rough idle or stalling. The idle adjustment screw might need tweaking. This screw controls fuel flow when the engine is idling. It’s usually on the side of the carburetor. Start with a half turn tighter or looser and test. Make small changes.
Carburetor won’t come off easily. Gaskets seal things tight. Use a soft mallet and tap gently around the edges. Don’t pry with a screwdriver hard. Apply some penetrating oil and wait a few minutes if needed.
Small parts are missing or damaged. If you can’t find a part or it’s broken, order a rebuild kit for your exact mower model. These kits include all the small parts you might need. They’re affordable and make things easier.
Preventing Future Carburetor Problems
Once you’ve cleaned your carburetor, you want to avoid the problem again.
Use fresh fuel. Don’t let gas sit in your mower all winter. Run the mower at the end of the season to burn through fuel. Or drain the tank completely.
Add fuel stabilizer. If you store your mower for months, add a fuel stabilizer to the tank before storing. This keeps fuel fresh and prevents varnish buildup.
Use quality fuel. Top-tier gasoline from major brands includes detergents that help keep carburetors clean.
Run it regularly. Mowers that run often are less likely to have carburetor problems. Regular use keeps fresh fuel flowing through.
Check your air filter. A clean air filter helps your mower run better. Dirty air filters make the engine work harder and strain the carburetor system.
Winterize properly. Before storing for the cold months, drain fuel or run the mower until the tank is empty. This prevents stale fuel from gumming up the carburetor.
When to Call a Professional
Sometimes cleaning doesn’t solve the problem. Knowing when to get help saves time and frustration.
Internal engine damage. If you hear metal-on-metal sounds or see metal shavings in the fuel, the engine itself might be damaged. This is beyond carburetor cleaning.
Carburetor has cracks. Cracked carburetors can’t be sealed properly. They need replacement.
You broke something while working. If you damaged jets or gasket seats, professional repair might be the only solution.
The problem persists after cleaning twice. Sometimes the issue is something else entirely. A mechanic can diagnose other fuel system problems.
You’re not comfortable taking it apart. Some people prefer leaving mechanical work to professionals. That’s okay. There’s no shame in getting expert help.
Professional carburetor service costs between fifty and two hundred dollars depending on the mower. DIY cleaning costs just the price of a spray can of cleaner. That’s why most homeowners try it first.
Tools and Skills You’ve Gained
By completing this project, you’ve learned valuable skills. You now understand how carburetors work. You can identify when one needs cleaning. You know how to safely remove and reinstall one. You can clean out deposits and reassemble the parts.
These skills apply to other small engines too. Snowblowers, tillers, generators, and chainsaws all have similar carburetors. The basic process is the same.
You’ve also saved money. Professional repair costs much more. You did the work yourself for just a few dollars in supplies.
Final Thoughts
A dirty carburetor doesn’t have to mean the end of your mower. With patience and the right approach, you can bring it back to life. The process isn’t complicated. It just takes time and care.
Start with fresh fuel and a clean carburetor. Run your mower regularly. Store it properly. Do these things and you’ll avoid the headache of carburetor problems in the future.
Your mower is a simple machine. Treat it well and it will serve you for years. Take care of the fuel system, keep the air filter clean, and change the oil regularly. These basic maintenance tasks keep everything running smooth.
If your mower has been sitting in the garage refusing to start, don’t panic. It’s probably just a dirty carburetor. Roll up your sleeves, grab your tools, and tackle this project. You can do this. And when your mower roars to life again, you’ll feel the satisfaction of a job well done.
Happy mowing!

Hi, I’m Mary, the founder of GardenCure.com. I’m passionate about creating healthy, beautiful gardens and well-kept lawns. I share practical experience and trusted advice on garden and lawn gear that truly works. With the support of my dedicated research team, our writers produce honest, in-depth reviews using reliable, authentic sources—helping you choose the right tools with confidence for your outdoor space.