How to Apply Scott’s Weed and Feed in a Spreader?
Getting a healthy, green lawn takes work, but it doesn’t have to be complicated. Scott’s Weed and Feed is one of the easiest ways to tackle two lawn problems at once—killing those pesky weeds while feeding your grass the nutrients it needs to thrive. The trick is knowing how to apply it correctly using a spreader. This guide walks you through every step so you can get professional results right from your own yard.
In this article
What Is Scott’s Weed and Feed and Why Use It?
Scott’s Weed and Feed is a combination product that does double duty on your lawn. It contains herbicide to kill broadleaf weeds like dandelions and clover, while also packing fertilizer that gives your grass the nutrients to grow thick and strong. Think of it as two lawn care tasks rolled into one application. This saves you time and effort compared to applying separate products.
The main appeal is convenience. Instead of buying weed killer and fertilizer separately, spreading them at different times, and managing multiple applications, you get everything in one bag. For homeowners just starting out with lawn care, this makes the whole process less intimidating and more manageable.
Scott’s makes different versions of this product for different lawn types and needs. Some formulas focus on fast results, while others are designed for spring or late-season use. No matter which version you choose, the application process stays basically the same. The spreader is your key tool, and learning to use it right makes all the difference.
Types of Spreaders and Which One Works Best
Before you start spreading, you need to know what kind of spreader you’re using. Scott’s Weed and Feed comes in granule form, which means you’ll need a spreader designed for granular products. There are two main types, and each one works a little differently.
The broadcast spreader throws granules out in a wide pattern in all directions from the spreader. These are fast and cover ground quickly. They’re great if you have a large lawn and want to finish the job fast. The downside is that they can sometimes miss spots or create overlap areas where you applied too much product. They also use more product overall because some granules scatter outside the area you’re trying to treat.
The drop spreader releases granules directly below the spreader in a straight line. This gives you more precise control and less product waste. If you have a smaller lawn or want to be really careful about where the product goes, a drop spreader is your friend. The tradeoff is that it takes longer to cover the same area since you can’t spread as wide with each pass.
Many people use a broadcast spreader for the main lawn area and switch to a drop spreader when they get near flower beds, driveways, or other areas where they want to be more careful. This gives you the best of both worlds—speed and precision.
Getting Your Spreader Ready
Before you pour Scott’s Weed and Feed into your spreader, take a few minutes to get everything ready. A spreader that’s clean and in good working order makes the whole job go smoother.
Start by checking your spreader over. Look at the hopper, which is the big container where you pour the product. Make sure there are no chunks of old fertilizer or debris stuck inside. If you see any buildup, wipe it out with a damp cloth. A hopper that’s partially blocked won’t spread product evenly, and that’s a recipe for patchy results.
Next, inspect the gate mechanism—that’s the part that controls how much product comes out. Open and close it a few times to make sure it moves smoothly. The gate should open wide without sticking and close completely. If it feels rough or jerky, a little lubrication helps. A dry cloth or light oil can get things moving again.
Check the spreader wheels and make sure they spin freely. Sometimes old product can dry inside the spreader and make wheels stick. Spin them by hand before you start working. You want them to turn easily so the spreader moves smoothly across your lawn and doesn’t get stuck or drag.
Look over the spreader deck—the flat surface at the bottom where the granules sit before they fall out. Wipe away any dust or dried product. You want a clean surface so granules flow out evenly.
If your spreader hasn’t been used in a long time, consider running it briefly over a tarp or concrete to make sure everything is working before you start on your actual lawn. This test run lets you spot problems now rather than halfway through your yard.
Reading the Spreader Settings
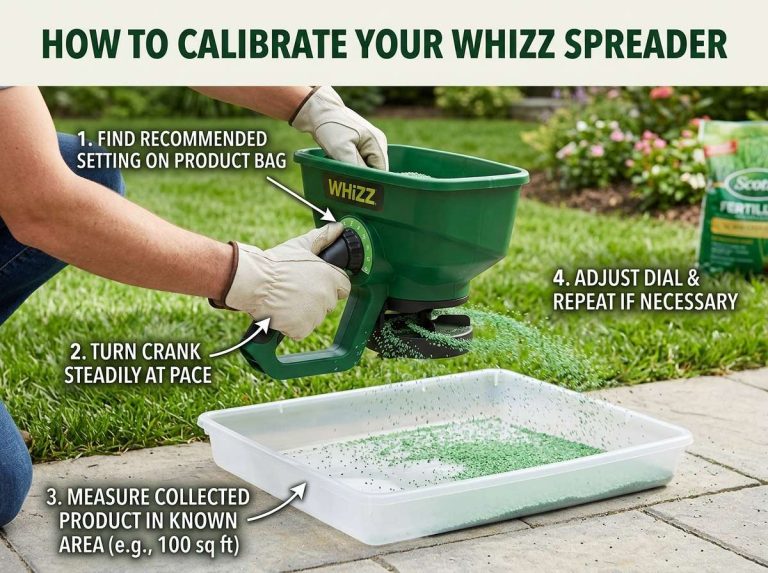
Scott’s Weed and Feed comes with directions that tell you what spreader setting to use. This number is crucial because it controls how much product comes out with each pass. Too little, and you won’t get the results you’re looking for. Too much, and you might damage your grass or waste money on extra product.
Most spreader settings are numbered, typically from 1 to 20 or 1 to 30. Lower numbers release less product, and higher numbers release more. Scott’s products usually specify a setting that works for their particular formula. This setting is printed on the bag, so check it before you start.
Here’s the important part: different spreader brands and models might use different numbers for the same setting, so you can’t just assume your old spreader setting will work with a new product. Always check the bag for the right number. Using the wrong setting is one of the most common mistakes people make, and it leads to uneven coverage and poor results.
If you have an older spreader and the setting number isn’t marked anymore, you might need to estimate based on the manufacturer’s instructions that came with the spreader. Some spreaders have guides that show which setting number corresponds to which product. If you’re not sure, start with a lower setting and do a test area first.
Setting Your Spreader the Right Way
Now it’s time to actually adjust your spreader to the correct setting. This is simple, but getting it exactly right makes a big difference in how evenly your lawn gets treated.
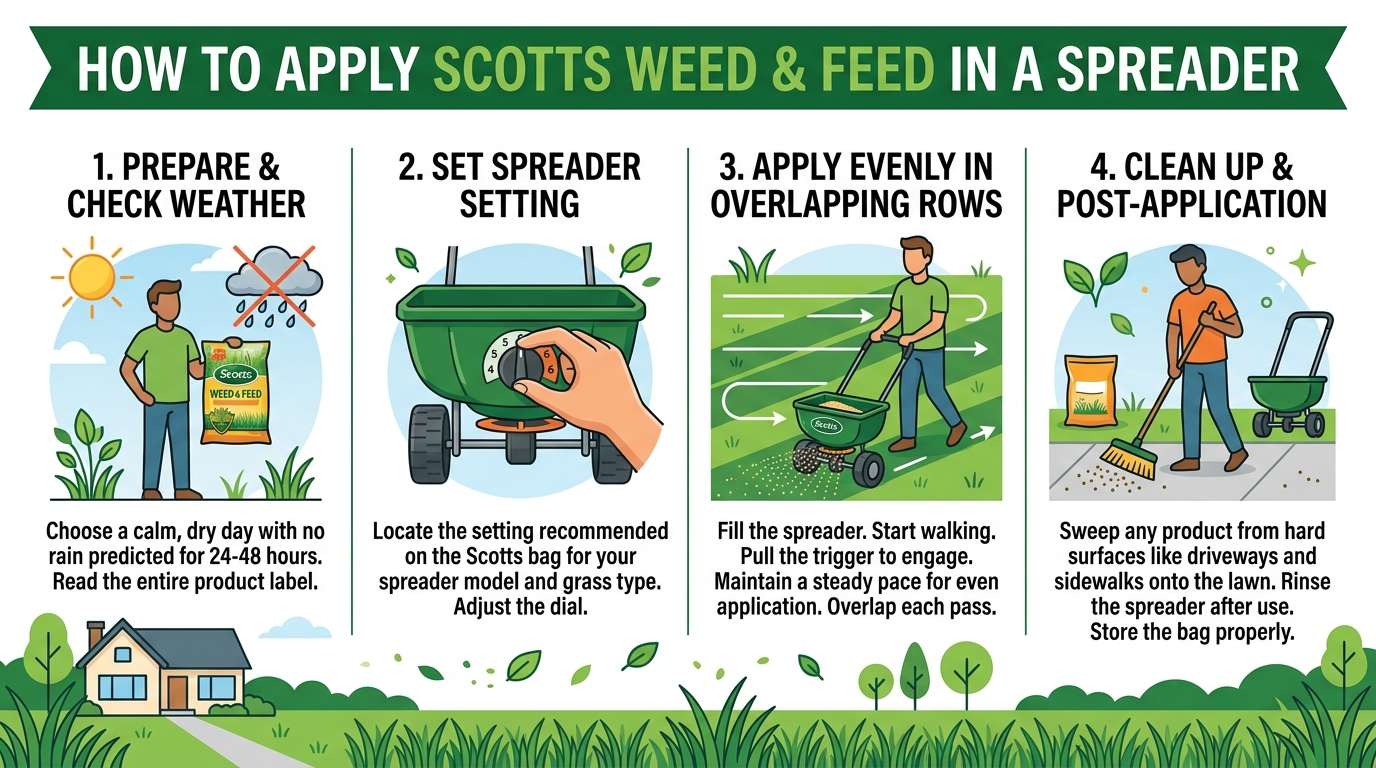
First, close the gate all the way. You don’t want product coming out while you’re adjusting. With many spreaders, you’ll see the setting dial or lever on the side or the front of the hopper. It might be a numbered dial that rotates, or it might be a slider that moves left and right. Whatever style you have, you’re looking for the number that matches the Scott’s Weed and Feed bag instructions.
Once you’ve found the right number, adjust the dial or lever to that exact setting. Don’t estimate or round up thinking you’ll get faster coverage. The settings exist for a reason—they’re calibrated to spread the right amount of product for best results.
Double-check your setting before you load the spreader with product. It’s much easier to adjust it now than to stop halfway through your lawn to change it. Some people mark their preferred settings with a permanent marker so they can find them quickly next time. This is a smart trick if you use the spreader regularly.
Loading Your Spreader Safely
Now comes the part where you actually pour Scott’s Weed and Feed into your spreader. This is where you need to be careful because you’re handling a product with herbicide in it. You want to use it right and keep it safe.
Before you open the bag, make sure your spreader’s gate is closed. You don’t want product spilling out while you’re loading. Place your spreader on a flat surface like a driveway or concrete patio. Avoid loading on your grass because any product that spills will sit right there on the lawn and could create brown or damaged spots.
Open the Scott’s Weed and Feed bag carefully. The granules might be a bit dusty, so avoid stirring up a lot of powder. Pour the granules into the hopper slowly and steadily. If you’re using a smaller spreader, you might not fit the whole bag at once, and that’s okay. You can always refill partway through.
Don’t overfill the hopper. Fill it to the recommended level, which is usually marked inside the container. Overfilling makes it harder to control the spreader and can cause granules to spill out around the edges of the hopper, wasting product and creating uneven coverage.
Once you’ve loaded your spreader, close the bag up tight and put any leftover product in a cool, dry place. Keep it away from kids and pets. Store it somewhere it won’t get damp, because moisture can cause the granules to clump together and stop working properly.
Preparing Your Lawn Before Spreading
A few quick prep steps before you start spreading make a huge difference in results. You want your lawn in the best condition possible to receive the Scott’s Weed and Feed treatment.
First, mow your lawn a day or two before you plan to spread. A freshly cut lawn makes it easier to see where you’re going and easier to walk while pushing your spreader. Plus, shorter grass means the product can reach the soil better. Don’t mow right before spreading though—you want some time between mowing and treatment so the grass can recover from the mowing stress.
Check the weather forecast and pick a calm day. Wind moves granules around and makes it hard to get even coverage. You might be spreading in one spot while the wind blows product into another area. Calm conditions give you much better control and better results.
Look at the moisture level of your lawn. Ideally, your grass should be dry but not dusty. A little morning dew or moisture helps the granules stick to the blades of grass, which keeps them in place until they dissolve. If your lawn is soaked, wait for it to dry out a bit. If it’s super dry and dusty, a light watering the day before helps without making things too wet.
Walk your lawn and mentally note any trouble spots—areas with lots of weeds, thin spots, or places that always look unhealthy. You’ll pay extra attention to these areas when you spread to make sure they get good coverage.
Spreading Scott’s Weed and Feed Step-by-Step
Now you’re ready to start spreading. The way you move across your lawn matters just as much as the spreader settings because it affects how evenly the product gets applied.
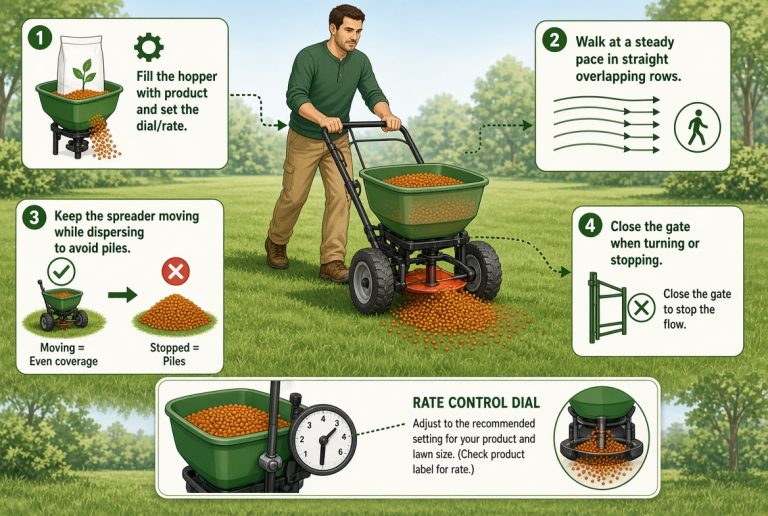
Start at one edge of your lawn and plan out your path. Most people work in straight lines, going back and forth across the yard like they’re mowing. This creates a pattern that’s easy to follow and helps you avoid missing strips. If you have an oddly shaped lawn, breaking it into sections helps you keep track of where you’ve been.
Hold your spreader with both hands and push it at a steady, even pace. Don’t hurry or slow down in different spots—consistency is key. Move at the same speed each time you push the spreader across the lawn. This ensures consistent product distribution. If you speed up in some places and slow down in others, you’ll get uneven coverage.
When you reach the end of a line, make a sharp 90-degree turn and walk back in the opposite direction, creating a new line right next to the previous one. This back-and-forth pattern makes sure you cover the entire lawn without big gaps. Some spreaders have better coverage width on one side than the other, so pay attention to which edge spreads the widest and overlap slightly at the edges to avoid missing spots.
As you go, keep your eyes on the pattern you’re creating. You should see granules spreading out in a consistent pattern. If you notice that one side is spreading more than the other, your spreader might not be level, or the gate might not be opening evenly. Stop and check. Better to fix it now than finish the whole lawn and realize you’ve got uneven coverage.
When you finish each line, open the gate and let it spread freely—don’t try to stop it abruptly at the end. The granules will keep flowing for a few steps, which is normal. Just make sure you’re walking in a straight line so you don’t create a concentrated spot at the end of each pass.
Overlapping: The Key to Even Coverage
One of the biggest mistakes people make when spreading is being afraid to overlap. They worry about applying too much product, so they leave gaps between passes. This creates a striped lawn where some areas get treated well and others don’t get enough product.
The truth is that slight overlapping is necessary for even coverage. There’s a zone in the middle of each pass where the spreader spreads the heaviest. The edges of the spreading pattern are lighter. When you overlap the edges from one pass with the edges from the next pass, you fill in those lighter zones and create overall even coverage.
A good rule of thumb is to overlap by about one foot when using a broadcast spreader. Look at the width of your spreading pattern—how wide the granules are being thrown. Overlap slightly so the edges of adjacent passes meet in the middle of each line. For drop spreaders, you might only need a tiny overlap since they spread in a narrow, controlled line.
If you’re really worried about overdoing it, remember that Scott’s Weed and Feed is formulated with safety in mind. It’s designed to be applied at specific rates, and reasonable overlapping won’t damage your lawn. It’s way better to have slight overlap and get even results than to have gaps and end up with a patchy lawn.
Treating Edges and Hard-to-Reach Areas
The edges of your lawn—where the grass meets the driveway, sidewalk, or flower beds—need special attention. Most people find it easier to switch to a drop spreader for these areas because you get more control and precision.
Walk slowly along the edge of your lawn with the drop spreader, keeping it parallel to the edge. The granules should come out in a straight line that covers your lawn without spreading into the driveway or onto flower beds. This takes a bit of practice to get smooth, but even your first attempt will probably be better than trying to use a broadcast spreader in these tight spots.
For corners and very small areas, you might need to slow down even more or make multiple short passes. It’s okay to go back over a corner again if you’re not sure it got enough coverage. Just keep the spreader moving—don’t let it sit in one spot while the granules pour out.
If you have landscaping islands or obstacles in your lawn, work around them carefully. Plan your path so you don’t have to do awkward maneuvering. If you do need to back up or turn sharply, make sure your gate is closed so you don’t create a concentrated spot of product.
After You’ve Spread the Product
Once you’ve covered your entire lawn, you’re not quite done. A few finishing steps help the Scott’s Weed and Feed work as well as possible.
Don’t water your lawn right after spreading. The granules need to stick to the grass blades, and watering them immediately washes them off. Wait at least 24 hours, and ideally 48 hours, before watering. This gives the product time to settle and start working. Check the bag instructions—most Scott’s products specify exactly how long to wait.
During those first couple of days, try to keep people and pets off the treated area if you can. Let the product sit and do its job without being disturbed. Kids running around and dogs rolling in the grass can mess up the coverage.
After the recommended time has passed, watering your lawn helps activate the product. The moisture helps the granules dissolve and allows the nutrients and herbicide to move into the soil and get absorbed by the roots. A good watering also helps settle the empty granule shells that are left on top of the lawn.
Over the next week or two, you’ll start to see results. The grass should begin looking greener and healthier as it gets the fertilizer nutrients it needs. The weeds should start to brown and die off as the herbicide does its work. Don’t expect overnight results—give it a couple of weeks to really see the full effect.
Common Mistakes to Avoid
Even with the best intentions, people sometimes make mistakes when spreading Scott’s Weed and Feed. Learning about these common errors helps you avoid them.
Using the wrong spreader setting is number one on the list. Always double-check the bag and make sure your spreader is set correctly. The second mistake is not overlapping enough, which leads to striped or patchy coverage. Go ahead and overlap—it’s the safe way to get even results.
Spreading too fast is another big one. People rush through the job and move the spreader too quickly. This causes uneven coverage because the spreader doesn’t have time to spread properly as you move. Slow down and move at a steady, controlled pace.
Forgetting to close the gate when you load the spreader ranks up there too. This leads to granules spilling out while you’re loading, wasting product and creating a mess. Always close that gate first.
Spreading on a windy day causes problems because wind pushes the granules off target. You end up with product in your flower beds, on the driveway, and in your neighbor’s yard instead of where you actually want it. Wait for a calm day if you can.
Not reading the instructions on the bag is surprisingly common. People assume they know how to use Scott’s Weed and Feed because they’ve used other products. But each product might have different instructions, different spreader settings, and different timing recommendations. Spend five minutes reading the bag—it’s worth it.
Frequently Asked Questions
Can I use Scott’s Weed and Feed in the rain? No, you should apply it on a dry day. Rain will wash the granules off before they have time to work. Check the forecast and pick a clear day.
How often can I apply Scott’s Weed and Feed? This depends on the specific product formula. Some can be used multiple times during the growing season, while others are designed for single applications. Check the bag for the recommended application frequency.
What should I do if I accidentally spread too much in one spot? If you notice you’ve applied way too much in a small area, you can try to lightly rake or sweep away the excess granules before they dissolve. This helps prevent potential damage to that spot.
Is Scott’s Weed and Feed safe for new lawns? New lawns need special care. Check the product instructions—most standard Scott’s Weed and Feed products are not recommended for newly seeded or newly sodded lawns. Wait until the grass is well-established.
Can I use a hand spreader for Scott’s Weed and Feed? Hand spreaders work for some products, but they’re slow and harder to control. For most lawns, a push spreader gives much better coverage and is easier to use. If you only have a small lawn, a hand spreader can work, but you’ll need to go slowly and carefully.
What if I can’t find my spreader setting number? Start with a low to medium setting and test a small area first. Watch how much product comes out and adjust from there. You’ll find the right setting through a little experimentation.
Final Thoughts
Applying Scott’s Weed and Feed with a spreader is a straightforward task once you understand the basics. Get your spreader ready, use the right settings, spread at a steady pace with good overlap, and let the product do its work. Your lawn will thank you with healthier, greener growth and fewer weeds to deal with.
The time you invest in learning the right technique now pays off every single time you use your spreader. You’ll get better results, save time, and spend less money because you’re not wasting product through poor coverage. Plus, you’ll feel confident tackling lawn care projects instead of wondering if you’re doing it right.
Remember that lawn care is a process. One application of Scott’s Weed and Feed doesn’t solve all lawn problems forever. But it’s a great step forward, and when combined with regular mowing and watering, it helps you build a thick, healthy lawn that looks fantastic and resists weeds and disease. Your yard will be the kind of place where you actually want to spend time outside.

Hi, I’m Mary, the founder of GardenCure.com. I’m passionate about creating healthy, beautiful gardens and well-kept lawns. I share practical experience and trusted advice on garden and lawn gear that truly works. With the support of my dedicated research team, our writers produce honest, in-depth reviews using reliable, authentic sources—helping you choose the right tools with confidence for your outdoor space.