How to Use a Hydroponic Growing System?
Growing plants without soil sounds strange the first time you hear about it. But once you try it, you will see why so many people are switching to hydroponic gardening. This method lets you grow herbs, veggies, and even fruits inside your home, on a balcony, or in a small garage. You don’t need a big backyard. You don’t need rich soil. You just need water, nutrients, and a bit of patience.
In this article
In this guide, we will walk through everything you need to know to start your own hydroponic system. We will keep things simple and skip the fancy jargon, so even if you have never grown a plant in your life, you will feel ready to begin by the end of this post.
What Is a Hydroponic Growing System?
A hydroponic system is a way to grow plants using water mixed with nutrients instead of soil. The plant roots sit directly in this nutrient-rich water, or they get misted with it, depending on the type of setup you use. Since the roots get direct access to food and water, plants often grow faster and healthier than they would in a traditional garden bed.
The word “hydroponics” comes from Greek roots meaning “water” and “labor,” which basically means the water does the work of feeding the plant. Instead of roots searching through dirt to find nutrients, everything is delivered straight to them.
This growing method has been used for a long time, and today it is becoming more popular for home gardeners because it saves space, saves water, and gives you more control over how your plants grow.
Why Try Hydroponic Gardening?
Before we jump into the how-to part, let’s talk about why this method is worth your time.
It saves water. Hydroponic systems recycle water again and again, so you end up using far less than a regular garden that loses water to soil and evaporation.
It grows plants faster. Since roots get direct access to nutrients, plants don’t waste energy searching for food. This often means quicker growth and bigger harvests.
It takes up less space. You can build a small system on a kitchen counter or a vertical setup along a wall. This makes it perfect for apartments, small homes, or anywhere with limited outdoor space.
It keeps pests away. Since there’s no soil, you avoid a lot of the bugs and diseases that come from dirt. This means fewer pesticides and cleaner produce.
It works all year round. Indoor setups with grow lights let you garden no matter the season or weather outside.
Types of Hydroponic Systems
There are several ways to build a hydroponic setup, and each one works a bit differently. Let’s go over the most common types so you can figure out which fits your space and budget.
Deep Water Culture (DWC)
This is the easiest system for beginners. Plants sit in net pots with their roots hanging into a tub of nutrient-rich water. An air pump keeps the water oxygenated so the roots don’t drown or rot. It’s simple, cheap, and works great for leafy greens like lettuce and basil.
Nutrient Film Technique (NFT)
In this setup, a thin stream of nutrient water flows continuously through a tube or channel, giving roots a steady flow of food. It’s a bit more advanced but works well for growing multiple plants in a row, like a mini indoor farm.
Ebb and Flow (Flood and Drain)
This system floods the grow tray with nutrient water at set times, then drains it back into a reservoir. It gives plants both water and oxygen in cycles, which many gardeners find gives strong, steady growth.
Drip System
A drip system slowly drips nutrient solution onto the base of each plant. It’s efficient and flexible, letting you control exactly how much water each plant gets. This works well for bigger plants like tomatoes and peppers.
Wick System
This is the simplest and cheapest option, great for total beginners. A wick pulls nutrient water up from a reservoir into the growing medium, much like how a candle wick pulls up wax. It doesn’t need pumps or electricity, but it grows plants a bit slower than other methods.
Aeroponics
This one is a bit more high-tech. Roots hang in the air and get misted with nutrient solution at regular intervals. It gives plants a lot of oxygen and can lead to fast growth, but it needs more careful monitoring to keep the misting system running properly.
If you are just starting out, go with a Deep Water Culture or a Wick system. Both are cheap, low-maintenance, and forgiving of small mistakes.
What You Need to Get Started
Here’s a basic list of supplies you’ll need before setting up your first hydroponic garden:
- A container or reservoir to hold water and nutrients
- Net pots to hold your plants
- A growing medium like rockwool, clay pebbles, or coconut coir (this replaces soil and holds the plant roots in place)
- Liquid hydroponic nutrients (these give plants the food they’d normally get from soil)
- An air pump and air stone (for systems like DWC, to keep the water oxygenated)
- A pH testing kit (to keep the water at the right acidity level)
- Grow lights (if you’re growing indoors without much natural sunlight)
- Seeds or young seedlings
You don’t need to buy the most expensive gear right away. Many beginners build their first system with a plastic tub, a few net pots, and an air pump bought online for a low price. As you get more comfortable, you can upgrade to bigger and more advanced setups.
Step-by-Step Guide to Setting Up Your Hydroponic System
Now let’s get into the actual steps. This part is easier than it sounds, so don’t worry if you’ve never done this before.
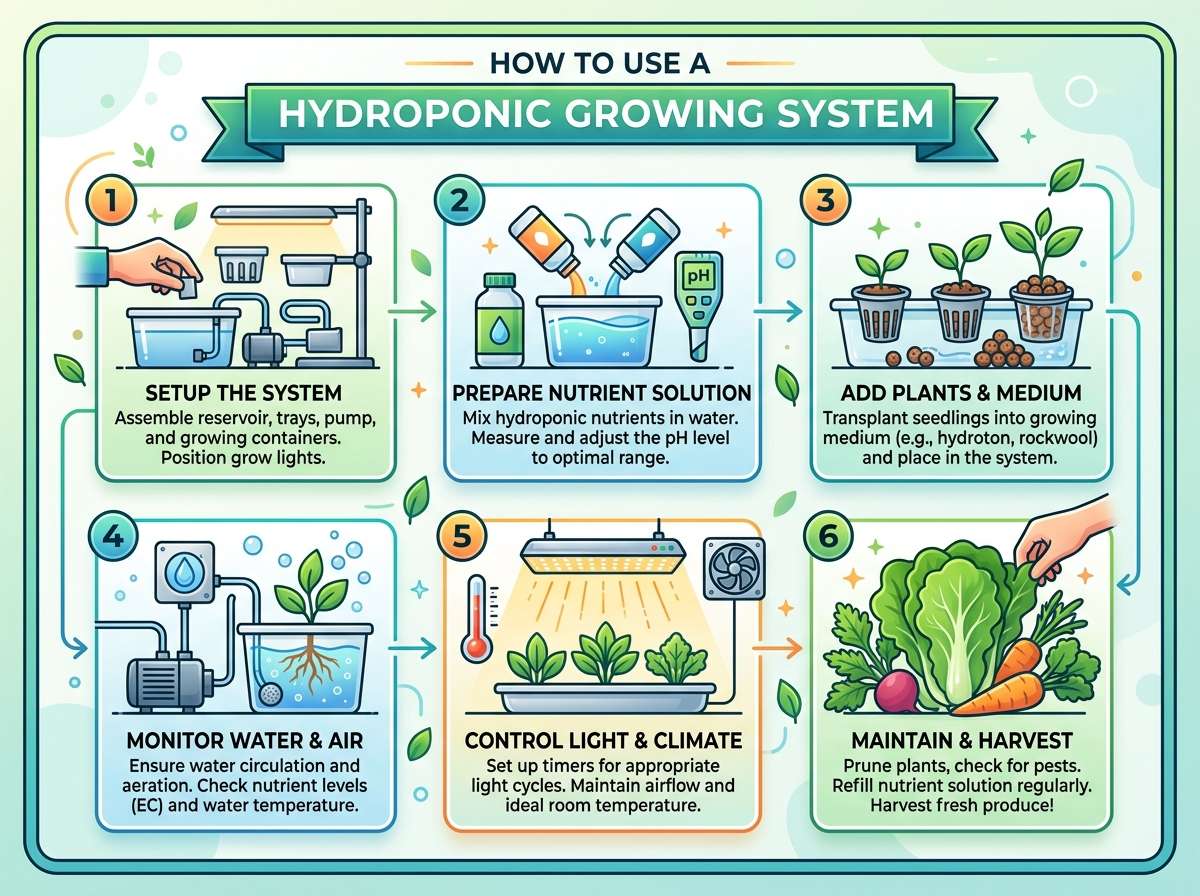
Step 1: Pick Your System Type
Go with something simple for your first try. A Deep Water Culture bucket system or a small Wick setup works great and doesn’t cost much.
Step 2: Set Up Your Reservoir
Grab a clean container, like a plastic tub or bucket, and fill it with water. Let the water sit for a day if it’s tap water, so the chlorine can evaporate a bit. This gives your plants cleaner water to grow in.
Step 3: Add Nutrients
Mix in your liquid hydroponic nutrients following the instructions on the bottle. Don’t guess the amount, as too much or too little can hurt your plants. Most nutrient bottles give clear directions based on how much water you’re using.
Step 4: Check the pH Level
Use your pH testing kit to check the water’s acidity. Most plants grow best in a pH range between 5.5 and 6.5. If the level is off, you can use pH up or pH down solutions to adjust it. This step matters a lot because if the pH is wrong, plants can’t absorb nutrients properly, even if the food is right there in the water.
Step 5: Place Your Plants
Put your seedlings into net pots filled with your growing medium, like rockwool or clay pebbles. Make sure the roots can reach down into the water below. If you’re starting from seeds, you can sprout them first in a small tray with wet rockwool cubes before moving them into the hydroponic system.
Step 6: Set Up Oxygen Flow
If you’re using a DWC or similar system, turn on your air pump. This adds bubbles into the water, keeping oxygen levels high so roots stay healthy and don’t rot.
Step 7: Add Light
If you’re growing indoors, set up your grow lights above the plants. Most leafy greens need around 12 to 16 hours of light a day, while fruiting plants like tomatoes often need a bit more. If you have a sunny window, natural light can work too, but grow lights give you steady, reliable results.
Step 8: Monitor and Adjust
Check your system daily at first. Look at water levels, pH balance, and how your plants are doing. Top off water as it evaporates or gets absorbed, and refresh the nutrient solution every couple of weeks.
Best Plants for Hydroponic Growing
Some plants take to hydroponics better than others, especially for beginners. Here are a few solid choices to start with:
- Lettuce – Grows fast and is very forgiving of small mistakes
- Spinach – Easy to grow and packed with nutrients
- Basil – Loves hydroponic setups and grows quickly
- Mint – Grows almost too well, so keep an eye on it
- Strawberries – A bit more advanced but very rewarding
- Tomatoes – Need more support and nutrients but grow well with a drip system
- Peppers – Similar to tomatoes, need patience but give great results
- Kale – Hardy and easy to manage indoors
Leafy greens and herbs are the best starting point since they grow fast, don’t need much space, and are pretty tolerant of small setup errors.
Managing Nutrients and pH Balance
This is one of the most important parts of hydroponic gardening, so let’s slow down here.
Plants need a mix of nutrients to grow well, including nitrogen, phosphorus, potassium, calcium, magnesium, and a handful of trace minerals. In soil, plants pull these from the ground naturally. In hydroponics, you have to add them yourself through liquid nutrient solutions made specifically for this kind of growing.
Buy a nutrient mix labeled for hydroponic use, not a regular soil fertilizer, since the formulas are different. Follow the mixing instructions closely, and don’t be tempted to add extra thinking it’ll help plants grow faster. Too much nutrient concentration can actually burn the roots and stunt growth.
Check your pH level every few days using a simple test kit or a digital pH meter. A pH between 5.5 and 6.5 works for most common plants. If it drifts outside that range, your plants may struggle to absorb nutrients even though the food is right there in the water around them.
Change your nutrient solution completely every one to two weeks, especially in smaller systems. This keeps the water fresh and prevents any buildup of salts or algae that could hurt your plants.
Lighting Tips for Indoor Hydroponics
If you’re growing indoors, lighting plays a huge role in how well your plants develop. Natural sunlight is great, but it’s not always strong or steady enough, especially in rooms with small windows.
LED grow lights are a popular pick because they use less electricity and produce less heat compared to older bulb types. Look for full-spectrum LED lights, since they mimic natural sunlight and support healthy growth from seedling to harvest.
Keep the lights close enough to give plants strong exposure, but not so close that they scorch the leaves. Most LED grow light setups include guidance on ideal distance based on wattage. As a general rule, leafy greens like a bit less intense light than fruiting plants like tomatoes or peppers.
Set a timer for your lights so plants get a consistent light schedule every day. Consistency helps plants grow steadily instead of getting confused by random light patterns.
Common Mistakes to Avoid
Even easy systems can run into trouble if a few key things go wrong. Here are common mistakes beginners make, so you can steer clear of them.
Ignoring pH levels. This is probably the biggest one. If pH drifts too high or too low, your plants can’t absorb nutrients properly no matter how good your nutrient mix is.
Overfeeding nutrients. More isn’t always better. Stick to the recommended dose on your nutrient bottle.
Not enough oxygen in the water. Roots need oxygen just like the rest of the plant. Without a working air pump in systems like DWC, roots can rot quickly.
Letting algae grow. Light hitting your nutrient reservoir can cause algae to grow, which competes with plants for nutrients. Keep your reservoir covered or use an opaque container to block light.
Inconsistent lighting. Random light schedules confuse plants and slow their growth. Stick to a steady daily routine.
Not cleaning the system. Leftover nutrient buildup or algae can clog pumps and tubes over time. Clean your system regularly to keep everything running smoothly.
Troubleshooting Common Problems
Sometimes plants show signs of stress, and it helps to know what’s going on.
Yellow leaves often mean a nutrient deficiency, especially nitrogen. Check your nutrient mix and make sure you’re feeding at the right strength.
Wilting plants can point to root rot from lack of oxygen, or a pH imbalance blocking nutrient absorption. Check both right away.
Slow growth might mean your light isn’t strong enough or isn’t running long enough each day. Try adjusting your light schedule or moving the light closer.
White, slimy roots usually signal root rot, often caused by low oxygen or dirty water. Clean the reservoir and boost aeration with a stronger air pump.
Stunted plants can be a sign of overfeeding. Cut back on nutrient concentration and give the plant time to recover.
Most issues in hydroponic gardening trace back to just three things: pH balance, nutrient levels, and oxygen supply. Once you get comfortable checking these regularly, your plants should stay healthy and strong.
Maintaining Your Hydroponic System Long-Term
Once your system is up and running, keeping it healthy doesn’t take much effort. A few simple habits go a long way.
Check water levels every day or two, especially in smaller reservoirs where water evaporates fast. Top off with fresh water as needed, and always keep an eye on nutrient concentration since removing plain water without adding nutrients back can throw off the balance.
Clean your entire system every few weeks, including tubes, pumps, and containers. This prevents algae buildup and keeps everything running smoothly.
Replace your nutrient solution completely on a regular schedule, roughly every one to two weeks, so plants always get fresh food instead of a diluted or unbalanced mix.
Watch your plants closely. They usually show early warning signs, like curling leaves or slow growth, before bigger problems appear. Catching these early makes fixing them much easier.
Final Thoughts
Hydroponic gardening might sound complicated at first, but once you break it down step by step, it’s actually one of the easiest and most rewarding ways to grow plants at home. You get faster growth, cleaner produce, and the ability to garden no matter what season it is outside.
Start small. Pick a simple system like Deep Water Culture, grow something forgiving like lettuce or basil, and learn the basics of pH and nutrients along the way. Once you get the hang of it, you can expand into bigger setups, try new plants, and even build a mini indoor farm right in your own home.
Growing without soil isn’t just a trend. It’s a smart, efficient way to garden, and once you try it, you might never go back to traditional dirt-based gardening again.

Hi, I’m Mary, the founder of GardenCure.com. I’m passionate about creating healthy, beautiful gardens and well-kept lawns. I share practical experience and trusted advice on garden and lawn gear that truly works. With the support of my dedicated research team, our writers produce honest, in-depth reviews using reliable, authentic sources—helping you choose the right tools with confidence for your outdoor space.