How to Store a Garden Hose?
A garden hose does a lot of work. It waters your flowers, fills up buckets, washes your car, and rinses off muddy boots. But once the job is done, most people just drop it on the ground and walk away. That one habit is the fastest way to ruin a good hose.
In this article
If you want your hose to last for many seasons instead of cracking, kinking, or turning into a tangled mess, you need a simple storage routine. The good news is that storing a hose the right way takes only a few minutes, and it does not require fancy tools or a big budget.
This guide walks you through every step, from draining the water to picking the best spot to keep it. By the end, you will know exactly how to store a garden hose so it stays soft, flexible, and ready to use the next time you need it.
Why Hose Storage Actually Matters
Before we get into the how, let’s talk about the why. A hose left in the sun, twisted on the lawn, or frozen outside during cold weather does not just look messy. It slowly falls apart.
Here is what happens when a hose is stored badly:
- Sun exposure breaks down the rubber or vinyl, making it stiff and prone to cracking.
- Water left inside can freeze in cold weather and split the hose from the inside out.
- Kinks and tight bends weaken the material at those spots, and weak spots turn into leaks.
- Rodents and bugs love to chew on hoses left flat on the ground, especially in storage sheds.
- Tangles waste your time and can damage the fittings when you yank too hard to untangle them.
None of this is hard to avoid. A little care after each use keeps your hose working like new for years.
Step 1: Turn Off the Water and Drain the Hose
The very first step, every single time, is to shut off the water at the spigot. Leaving the faucet on even a little bit keeps pressure inside the hose, and that pressure adds stress to the walls of the hose over time.
Once the water is off, disconnect the hose from the spigot. Now comes the part most people skip: draining out all the water inside.
To drain your hose:
- Hold one end up high, like near a fence post or your shoulder.
- Let gravity pull the water down and out the other end.
- Walk along the hose length, lifting sections as you go, so no water pockets stay trapped inside.
- If you have a hose reel, this step is even easier because reeling it up naturally pushes the water out.
Skipping this step is one of the biggest mistakes people make. Standing water inside a hose grows algae, gives off a musty smell, and freezes solid in cold weather. Frozen water expands, and that expansion can crack the hose wall or split the fittings at the ends.
Step 2: Let It Dry Before You Coil It
After draining, give the hose a few minutes to air out, especially the inside near the ends. A hose stored while still damp on the inside can develop a moldy smell over time, particularly if it sits in a closed bin or box.
You do not need to wait long. A quick five or ten minutes in open air is usually enough. If it is a sunny day, do not leave it out in direct sun for too long though, since long sun exposure is exactly what damages the material.
Step 3: Coil the Hose Without Kinks
Now for the main event: coiling. This is where technique really matters, because a hose coiled the wrong way develops kinks, and kinks are the number one cause of hose damage.
Here is the easy method that works for almost any hose:
- Start at the end connected to the spigot.
- Make a loop about two to three feet wide, laying it flat on the ground or over your arm.
- As you make each new loop, give the hose a slight twist in the same direction the hose naturally wants to curve. Most hoses have a memory from being on a reel or in a coil shape, so let it follow that natural curve instead of fighting it.
- Keep the loops even in size, stacking them like a rope coil a sailor would make.
- Finish at the far end and tuck the nozzle or end fitting into the coil so it does not dangle and catch on things.
If your hose keeps twisting into figure-eight shapes no matter what you do, try the “over-under” coiling method used by cable and rope handlers:
- Make one loop clockwise.
- Make the next loop counter-clockwise, with a small twist to flip it.
- Alternate back and forth.
This over-under method cancels out the twisting tension built into the hose, so it lies flatter and stores more neatly. It takes a little practice, but once you get the hang of it, your hose will coil up smooth every single time.
Step 4: Pick the Right Storage Spot
Where you keep your hose matters just as much as how you coil it. The goal is a spot that is shaded, dry, and off the ground.
Good storage spots
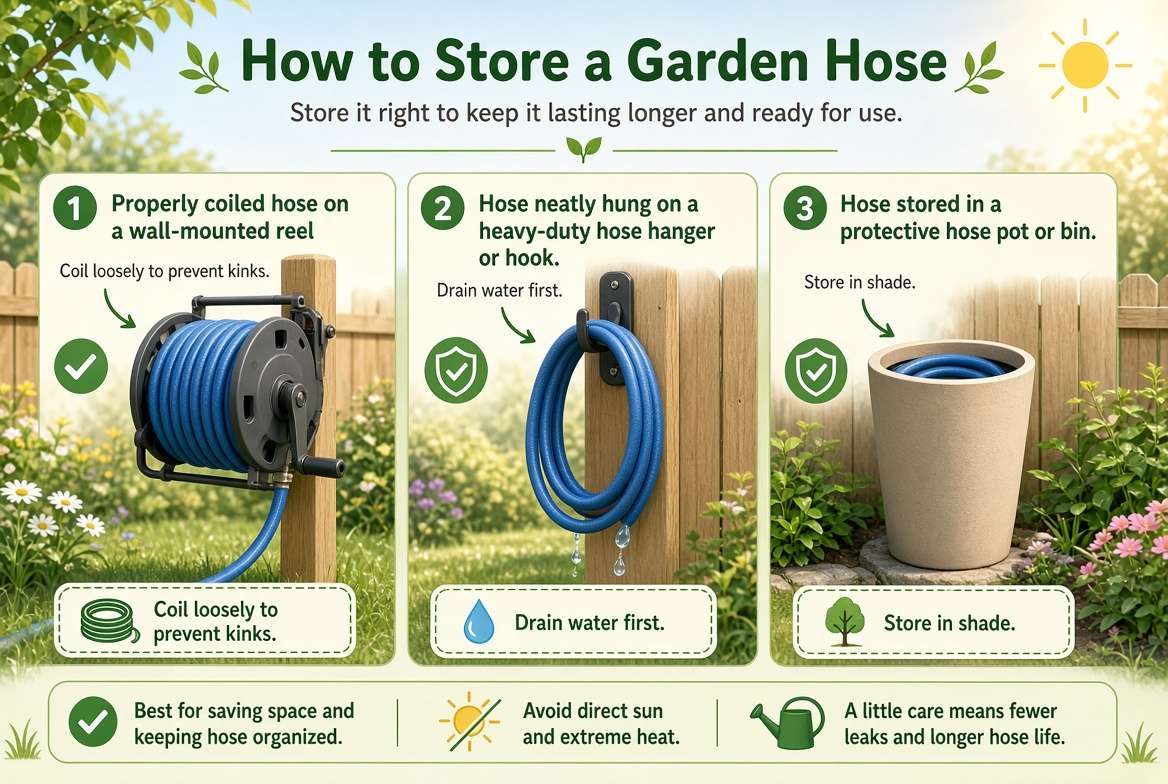
- A hose reel or hose cart – these are built exactly for this job and make winding and unwinding effortless.
- A wall-mounted hose hanger – a simple hook or bracket keeps the coil off the dirt and out of the way.
- A storage box or hose pot – decorative pots designed to hide the hose look tidy on a patio and protect it from sun.
- A garage shelf or shed hook – as long as it is out of direct sunlight and away from sharp tools that could nick the hose.
Spots to avoid
- Direct sunlight for long stretches, since UV rays dry out and crack the material.
- Flat on the lawn or driveway, where it can be run over, stepped on, or chewed by animals.
- Near sharp-edged tools like rakes or shovels that could puncture it.
- Right next to a heat source such as a furnace vent, since heat speeds up material breakdown just like sun does.
A hose reel is probably the easiest upgrade you can make if you use your hose often. It keeps the hose evenly wound, prevents kinks automatically, and saves you the daily coiling routine. For occasional use, a simple wall hook works just fine and costs very little.
Step 5: Protect the Hose in Cold Weather
If you live somewhere that gets freezing temperatures, cold weather storage needs a bit more attention. Water left inside a hose during a freeze will expand as it turns to ice, and that expansion can crack the hose or damage the brass fittings at the ends.
Follow these steps before the cold season sets in:
- Disconnect the hose from every spigot, sprinkler, or attachment.
- Drain it completely using the lifting method from Step 1.
- If you have an air compressor, blow out any leftover moisture from inside, especially near the fittings.
- Coil the hose and store it indoors, in a garage, shed, or basement where it will not freeze.
- Do not forget to also shut off the outdoor spigot itself and drain that line if your home has that kind of shutoff valve. This protects the pipe as well as the hose.
Vinyl hoses tend to get stiff and brittle in cold weather even without water inside, so bringing them indoors is the safest bet. Rubber hoses handle cold a little better, but indoor storage is still the smart move if you have the space.
Different Storage Options Compared
Not every yard or budget calls for the same setup. Here is a quick rundown of common storage methods so you can decide what fits your space best.
Wall-mounted hangers are cheap, easy to install, and keep the hose visible and ready to grab. They work great for small yards or anyone who waters often. The downside is that the hose still hangs in loops that can sag over time if it is a heavy hose.
Hose reels (either fixed or on wheels) wind the hose neatly around a spool. They prevent kinks better than any other method and make reeling out a long hose much faster. They cost more than a basic hanger but are worth it if you have a large yard or a long hose.
Hose pots and decorative storage bins hide the hose from view, which is nice if you care about how your patio or garden looks. They protect against sun exposure too. The trade-off is that you still need to coil the hose by hand before placing it inside.
Retractable hose reels pull the hose in automatically at the push of a button or a light tug. They are the most convenient option and almost eliminate tangling entirely, though they come at a higher price point.
Simple ground coiling in a shaded spot costs nothing extra but offers the least protection. It works fine as a short-term solution, but it is not the best long-term habit if you want your hose to last.
Think about how often you use your hose, how much space you have, and how much you want to spend, then pick whichever method matches your daily habits. The best storage system is the one you will actually use every time, not just the fanciest one sitting unused in a box.
Common Mistakes to Avoid
Even with good intentions, a few habits sneak in and shorten the life of a hose. Watch out for these:
- Leaving the nozzle attached and closed. This traps water and pressure inside the hose, especially in heat, which can weaken the walls over time.
- Dragging the hose across rough concrete or gravel. This wears down the outer layer and can create small cuts that turn into leaks.
- Storing it near chemicals. Fumes from paint, gasoline, or fertilizer stored nearby can degrade rubber and vinyl hoses.
- Ignoring small leaks. A tiny drip at a fitting only gets worse with time. Tighten or replace the washer before storing it away.
- Using the wrong size loops. Coiling a hose too tightly stresses the material and encourages kinks the next time you use it.
Fixing these small habits makes a bigger difference than most people expect.
Quick Maintenance Checks Before You Store It
While you are draining and coiling your hose, take thirty extra seconds to check for problems. This little habit catches issues early, before they turn into a bigger repair or a wasted hose.
- Look at both ends for cracks, rust, or stripped threads.
- Check the rubber washer inside the female fitting and swap it out if it looks worn or flat.
- Run your hand along the length of the hose to feel for soft spots, bulges, or cracks.
- Wipe off dirt and grass clippings with a damp cloth so grime does not build up during storage.
A hose that gets this kind of quick check each time will show problems early, giving you a chance to fix them before they turn into a bigger leak or a full hose replacement.
How to Store a Hose You Rarely Use
If you only bring out the hose a few times a season, long-term storage calls for a bit more care than your weekly coil-and-hang routine.
- Drain it completely and let it dry fully, inside and out, before packing it away.
- Coil it loosely rather than tightly, since a hose left in a tight coil for a long stretch of time can develop a permanent kink.
- Store it in a cool, dry spot away from sunlight and away from any rodents that might chew on it.
- Keep it off concrete floors if possible, since concrete can hold moisture and cause the hose to sit in a damp spot for weeks at a time.
- Check on it once in a while during long storage stretches, just to make sure nothing chewed through it or nothing is leaking.
A hose stored this way, even for a long stretch, should come out ready to use with barely any prep needed.
Final Thoughts
Storing a garden hose well is one of those small chores that pays off in a big way. It takes just a few extra minutes after each use, but it protects your hose from cracks, kinks, sun damage, and freezing, all things that would otherwise force you to buy a new one far sooner than you’d like.
Drain it, let it dry, coil it without twisting, and tuck it away in a shaded, dry spot. Add a hose reel or wall hanger if you want to make the whole process even easier. Follow these simple habits, and your hose will stay flexible, leak-free, and ready to go every time you turn on the water.
A little care today means one less trip to the store later, and a garden hose that keeps doing its job season after season.

Hi, I’m Mary, the founder of GardenCure.com. I’m passionate about creating healthy, beautiful gardens and well-kept lawns. I share practical experience and trusted advice on garden and lawn gear that truly works. With the support of my dedicated research team, our writers produce honest, in-depth reviews using reliable, authentic sources—helping you choose the right tools with confidence for your outdoor space.