How to Use Grass Seed on Existing Lawn?
Your lawn doesn’t have to look like a patchy, thin mess anymore. You can fix those bare spots and dead areas with grass seed. The good news? It’s easier than you think. Whether you have a big yard or a small patch of grass, you can reseed your lawn and bring it back to life.
In this article
This guide walks you through everything you need to know about seeding an existing lawn. We’ll cover the basics, the tools you need, and the exact steps to follow. By the time you finish reading, you’ll feel confident enough to tackle your lawn improvement project.
Why Overseed Your Lawn?
Before we dive into the how, let’s talk about why you should overseed in the first place.
Your lawn gets beat up over time. Foot traffic wears it down. Weeds move in. Heat, cold, and drought all stress your grass. Once grass gets damaged or dies, it doesn’t come back on its own. That’s where overseeding comes in.
Overseeding means adding grass seed to an existing lawn. It fills in the gaps. It thickens up thin areas. It helps your grass crowd out weeds because there’s less space for them to grow.
Think about it this way: a thick, healthy lawn is like a fortress. Weeds can’t invade because there’s no room. Diseases have a harder time taking hold. Your grass stays green and strong.
Here are the main reasons to overseed:
Bare patches and dead spots – These happen everywhere. Dog damage. Heavy foot traffic. Disease. Seed solves this problem.
Thin turf – If you can see soil when you look at your lawn, it’s too thin. Overseeding makes it denser and healthier.
Weed control – Thick grass beats weeds every single time. When you fill in those gaps, weeds have nowhere to settle.
Lawn renewal – Sometimes your lawn just needs a refresh. New seed brings new life to tired grass.
Better color – Fresh grass seed creates vibrant green growth. Your whole lawn looks younger and more vibrant.
The beauty of overseeding is that you don’t have to tear out your lawn and start over. You keep what’s good and add what’s missing.
When Should You Overseed?
Timing matters for grass seed success. You can’t just throw seed down anytime and expect results.
The best time to overseed depends on what type of grass you have. Cool-season grass grows in spring and fall. Warm-season grass grows in late spring and summer.
If you’re in a cooler climate with cool-season grass, overseed in early fall or spring. These seasons give seed the moisture and temperature it needs to grow strong. Your grass has time to establish before summer heat or winter cold arrives.
If you’re in a warmer climate with warm-season grass, overseed in late spring or early summer. This gives your new seed time to take root before it gets too hot.
The key is matching seed germination to active growth periods for your grass type. Seed won’t sprout and grow if conditions aren’t right. Cold-season seed planted in hot summer won’t work well. Warm-season seed planted in fall won’t germinate.
Check with your local cooperative extension service to find the exact best time for your area. They know your climate and can point you in the right direction.
One more timing tip: avoid overseeding right before summer or winter dormancy. Your new grass needs time to establish itself before extreme conditions hit.
How to Test Your Soil
Before you buy seed, test your soil. You need to know what you’re working with.
Soil testing tells you three important things: pH level, nutrient content, and texture. This info helps you pick the right grass seed and know if you need to add anything to the soil.
You can buy a cheap soil test kit from any garden store. Follow the instructions on the package. Most kits ask you to take samples from several spots in your yard, mix them together, and mail or drop them off at a testing lab.
Your test results come back with numbers and recommendations. You’ll see your pH (is your soil acidic or alkaline?), nutrient levels (nitrogen, phosphorus, potassium), and texture information.
Most grasses like soil that’s slightly acidic to neutral, with a pH between 6.0 and 7.0. If your soil is outside this range, your seed won’t germinate well.
If your test shows you’re missing nutrients, buy a basic lawn fertilizer. You can apply it before or after you overseed. Just follow the package directions.
Don’t skip this step. A soil test costs $15 to $30 and saves you money on wasted seed. It takes the guesswork out of lawn care.
Choosing the Right Grass Seed
This is crucial. Wrong seed = poor results. Right seed = lawn transformation.
You have two main options: a grass seed blend or a grass seed mix.
Grass seed blends contain multiple varieties of the same grass species. This is usually your best bet. Blends give you disease resistance and better performance in different conditions across your yard.
Grass seed mixes contain different grass species. These work when your lawn has different sun and shade areas. You get different grasses for different conditions.
To pick the right seed, you need to know:
What grass grows in your region? Your area has native grasses that thrive there. Don’t fight nature. Buy seed made for your climate zone. Check the USDA hardiness zones or ask at your local garden center.
How much sun does your lawn get? Sun-loving grasses need 6+ hours of direct sun. Shade-tolerant grasses work under trees. Most lawns have mixed sun and shade, so buy a blend made for that.
What’s your soil like? Some grasses love clay. Others prefer sandy soil or loam. Your soil test tells you what you have.
Do you have pets? Some grass varieties hold up better to pet traffic and damage than others. If you have dogs, buy dog-tough seed.
How much maintenance do you want? Some grasses need regular watering and feeding. Others are low-maintenance. Think about how much work you want to do.
Most garden centers sell seed packets with labels that say things like “full sun blend” or “shade mix” or “pet-proof grass.” Read these labels. They make the choice easy.
Don’t buy the cheapest seed you can find. Cheap seed often has low germination rates and lots of filler. Spend a bit more for quality seed. You’ll get better results.
Buy enough seed to cover your lawn. The package tells you how much area it covers. Measure your lawn first so you know how many bags you need.
Preparing Your Existing Lawn
Now comes the prep work. This step is what separates good results from bad ones.
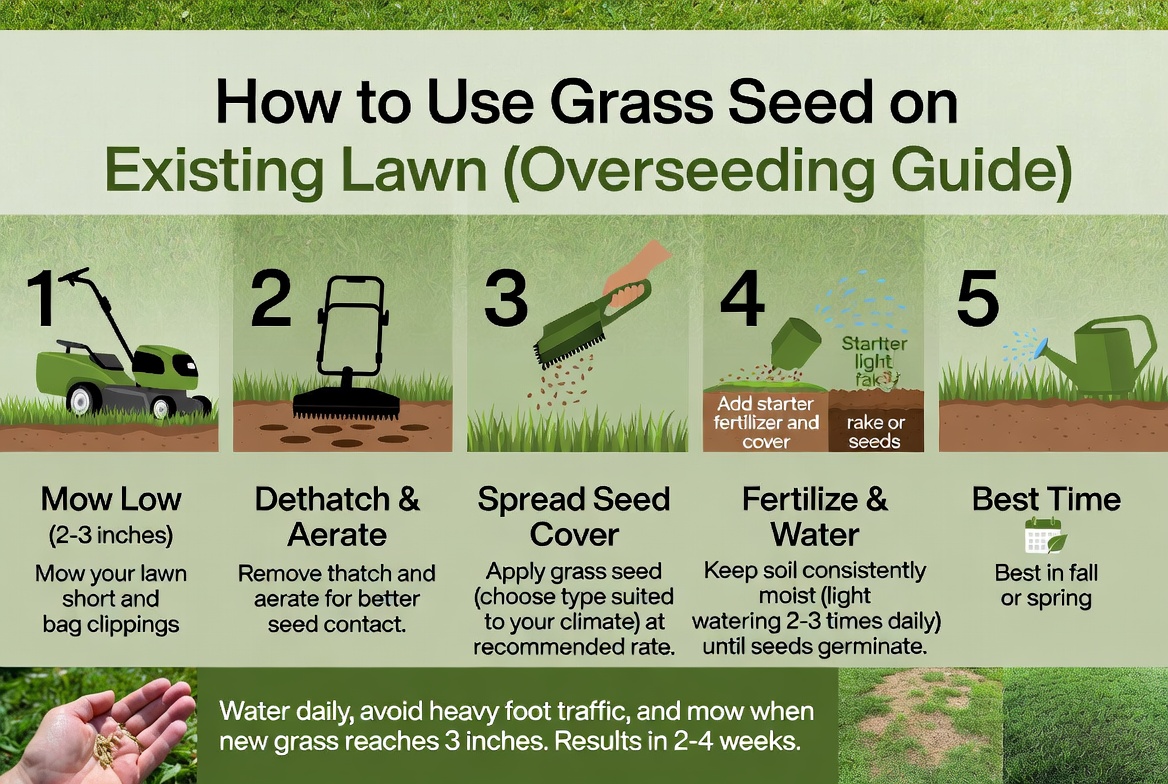
Start by mowing your lawn short. Cut it down to about 1 to 1.5 inches. Your grass should look stubby. This short cut lets seed make contact with soil, which is what it needs to germinate.
Use a rake to break up the soil surface. You’re trying to rough up the top layer so seed can settle in. Rake in different directions to get good coverage. You’ll see dead grass, sticks, and debris come loose. This is normal and good.
Don’t be afraid to rake hard. You want to create a rough, loose soil surface. Smooth soil doesn’t give seed the contact it needs.
Next, look for compacted areas. If soil is hard and dense, seed will struggle to take root. You can use a dethatcher or power rake to break this up. These machines pull out dead grass and loosen soil.
If you don’t have a dethatcher, you can skip this step for small areas. Just rake extra hard and dig into the soil with your rake tines.
Remove any obvious weeds before seeding. You don’t want established weeds competing with your new grass. Pull them by hand or treat with weed killer a week or two before seeding.
Clean up all the debris. You want bare, loose soil, not piles of dead grass and sticks. Sweep and rake until your lawn bed looks ready.
Water your lawn lightly. Moist soil helps seed germinate. But don’t make it soggy. Damp is the sweet spot.
Now your lawn is ready for seed. The soil is loose, moist, and clean.
How to Apply Grass Seed to Your Lawn
You have several ways to apply seed. Each method works. Pick what feels easiest for you.
Hand spreading – For small areas, grab a handful of seed and toss it around. Walk back and forth in lines to cover everything. It takes longer but works fine for patchy lawns.
Broadcast spreader – This tool looks like a fertilizer spreader. You fill the hopper with seed, set the spread rate, and walk across your lawn. The spreader throws seed out in a wide pattern. Fast and even coverage. Great for medium to large lawns.
Drop spreader – This tool drops seed in straight lines as you push it. No scatter pattern. More precise. Better for edged lawns where you don’t want seed in beds or sidewalks.
Slice seeder – This machine cuts grooves in the soil and drops seed right in. It’s the most expensive option but gives excellent seed-to-soil contact. Consider renting one for large lawns.
Whatever method you use, apply seed evenly. Walk in straight lines. Overlap your path a bit so you don’t miss strips.
Here’s a pro tip: divide your seed in half. Apply half walking north to south. Apply the other half walking east to west. This cross-pattern ensures even coverage.
Don’t overseed. More seed doesn’t equal better results. Too much seed means the seedlings compete with each other and produce weaker grass. Follow the package rate.
Getting Seed Into Soil Contact
Here’s something most people skip that actually matters: getting seed into contact with soil.
Seed doesn’t germinate sitting on top of dead grass or mulch. It needs to touch soil.
After you apply seed, lightly rake over the area. You’re not trying to bury the seed. You just want to press it into the soil and cover it slightly with soil.
Rake gently. One or two passes with light pressure is enough. Think of it as tucking the seed into bed, not digging holes.
An alternative is to roll the area after seeding. A lawn roller presses seed into soil contact without burying it too deep. Rent one from a garden center if you have a big lawn.
The goal is light contact. Seed germinates best in the top quarter inch of soil.
After this step, your seed is in position to grow.
Watering Your Seeded Lawn
Water is everything for seed germination.
You need to keep seeded areas moist for 2 to 3 weeks. This is the germination window. Seed needs consistent moisture or it won’t sprout.
Start watering right after seeding. Give your lawn a light watering. You want the top inch of soil wet, not drenched.
Water every day for the first week or two. Light, frequent watering works better than heavy, occasional watering. Think of gentle rain, not a downpour.
Early morning is the best time to water. The grass has all day to dry slightly before cool evening, which reduces disease risk. Evening watering leaves grass wet overnight, which invites fungal problems.
Use a gentle spray. Don’t blast seed with a hard stream. A oscillating sprinkler or impact sprinkler set on low is perfect.
After germination starts (usually 7 to 10 days), you can reduce watering frequency but increase the amount per watering. Your goal shifts to deeper, less frequent watering to encourage deep root growth.
By week 3, when your grass is up and growing, you can ease into normal lawn watering. Most lawns need 1 to 1.5 inches of water per week.
Consistency is key. Don’t let seeded areas dry out completely. But don’t waterlog them either. Moist is the goal.
If you don’t have an irrigation system, an inexpensive oscillating sprinkler does the job fine.
Keeping Off Your Seeded Lawn
This part is hard for some people: you need to stay off your new seeded lawn.
Don’t walk on it. Don’t let kids play on it. Don’t let pets run through it.
Foot traffic disrupts seed in soil. It compacts the soil and can wash out seed. Plus, people walking through can kick up dust and disturb everything you just set up.
Keep everyone off for at least 2 to 3 weeks. This gives seed time to germinate and seedlings time to develop roots.
Pets are especially hard on young seedlings. Dogs running through or digging can destroy your work. Keep pets away from seeded areas until grass is established and mowed twice.
Post a sign if you need to. “Seeding in progress – please stay off” works for neighbors and family.
We know this is tough when you have kids and pets. But this short window of staying off leads to success. It’s worth the inconvenience.
Once your grass is mowed a couple of times, you’re good. The seedlings have enough strength to handle some traffic.
Fertilizing Your New Seeded Lawn
Fertilizer helps new grass grow strong.
You can apply a lawn starter fertilizer right after seeding. Starter fertilizers are high in phosphorus, which promotes root development. This gives young seedlings a boost.
Follow the package directions. Most are applied at seeding time.
If you did a soil test before seeding, you already know if you need fertilizer. Your test results recommend what to apply.
Don’t over-fertilize. Too much fertilizer encourages disease and wastes money. Apply what the package says.
After about 4 weeks, once your new grass is established and mowed once, you can apply a regular lawn fertilizer if you want. But it’s not required. Many people skip this step.
Some folks prefer slow-release fertilizers that feed grass over time. Others like liquid fertilizers that work fast. Both work. Pick what’s convenient for you.
How Long Until You See Results?
Patience is part of seeding.
Most grass seed germinates in 7 to 10 days. You’ll see tiny green shoots coming up from the soil. It’s exciting!
By 2 to 3 weeks, the seedlings are visibly growing. They’re not grass yet, but they’re getting there.
At 4 weeks, your new grass is tall enough to mow. This is the big milestone. You can finally cut your lawn after seeding.
By 6 to 8 weeks, new grass is established. Roots have grown deep. Seedlings are becoming real grass plants.
By 3 months, most seeded areas look like normal lawn. The difference between old and new grass fades as everything blends together.
Don’t judge your results before 3 months. New seed takes time to establish and fill in.
Troubleshooting Common Seeding Problems
Sometimes things don’t go as planned. Here are common issues and how to fix them.
Seed didn’t germinate – Usually the soil was too dry or temperature was wrong. Next time water more often and seed during the right season for your grass type.
Thin, weak seedlings – Too much shade, poor soil, or too much foot traffic. Thin seedlings also happen if you applied too much seed. Thin seedlings often thicken up once established.
Fungal disease (white fuzzy growth) – You’re watering too often or at the wrong time. Reduce watering frequency. Water in early morning only. Better air circulation helps.
Weeds in seeded areas – Weeds grow fast. Don’t use pre-emergent weed killers before seeding. Once seedlings are established and mowed, you can spot-treat weeds.
Uneven coverage – You missed spots when applying seed or didn’t overlap your spreading pattern enough. Next time do the cross-pattern (north-south then east-west).
Seed washed away – Your watering was too strong or there was heavy rain. Use gentler water spray.
Bare spots still after seeding – Some areas might need a second seeding pass. Or those spots have poor soil that needs amendment. Test your soil in those areas.
Most seeding problems fix themselves over time. Patience and consistency work.
Tips for Seeding Success
Here are our best tips to make seeding work for you.
Do it in the right season – This is the biggest factor. Right time, right results. Wrong time, wasted effort.
Test your soil first – It costs little and tells you everything. This one step prevents most problems.
Use quality seed – Cheap seed is cheap for a reason. Invest in decent seed.
Prep your lawn thoroughly – Rough soil and good contact matter more than people think.
Water consistently – This is where most people fail. Consistent moisture is non-negotiable for germination.
Keep people and pets off – These few weeks are worth the inconvenience.
Be patient – Grass grows at its own pace. Three months is the real test, not three weeks.
Rake over bare spots twice – Once before seeding and once after to improve seed-to-soil contact.
Mark seeded areas – Use stakes or signs so people remember to stay off.
Monitor for disease – Adjust watering if you see fungal growth.
Overseeding Vs. Resodding
You might wonder: should I just replace my lawn with sod instead of seeding?
Overseeding is cheaper and works well for patchy lawns. You keep your existing grass and add new grass in gaps.
Sodding is faster but expensive. You’re buying mature grass and replacing entire lawn sections. It costs 5 to 10 times more than seeding.
Sodding makes sense if your lawn is mostly dead or you need instant results. Overseeding makes sense if you have decent grass with some problem areas.
Most people start with overseeding. It’s affordable and effective. Only move to sod if seeding doesn’t get the results you want.
Common Overseeding Mistakes to Avoid
Don’t be like most people who mess up seeding. Avoid these mistakes.
Seeding at the wrong time – This is number one. Wrong season = no germination. Know your grass type and local climate.
Skipping soil prep – Lumpy, compacted soil doesn’t work. Spend time prepping.
Not watering enough – Dry soil kills seed. This is a main reason seeding fails.
Walking on seeded areas – Foot traffic in the germination window destroys your work.
Using old seed – Grass seed loses viability over time. Buy fresh seed each season.
Applying seed too thick – More seed isn’t better. Overcrowding weakens seedlings.
Fertilizing wrong – Wrong fertilizer or too much causes problems. Test your soil first.
Expecting overnight results – Grass takes time. Rushing expectations leads to disappointment.
Not adjusting water as seedlings grow – Watering needs change. Don’t water the same at week 1 and week 4.
Mowing too short – Don’t cut your new grass short. Let it get 3 inches tall before mowing.
Final Thoughts
Overseeding your lawn is one of the best investments you can make. It costs way less than new sod. It improves your lawn’s health and appearance. It crowds out weeds naturally. And it’s simple enough for anyone to do.
The process is straightforward. Test soil. Pick the right seed. Prep your lawn. Apply seed. Water consistently. Stay off. Wait. Results come.
You don’t need fancy equipment or advanced skills. You need patience and consistency. Water every day for a few weeks. Keep people off. Let nature do its thing.
Before long, you’ll have a thicker, healthier, greener lawn. Those bare patches and thin spots disappear. Weeds have nowhere to grow. Your whole lawn looks younger.
Your neighbors will ask what you did. You’ll smile and tell them about seeding.
Start with small problem areas if you’re nervous. Prove to yourself it works. Then tackle your whole lawn next time.
Grab some seed this weekend. Prep your lawn Sunday. Start watering Monday. In three months, you’ll have a lawn you’re proud of.
That’s what overseeding does. It transforms patchy, thin grass into a lush, healthy lawn. And anyone can do it.

Hi, I’m Mary, the founder of GardenCure.com. I’m passionate about creating healthy, beautiful gardens and well-kept lawns. I share practical experience and trusted advice on garden and lawn gear that truly works. With the support of my dedicated research team, our writers produce honest, in-depth reviews using reliable, authentic sources—helping you choose the right tools with confidence for your outdoor space.