How to Build a Greenhouse?
So you want to grow your own fresh vegetables, beautiful flowers, or exotic plants all year long? A greenhouse might be exactly what you need. Building one isn’t as hard as you think. Let me walk you through everything you need to know.
In this article
Why You Should Build Your Own Greenhouse
Growing food in a greenhouse changes everything. You can start seeds earlier in spring. You can keep plants alive through winter. You can grow tomatoes when snow covers the ground outside.
Plus, building your own greenhouse saves you serious money compared to buying a pre-made kit. You get to customize every detail to fit your exact needs. Want it taller for climbing beans? Done. Need it wider for more growing beds? Easy.
The best part? You control the growing environment completely. Temperature, humidity, light — it’s all in your hands.
Types of Greenhouses You Can Build
Before you grab your tools, think about what kind of structure works best for your space and budget.
Hoop House Style
This is the simplest design out there. You bend metal or PVC pipes into arcs and cover them with plastic sheeting. It’s cheap, fast to build, and works great for season extension.
Many gardeners use hoop houses to protect crops from frost. They’re not fancy, but they get the job done. You can build a small one in a weekend.
Lean-To Greenhouse
Got a sunny wall on your house or garage? A lean-to greenhouse attaches to that existing structure. You only need to build three walls instead of four.
This design saves materials and shares heat from your house. It’s perfect for small yards or if you want easy access from your kitchen.
Freestanding Greenhouse
This traditional style stands alone in your yard. It gets sun from all sides, which means more light for your plants. You can make it any size you want.
Freestanding greenhouses need more materials and work. But they give you the most growing space and flexibility.
Cold Frame
Technically, this is a mini greenhouse. Cold frames are low boxes with transparent tops. They sit right on the ground and protect seedlings from cold weather.
Think of them as training wheels for greenhouse gardening. They’re super cheap to build from old windows or scrap lumber.
Finding the Perfect Spot
Location makes or breaks your greenhouse success. Let’s talk about where to put this thing.
Your greenhouse needs at least six hours of direct sunlight daily. Eight hours is even better. Morning sun warms up the space early. Afternoon sun keeps it warm longer.
Face the long side toward the south if you can. This captures maximum sunlight during winter when plants need it most.
Avoid placing your greenhouse under trees. Falling branches can damage the structure. Shade from trees blocks precious sunlight. Tree roots will invade your growing beds.
Check the drainage too. Water needs to flow away from the greenhouse foundation. Standing water leads to rot, mold, and foundation problems.
Stay away from windy spots if possible. Constant wind makes heating expensive and can damage lightweight structures. A natural windbreak like a fence or hedge helps a lot.
Keep your greenhouse close to water and electricity sources. Running a hose 200 feet gets old fast. You’ll want power for fans, heaters, and lighting.
Deciding on the Right Size
How big should you build it? Start by thinking about what you want to grow.
A small 6×8 foot greenhouse works fine for starting seeds and growing lettuce. You can build this size in a weekend with basic tools.
Medium greenhouses around 8×12 or 10×12 feet give you real growing space. You can fit benches on both sides with a walkway down the middle. This size suits most home gardeners perfectly.
Large greenhouses over 12×16 feet become serious food production centers. You can grow enough vegetables to feed a family year-round. But they cost more and take longer to build.
Remember to make your greenhouse tall enough. You need to stand up comfortably inside. Leave room above your head for hanging baskets and tall plants like tomatoes.
Plan for a door wide enough to fit a wheelbarrow through. You’ll be hauling soil, compost, and plants in and out constantly.
Gathering Your Materials
Let’s talk about what you’ll actually build this thing from.
Frame Materials
Wood is cheap and easy to work with. Cedar and redwood resist rot naturally. Pressure-treated lumber lasts forever but costs more. Regular pine works fine if you paint it well.
PVC pipe creates the easiest greenhouse frames. Cut it with a regular saw. Connect pieces with simple fittings. It won’t rot or rust. But it’s not super strong in heavy snow.
Metal conduit or EMT tubing makes sturdy frames. It bends nicely for hoop houses. Metal lasts basically forever and handles snow loads well.
Galvanized steel pipe builds the strongest greenhouses. Commercial growers use this stuff because it never quits. It costs more and needs power tools to cut.
Covering Materials
Plastic sheeting is your budget option. Greenhouse-grade polyethylene film lasts 3-5 years. It’s cheap to replace. UV-resistant film won’t break down in sunlight as fast.
Polycarbonate panels cost more upfront but last 10-15 years. They insulate better than plastic film. They come in rigid sheets that snap into frames. Twin-wall polycarbonate traps air for extra insulation.
Glass looks beautiful and lasts forever. Old windows work great for small greenhouses. But glass breaks easily, costs more, and is heavy to work with.
Corrugated fiberglass panels are tough and let light through. They handle wind and snow better than plastic film. They yellow over time but still work fine.
Foundation Options
You can skip a foundation for temporary plastic-covered hoop houses. Just anchor the frame to the ground with stakes or rebar.
Gravel bases work for most backyard greenhouses. Dig down a few inches. Fill with gravel. Tamp it flat. This provides drainage and a stable surface.
Concrete block foundations suit permanent structures. Stack blocks around the perimeter. No mortar needed for small greenhouses. Blocks keep wood frames off wet ground.
Poured concrete slabs create the ultimate foundation. They’ll outlast everything else. Pour them level with good drainage. But they’re overkill for most home greenhouses.
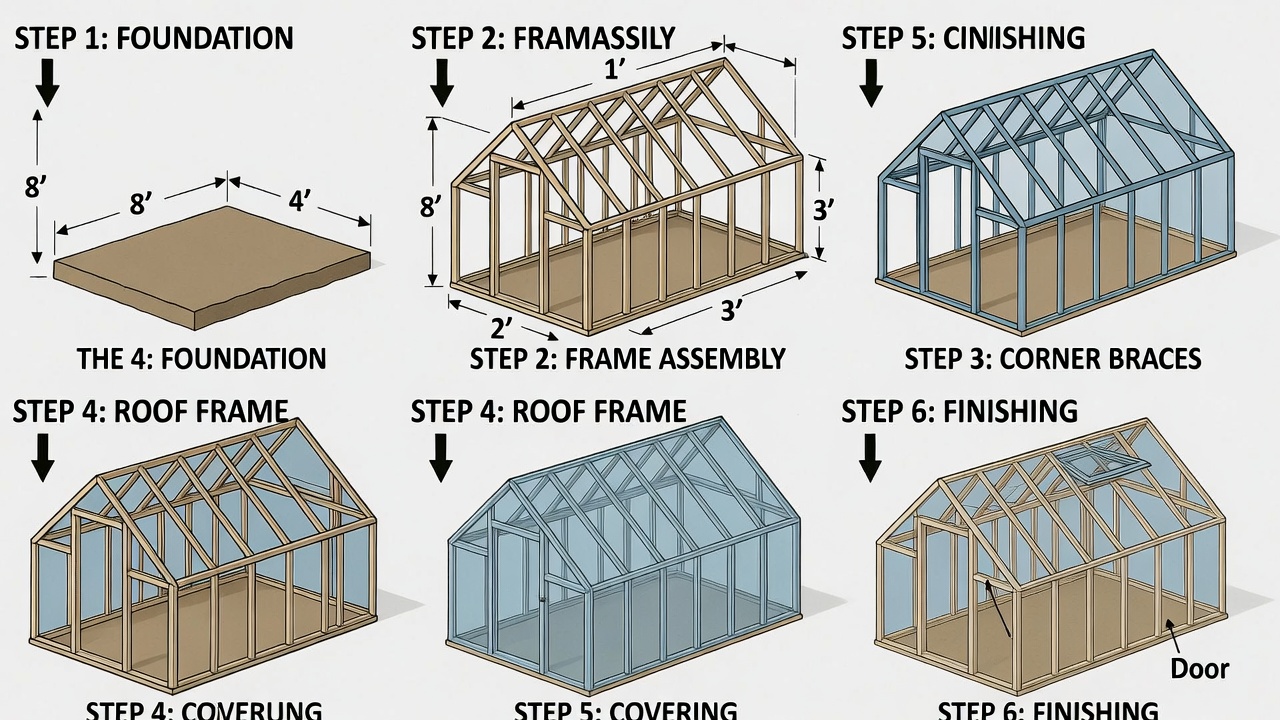
Building Your Greenhouse Step by Step
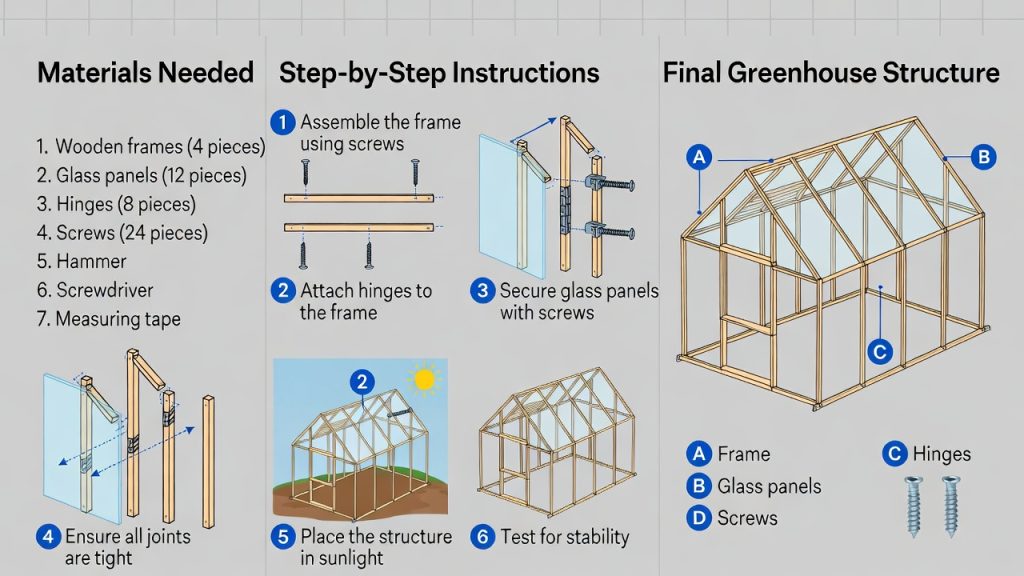
Ready to actually build this thing? Here’s how it goes down.
Step 1: Prepare the Ground
Mark out your greenhouse footprint with stakes and string. Make sure the corners are square. Measure diagonally from corner to corner — both measurements should match.
Level the ground as much as possible. Remove grass, weeds, and rocks. A flat base makes everything else easier.
If you’re pouring a foundation, dig the footings now. Follow local frost depth requirements. Nobody wants their greenhouse heaving up in spring.
Step 2: Build the Foundation
For a gravel base, dig down 4-6 inches. Lay landscape fabric to stop weeds. Fill with crushed gravel. Rake it level. Tamp it down hard.
For concrete blocks, dig a trench around the perimeter. Make it level. Set blocks in the trench. Check that they’re level both ways. Fill gaps with sand or gravel.
For pressure-treated lumber foundations, set 4×4 posts at each corner. Connect them with 2×6 or 2×8 boards. Anchor everything to the ground with rebar or stakes.
Step 3: Construct the Frame
Start with the base frame on your foundation. Square everything up before you attach pieces permanently.
Build the end walls next. Create door openings in one or both ends. Make the door at least 30 inches wide.
Erect the side walls or hoops. Space them evenly according to your plan. Plumb them straight up and down.
Connect everything with cross braces. The frame shouldn’t wobble at all when you shake it.
For hoop houses, bend your pipes carefully. Space them every 4 feet along the length. Attach them securely to the base rails.
Step 4: Add the Door
Build a simple door from 2×2 lumber covered with the same material as your walls. Use three hinges for stability.
Install a handle and latch that you can open from both inside and outside. You don’t want to get locked in your greenhouse.
Make sure the door swings freely and closes tight. Gaps around the door waste heat and let pests inside.
Step 5: Install the Covering
Start from one end and work toward the other. Pull plastic film or panels tight to avoid sagging.
For plastic film, secure it with battens (thin strips of wood) screwed over the edges. Or use wiggle wire in aluminum channels designed for greenhouses.
For polycarbonate panels, follow the manufacturer’s instructions. Leave room for expansion and contraction. Seal edges with appropriate tape.
Overlap seams properly to shed water. You want rain running down the outside, not leaking inside.
Step 6: Set Up Ventilation
Cut in roof vents or install automatic vent openers. Hot air rises and needs to escape. Without vents, your greenhouse becomes an oven on sunny days.
Add low side vents for cross-ventilation. Cool air enters low. Hot air exits high. This creates natural airflow.
Install screen over vents to keep bugs out. Nobody wants aphids infesting their tomatoes.
Step 7: Finish the Interior
Put down landscape fabric or cardboard on the floor. Cover with pea gravel, wood chips, or stepping stones. This controls weeds and mud.
Build or install growing benches at a comfortable working height. Leave space underneath for storage.
Run water lines to convenient locations. Install a frost-free faucet if you’ll use the greenhouse in winter.
Add electrical outlets for fans, heaters, and grow lights. Use GFCI outlets rated for damp locations.
Essential Greenhouse Equipment
Your empty greenhouse needs a few key items to function properly.
Thermometers
Get a min-max thermometer that records high and low temps. This tells you if your greenhouse is too hot or too cold when you’re not around.
Place thermometers at plant height, not up high where they’ll read warmer.
Heating System
Small electric space heaters work fine for hobby greenhouses. Get one with a thermostat so it runs only when needed.
Propane heaters put out good heat but create moisture and fumes. Vent them properly.
For large greenhouses, install a proper greenhouse heater sized to your space. This investment pays off in lower heating bills.
Cooling and Ventilation
Automatic vent openers use wax cylinders that expand when hot. They open vents with no electricity needed. These are fantastic.
Circulation fans keep air moving. This prevents hot spots and cold corners. It also strengthens plant stems.
Shade cloth reduces summer heat. Hang it inside or outside to block 30-50% of sunlight during the hottest months.
Watering System
A simple garden hose works for small greenhouses. Add a spray wand for gentle watering.
Soaker hoses or drip irrigation save time and water. Set them on timers to water automatically.
Install rain barrels to catch water from the greenhouse roof. Free water that’s already the right temperature.
Managing Your Greenhouse Environment
Building the greenhouse is just the start. Now you need to manage what happens inside.
Temperature Control
Most plants thrive between 65-75°F during the day. Nighttime temps can drop to 55-65°F without problems.
Tomatoes, peppers, and cucumbers like it warmer. Lettuce, spinach, and kale prefer cooler temps.
Open vents when temps climb above 80°F. Close them when it drops below 60°F in the evening.
Run heaters when nighttime temps will fall below 50°F. Insulate the north wall with bubble wrap for better heat retention.
Humidity Management
Greenhouses naturally have high humidity from watering and plant transpiration. Too much moisture causes mold and disease.
Improve airflow with fans. This moves humid air out through vents.
Water plants in the morning so leaves dry before evening. Wet leaves overnight invite fungal problems.
Space plants far enough apart for air circulation. Crowded plants stay damp and get sick.
Light Optimization
Clean your greenhouse covering regularly. Dirt and algae block significant light.
Paint interior surfaces white to reflect light onto plants. Every bit of extra light helps in winter.
Add grow lights if you’re starting seeds in late winter. Seedlings need strong light to grow stocky instead of leggy.
Rotate plants occasionally so all sides get equal light.
What to Grow in Your Greenhouse
The options are almost endless. Here are some favorites.
Spring Seedlings
Start tomatoes, peppers, eggplants, and other warm-season crops 6-8 weeks before your last frost. They’ll be ready to transplant outside when the weather warms up.
Grow cool-season crops like broccoli, cabbage, and cauliflower from seed. These handle light frost.
Summer Crops
Heat-loving plants thrive in greenhouses. Tomatoes produce like crazy with consistent warmth. Cucumbers climb trellises and fruit heavily.
Peppers of all types love greenhouse heat. They’ll produce earlier and longer than outdoor plants.
Basil, cilantro, and other herbs grow fast in the warm, protected environment.
Fall and Winter Growing
Lettuce and salad greens grow through winter with minimal or no heat. Cut them regularly and they keep producing.
Spinach and kale handle cold well. They’ll slow down but keep growing during short winter days.
Asian greens like bok choy, mizuna, and tatsoi tolerate cold and mature quickly.
Carrots, radishes, and other root crops grow fine in unheated greenhouses if started early enough in fall.
Year-Round Favorites
Herbs like parsley, cilantro, and chives grow continuously in greenhouses. Snip what you need for cooking anytime.
Strawberries in pots produce fruit earlier and stay productive longer under cover.
Dwarf citrus trees fruit in greenhouses where they’d freeze outside. Lemons, limes, and kumquats all work well.
Common Problems and Quick Fixes
Every greenhouse grower faces these issues eventually.
Overheating
Your greenhouse bakes on sunny spring days even when it’s cold outside. The solution is better ventilation.
Install more vents or bigger ones. Add shade cloth. Run fans. Open doors on nice days.
Excessive Humidity
Dripping condensation and moldy plants mean your humidity is too high. Increase air circulation dramatically.
Add more vents. Run fans constantly. Water less frequently. Space plants farther apart.
Pest Invasions
Aphids, whiteflies, and spider mites love greenhouses as much as your plants do. Catch them early before they explode.
Inspect plants weekly. Spray strong streams of water to knock pests off. Release beneficial insects like ladybugs.
Use insecticidal soap for serious infestations. Avoid harsh chemicals in enclosed spaces.
Algae Growth
Green slime on floors, benches, and pots looks gross and harbors disease. It means too much moisture and not enough drainage.
Improve drainage. Let surfaces dry between waterings. Scrub algae off with vinegar solution.
Temperature Swings
Wild fluctuations from too hot to too cold stress plants. This happens in small greenhouses without thermal mass.
Add water barrels painted black to absorb and release heat. Insulate the north wall. Use automatic vent openers that respond faster than you can.
Maintaining Your Greenhouse
Take care of your structure and it’ll take care of your plants for decades.
Clean the covering inside and out at least twice yearly. Spring and fall work well. Use mild soap and water. Rinse thoroughly.
Inspect the frame for damage after storms. Tighten loose bolts. Replace broken pieces promptly.
Check seals and caulking around doors and vents. Repair gaps that waste heat or let rain in.
Oil door hinges and vent mechanisms so they operate smoothly.
Remove old plants and debris regularly. Clean up fallen leaves. This reduces pests and diseases.
Disinfect benches and pots between crops. A diluted bleach solution kills most pathogens.
Repair or replace covering material before it fails completely. Don’t wait until a storm shreds worn-out plastic.
Expanding Your Skills
Once you’ve mastered basic greenhouse growing, try these advanced techniques.
Season Extension
Use your greenhouse to stretch growing seasons at both ends. Start plants earlier in spring. Keep them alive later into fall.
Even an unheated greenhouse adds 4-6 weeks to your growing season. A heated one lets you grow year-round.
Succession Planting
Sow new crops every few weeks. This gives you continuous harvests instead of feast-or-famine.
Plant quick-maturing crops like lettuce every two weeks. You’ll always have fresh greens ready to pick.
Soil Building
Compost right in your greenhouse during winter. The enclosed space stays warmer and breaks down materials faster.
Add worm bins to process kitchen scraps into fantastic fertilizer.
Build raised beds filled with quality soil mix. This gives you perfect growing conditions.
Grafting
Graft tomatoes onto disease-resistant rootstock for vigorous, productive plants.
Try grafting different pepper varieties onto one root system for variety in small spaces.
Hydroponics
Grow plants in nutrient solution instead of soil. This eliminates soil-borne diseases and often increases yields.
Start simple with containers of nutrient solution. Work up to more complex systems as you learn.
Final Thoughts
Building a greenhouse transforms your gardening completely. You’ll grow food when neighbors can’t. You’ll enjoy fresh tomatoes and herbs all winter. You’ll wonder how you ever gardened without one.
Start small if you’re not sure. Build a simple hoop house or cold frame first. Learn the basics. Then upgrade to something larger.
The hardest part is taking that first step. Once you start building, everything falls into place. Your future self will thank you every time you pick fresh salad in the middle of winter.
So grab your tools, pick a sunny spot, and start building. Your greenhouse adventure begins today.
The plants are waiting. The seasons don’t matter anymore. You’re about to become a year-round gardener.
Get out there and make it happen.

Hi, I’m Mary, the founder of GardenCure.com. I’m passionate about creating healthy, beautiful gardens and well-kept lawns. I share practical experience and trusted advice on garden and lawn gear that truly works. With the support of my dedicated research team, our writers produce honest, in-depth reviews using reliable, authentic sources—helping you choose the right tools with confidence for your outdoor space.