How to Grow Potatoes in a Bag?
Growing your own potatoes is easier than you think. If you have limited space, a sunny spot, and a bag, you can produce fresh potatoes at home. This guide walks you through every step of container gardening with potatoes.
In this article
Why Grow Potatoes in a Bag?
You don’t need a big garden to grow potatoes. A bag can sit on your patio, balcony, or deck. This method works great for small spaces.
Benefits of bag gardening:
- Takes up minimal space
- Easy to manage and harvest
- No digging in the ground needed
- Perfect for renters who can’t dig up their yard
- Less pest pressure than traditional gardens
- You control the soil quality
- Great for teaching kids about growing food
- Saves your back from bending over
Bags are also cheap. You can start with five to ten dollars. Many people use potato growing bags, but burlap sacks, large plastic bags, or even old cloth bags work fine too.
What You’ll Need to Get Started
Before you begin, gather your supplies. The good news is you probably have some of these items at home already.
The Bag
Your bag needs to hold soil and water. Thick plastic bags work best. Dedicated potato growing bags are great, but they cost more. Look for bags that are at least five gallons in size. Bigger bags mean bigger potato crops.
Burlap sacks are another solid choice. They let water drain well and break down slowly over time. You can also use large plastic pots, cloth bags, or even old laundry baskets with plastic liners.
One key rule: make sure your bag has drainage holes at the bottom. Without drainage, your potatoes will rot.
Seed Potatoes
You need seed potatoes, not regular grocery store potatoes. Grocery store potatoes may carry diseases. Seed potatoes are grown specifically to be disease-free and ready to grow.
Buy seed potatoes from:
- Garden centers
- Online seed suppliers
- Farmers markets
- Trusted local nurseries
Seed potatoes are small whole potatoes or pieces about the size of an egg. One seed potato produces multiple new potatoes underground.
How many do you need?
For a five-gallon bag, use one seed potato. For bigger bags, use two or three. Space them out so they’re not touching.
If your seed potato is really large, you can cut it into pieces. Each piece needs at least two “eyes” (the little bumps where sprouts grow). Let the cut pieces dry for a day before planting. This stops rot.
Soil Mix
Don’t use dirt from your yard. Garden soil is too heavy and may contain disease. Bag gardening works best with light, fluffy growing mix.
Mix together:
- Potting soil or seed-starting mix
- Compost or aged manure
- Perlite or coarse sand
A good ratio is three parts potting soil, one part compost, and one part perlite. This mix drains well but holds enough moisture for potato growth.
You’ll need about ten to fifteen gallons of soil mix per five-gallon bag. That sounds like a lot, but you’ll add soil in layers as the potatoes grow.
Other Supplies
You also need:
- A place with full sun (at least six hours daily)
- Water source nearby
- A trowel or shovel
- Ruler or measuring tape
- Optional: fertilizer for potatoes
That’s really it. Keep it simple.
Choosing Your Potato Variety
Different potatoes grow at different speeds. Some are waxy and great for salads. Others are starchy and perfect for mashing.
Fast-Growing Varieties
- Early potatoes: ready in 50-70 days
- Good varieties: Red Norland, Irish Cobbler, Yukon Gold
- These are best for beginners
Late-Season Potatoes
- Take 80-120 days to mature
- Larger yields
- Better for storage
- Russet, Katahdin, and Kennebec are popular choices
For your first try, pick an early variety. You’ll harvest sooner and feel success faster.
Step-by-Step Planting Guide
Now let’s plant. This is where the real fun starts.
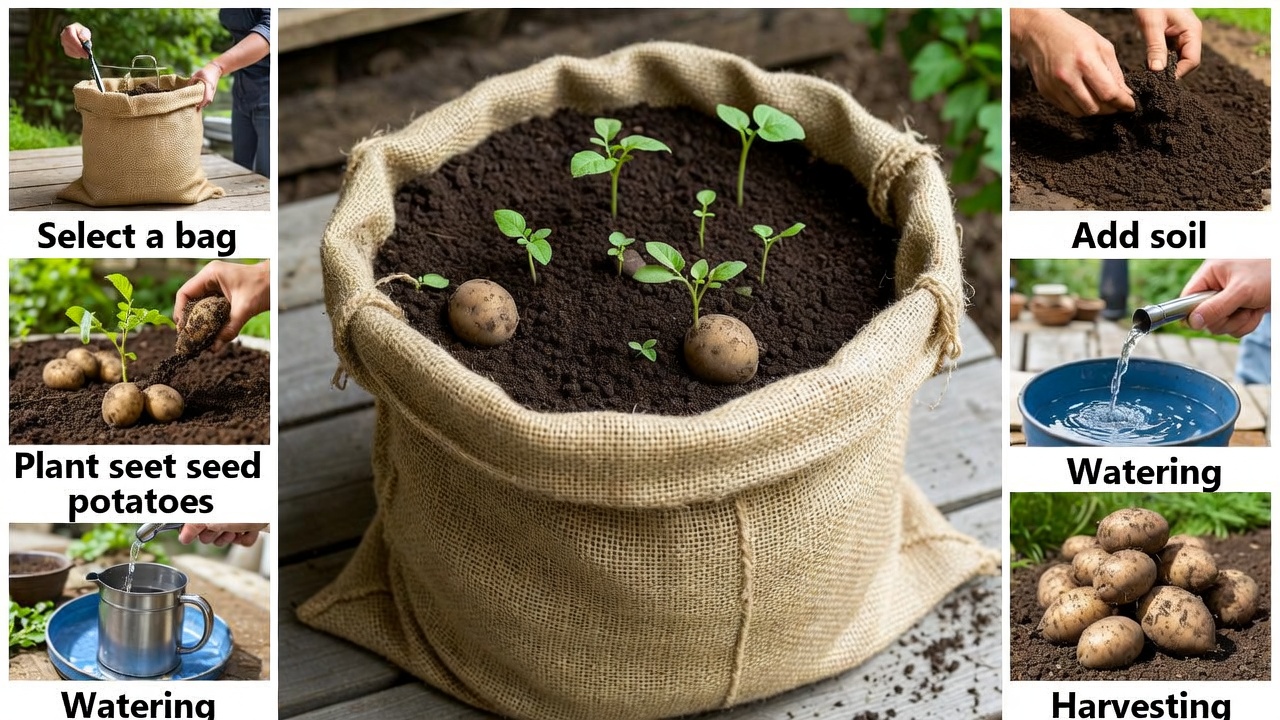
Step 1: Prepare Your Bag
Place your bag in its final location. Moving a full, wet bag is hard work. Set it somewhere with six to eight hours of direct sunlight daily.
If your bag doesn’t have drainage holes, poke holes in the bottom with a knife or drill. Make three to five holes.
Add a few inches of your soil mix to the bottom. This gives seed potatoes something to sit on.
Step 2: Plant Your Seed Potatoes
Place seed potatoes on the soil layer with the eyes facing up. Space them evenly across the bag.
Cover with four to six inches of soil mix. Press gently so the soil makes contact with the seed potatoes.
Water thoroughly until water drains from the bottom. The soil should be moist like a wrung-out sponge.
Step 3: Wait for Sprouts
Seed potatoes need cool, moist soil to sprout. In about two to three weeks, you’ll see green shoots pushing through the soil. This is exciting.
Keep the soil moist during this waiting period. Check daily with your finger. If the top inch feels dry, water again.
Step 4: Add More Soil (First Earthing Up)
When shoots are about six inches tall, add another four to six inches of soil over the top. This process is called “earthing up.”
Bury most of the stems. Leave just the top leaves showing above the soil. This step is crucial. It encourages potatoes to form along the buried stem.
Water well after earthing up.
Step 5: Keep Growing
Now your job is simple. Water regularly and watch your potatoes grow.
Check soil moisture every two to three days. The soil should stay moist but not waterlogged. In hot weather, you might water daily.
As the plants grow taller, keep earthing up. Every time plants get six inches taller, add another layer of soil. Stop when the bag is nearly full or when the plants reach the top of the bag.
Step 6: Fertilize (Optional but Helpful)
Potatoes are hungry plants. If you use store-bought potting soil, it may lack nutrients.
Fertilize every two to three weeks with a balanced plant food. Follow the label directions. Too much fertilizer causes big plants but small potatoes.
Compost is a gentler option. Mix compost into your soil layers as you earth up.
Caring for Your Potato Plants
Growing potatoes in bags is low-maintenance, but a few care tips help you get bigger harvests.
Watering
Water is the most important thing. Potatoes need consistent moisture. They prefer steady water rather than feast-or-famine watering.
In cool weather, water every three to four days. In hot weather, water daily or every other day.
Signs of underwatering:
- Leaves look droopy
- Soil pulls away from bag sides
- Dry soil when you check
Signs of overwatering:
- Soggy, smelly soil
- Yellow leaves
- Fungal problems
Aim for the middle ground. Moist is good. Soggy is bad.
Sunlight
Put your bag where it gets six to eight hours of direct sun daily. More sun means bigger plants and more potatoes.
If you only have a partly sunny spot, don’t worry. Potatoes are flexible. Even four to five hours of sun will produce potatoes, just smaller ones.
Temperature
Potatoes grow in cool to moderate temperatures. They like it between 60 and 70 degrees. Hot temperatures above 80 degrees slow their growth and reduce yields.
If your climate is very hot, place the bag in afternoon shade to keep it cooler.
Pests and Diseases
The good news: bags usually have fewer pests than gardens.
Common problems:
- Potato beetles: Hand-pick them or use neem oil spray
- Aphids: Spray with water or insecticidal soap
- Powdery mildew: Space plants for air flow, avoid overhead watering
- Late blight: Water at soil level, remove infected leaves immediately
Most bags escape serious pest issues. The high soil means fewer ground pests reach your potatoes.
When to Stop Watering
About two weeks before harvest time, reduce watering. Let soil dry out a bit. This toughens the potato skin and makes harvesting easier.
How to Tell When Potatoes Are Ready
Timing depends on your potato variety. Check your seed potato label for days to maturity.
Early potatoes: ready in 50-70 days
Late potatoes: ready in 80-120 days
You can harvest early if you want small new potatoes. Just reach into the soil and pull some out carefully. The plant keeps growing and making more potatoes.
Signs Your Potatoes Are Mature
- Plants flower and then flowers fade
- Leaves yellow and start to die back
- Stems look leggy and weak
- Soil stops getting heavier as you water
The Potato Peekaboo Test
Want a sneak peek? Carefully reach into the soil and feel around for potato size. Don’t pull the whole plant. Just see how big things are getting.
Some people do this at the 60-day mark to check progress.
Harvesting Your Potatoes
This is the payoff moment. Harvesting is simple and satisfying.
When the Plant Is Fully Mature
Wait until the plant looks mostly dead. Most of the leaves are yellowed or brown. This means the potatoes finished growing and the skins are thick.
How to Harvest
Tip the bag over. Dump the contents onto a tarp or into a large bin. Get your hands in there and feel around for potatoes.
They’re usually round or oval lumpy shapes. They don’t hurt to touch. Pull them out gently.
Keep the soil in a pile. You can reuse it next season.
Spread harvested potatoes on newspaper to dry for a few hours. Brush off loose soil.
How Much Can You Get?
A five-gallon bag with one seed potato usually gives you five to ten pounds of potatoes. A larger bag with two seed potatoes might give you fifteen to twenty pounds.
Results vary based on sunlight, water, and soil quality. Don’t stress if your first try produces less. You’ll learn and do better next time.
Storing Your Potatoes
Fresh homegrown potatoes taste amazing. Store them right to keep them longer.
Storage tips:
- Keep them cool and dark
- A temperature of 45-50 degrees is ideal
- Don’t wash them until you’re ready to eat them
- Keep them in a breathable container, not a sealed bag
- Remove any with green spots before storage
- A dark cupboard or basement works great
Properly stored potatoes keep for two to three months. Some varieties store longer.
Troubleshooting Common Problems
Potatoes Have Green Skin
Green means they got too much sunlight. Earth up more soil to cover them. Green potatoes contain toxic compounds and aren’t safe to eat.
Prevent this by keeping exposed potatoes buried under soil.
Small Potatoes
Small potato production happens when:
- Not enough sunlight
- Inconsistent watering
- Too much crowding (too many seed potatoes in one bag)
- Poor soil quality
Next time, use one seed potato per five gallons and add compost to your mix.
Mushy, Rotting Potatoes
Rot means too much water. Let the soil dry out between waterings. Make sure drainage holes work properly.
Check for soggy conditions before the problem starts.
Yellow Leaves Early in Season
This might mean nutrient deficiency. Add compost or fertilizer. Early yellowing can also mean too much water.
No Potatoes at All
If you harvest and find no potatoes, something went wrong early on. Possible causes:
- Seed potato was bad or diseased
- Not enough sunlight
- Terrible drainage and rot below soil surface
- Plant never got watered consistently
Troubleshooting is part of gardening. Even failures teach you something for next time.
Advanced Tips for Bigger Yields
Once you’ve grown potatoes successfully once, try these techniques.
Stack Multiple Bags
Stack two bags on top of each other. Plant in the bottom bag, and as it grows, set a second bag on top and fill it with soil. You get two growing zones in one spot.
This takes more space above but less floor space.
Use Bigger Containers
Five-gallon bags are fine, but bigger bags produce more. Ten-gallon bags, large plastic bins, or even food-grade drums work great.
More space means more soil, and more soil means more potatoes.
Try Different Varieties
Once you’re comfortable, grow multiple varieties at once. Early potatoes give you a quick harvest. Later potatoes give you bigger yields.
Some people grow three bags of early potatoes across the season. Stagger plantings two weeks apart for potatoes over several months.
Add Compost Between Layers
As you earth up, mix compost into your soil layers. This feeds plants steadily and improves soil structure.
Mulch the Top
A layer of straw or shredded leaves on top helps retain moisture and keeps the bag cooler. Pull back the mulch during earthing-up sessions.
Common Questions About Bag Potato Growing
Can I use regular grocery store potatoes?
You can try, but it’s risky. Grocery potatoes often carry diseases or have been treated with sprout inhibitors. Seed potatoes are clean and ready to grow. Spend a few extra dollars for seed potatoes.
What if I only have partial shade?
Potatoes still grow with four to five hours of sun. You’ll get a smaller harvest, but it works. More sun is always better if you have the choice.
Can I grow potatoes indoors?
Not really. Potatoes need real sunlight. A grow light might work, but it’s complicated and uses a lot of electricity.
How long until I can eat my potatoes?
Early varieties are ready in 50-70 days. Late varieties take 80-120 days. That’s roughly two to four months depending on what you plant.
Do I need fertilizer?
If you use quality potting soil with compost, you might not need extra fertilizer. If you use just potting soil, add fertilizer every two weeks. A light feeding is better than heavy feeding.
What temperature is too hot for potatoes?
Potatoes slow down above 80 degrees and struggle above 85 degrees. In very hot climates, afternoon shade helps.
Can I grow potatoes in bags indoors?
Potatoes need real outdoor sun. Indoor growing is very difficult.
What happens to the soil after harvest?
Save it! You can reuse the soil for next season. Mix in fresh compost to replenish nutrients, and it’s good to go again.
Getting Started Is Easy
Bag potato growing sounds complicated when you read about it. But the actual work is simple.
You need:
- A bag with drainage holes
- Good soil mix
- A seed potato
- Sunlight
- Water
That’s it. Really.
Plant your seed potato, water it, add soil as it grows, and harvest when it’s done. You’ll have fresh potatoes in a couple of months.
Your first attempt might not be perfect. That’s normal. Even imperfect results taste delicious when you grew them yourself.
Why Home Potatoes Taste Better
Store-bought potatoes are picked before fully ripe and sit in storage. Homegrown potatoes go from plant to plate in days or weeks.
The taste difference is real. Starch levels are higher. Flavor is fresher. Texture is creamier.
Once you taste homegrown potatoes, you’ll understand why people get obsessed with gardening.
Seasonal Growing Tips
Spring Planting
Spring is ideal. Soil is cool, and potatoes love it. Daylight increases every day, which helps plants grow strong.
Plant as soon as soil can be worked. In most places, that’s early spring.
Summer Growing
Summer heat challenges potatoes. Water more frequently. Provide afternoon shade if temperatures exceed 80 degrees consistently.
Many growers in hot climates shift to spring planting and early summer harvesting.
Fall Planting
You can plant potatoes again in late summer for a fall harvest. They’ll grow slower with less light, but it works.
This gives you a second crop in some climates.
Winter Regions
Cold climates only have one planting season in spring. Potatoes won’t survive freezing ground.
Store your harvest and enjoy it through fall and winter.
Your Next Steps
Ready to grow potatoes in bags? Here’s what to do:
- Get a bag and drainage holes ready
- Buy seed potatoes from a garden center
- Gather potting soil and compost
- Pick a sunny spot
- Follow the planting steps in this guide
- Water consistently
- Harvest and enjoy
Don’t overthink it. Start small with one bag. Learn from the experience. Next time, you’ll grow more bags or bigger containers.
Potato growing becomes a fun hobby that pays you back in delicious food.
Final Thoughts
Growing potatoes in bags is one of the easiest vegetable gardening projects you can do. Space isn’t an excuse anymore. You don’t need a big yard, perfect soil, or years of experience.
A bag, a sunny spot, and some water are all you need. In two to four months, you’ll be eating potatoes you grew yourself.
That’s pretty cool.
Start simple. Use one bag. Learn. Enjoy. Then scale up next time if you want.
Homegrown potatoes taste better than anything at the store. Your friends and family will be amazed when you tell them you grew them. Kids love seeing potatoes develop underground.
Bag gardening works for potatoes and opens doors to growing other vegetables too. Tomatoes, peppers, and carrots all grow well in containers.
But let’s focus on potatoes first. They’re forgiving, productive, and delicious.
Get your bag ready. Plant your seed potato. Water it. Watch it grow. Harvest your bounty.
Happy growing!

Hi, I’m Mary, the founder of GardenCure.com. I’m passionate about creating healthy, beautiful gardens and well-kept lawns. I share practical experience and trusted advice on garden and lawn gear that truly works. With the support of my dedicated research team, our writers produce honest, in-depth reviews using reliable, authentic sources—helping you choose the right tools with confidence for your outdoor space.