How to Change a Lawn Mower Blade?
Your lawn mower blade is one of the hardest working parts of your equipment. It spins fast and cuts through grass day after day. But like all tools, mower blades get dull and tired. When your blade stops cutting the way it should, it’s time to replace it.
In this article
The good news? You don’t need to be a mechanic to swap out your blade. In fact, changing a lawn mower blade is one of the easiest repairs you can do at home. This guide walks you through every step of the process.
Why Your Lawn Mower Blade Needs Changing
Before we get into the how, let’s talk about the why. Your mower blade does heavy work every single time you cut grass. It hits rocks. It collides with sticks. It gets bent, dented, and worn down.
A dull blade doesn’t cut clean. Instead, it tears the grass. This leaves your lawn looking ratty and brown at the tips. Torn grass also gets sick more easily. A proper blade cut keeps your grass healthy and green.
You’ll also notice other signs that your blade is ready for a change. Your mower might vibrate more than normal. It might make strange sounds. The engine could work harder to cut the same patch of grass. All of these are hints that it’s time for a new blade.
Replacing your blade keeps your mower running smooth. It makes your lawn look better. It also keeps your equipment from breaking down at the worst possible time.
Types of Lawn Mower Blades
Not all mower blades are the same. Before you buy a replacement, you need to know which type you have.
Push Mower Blades
Push mowers are the small, lightweight machines you push by hand. They have a single blade that sits under the mower deck. These blades are usually around 14 to 22 inches wide. They’re simple and straightforward to change.
Riding Mower Blades
Riding mowers are bigger machines that you sit on. They typically have two or three blades underneath. Each blade works on its own. If you own a riding mower, you might need to change multiple blades at once.
Reel Mower Blades
Reel mowers have a set of curved blades that roll. These work differently than rotary blades. If you have a reel mower, the process is a bit different. We’ll cover that later.
Rotary Blades
Most homeowners use rotary mowers. These have a flat blade that spins fast. The blade lies flat and rotates on a shaft. This is the most common type you’ll work with.
Getting the Right Replacement Blade
Before you even touch your current blade, you need to know what to buy. Using the wrong blade can damage your mower or cause it to work poorly.
Find your mower’s model number. Look on the side of the mower body or under the handle. You can also check the original paperwork that came with your mower.
Take a picture of this number and bring it to your local hardware store or lawn equipment shop. The staff can help you find the right replacement blade. You can also search online using your model number.
When you get your new blade, check that it has the same hole size as your old one. The mounting hole needs to fit perfectly on the shaft.
Some blades have a right side and a left side. Check your replacement to see if it’s directional. Your blade should have an arrow showing which way it spins.
Tools You’ll Need
The good news is that you probably have most of these tools already.
Essential tools:
- Socket wrench or open-end wrench (size depends on your mower)
- Spark plug wire (to disconnect)
- Jack or blocks (to safely lift the mower)
- Work gloves (thick leather ones work best)
- Safety glasses
- A clean cloth or rag
Nice to have:
- Blade holder tool (prevents the blade from spinning while you loosen bolts)
- Penetrating oil (helps stuck bolts come loose)
- Socket set (easier than just one wrench)
- Wooden blocks (for safety)
Don’t skip the safety gear. Mower blades are sharp and dangerous. Gloves and glasses protect you from cuts and flying debris.
Safety First: Preparing Your Mower
Safety is the most important part of this whole process. A careless move can lead to serious cuts or injuries.
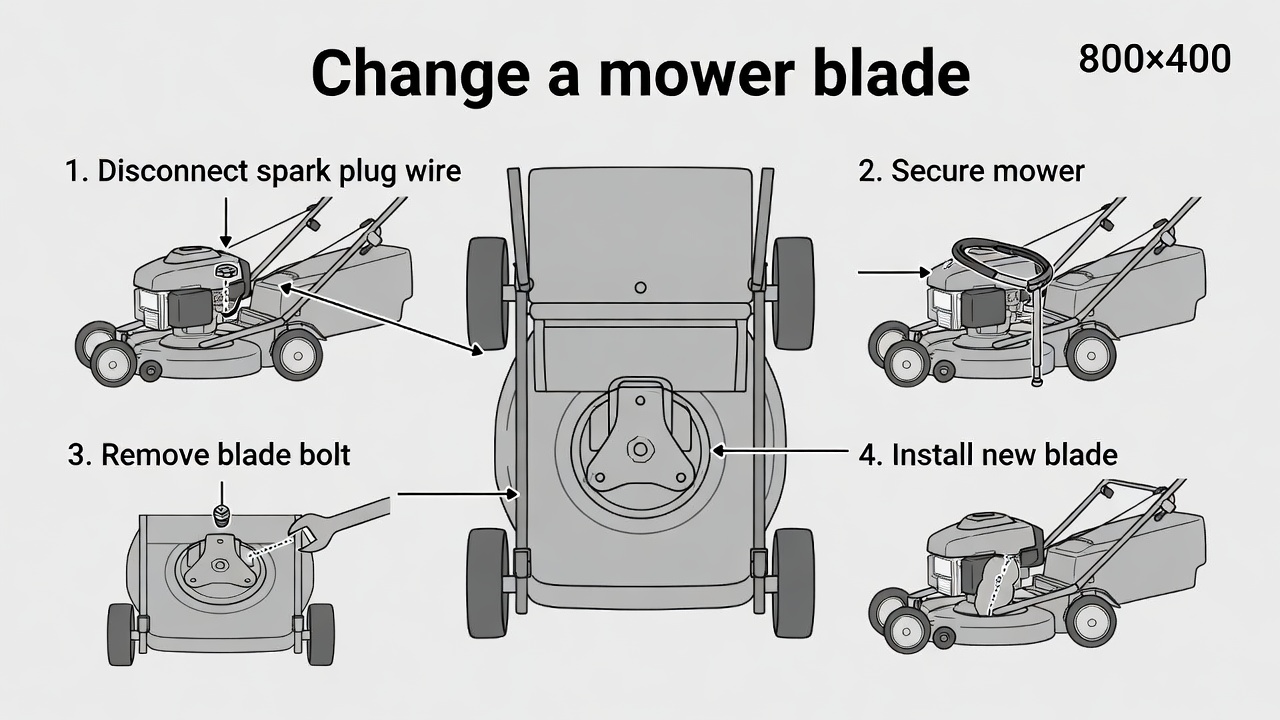
Step 1: Disconnect the spark plug.
This is critical. Find the spark plug wire on your mower engine. It’s a thick black or red wire connected to a plug on top of the engine. Pull it off gently. Don’t yank on the wire itself. Pull on the rubber cap.
Disconnecting the spark plug prevents the engine from starting while you work. Even if someone accidentally hits the ignition, the mower won’t turn on.
Step 2: Empty the fuel tank.
This step prevents spills and fire hazards. Some people skip it, but we don’t recommend that. Run your mower until it runs out of gas. This only takes a few minutes.
If you really don’t want to do that, at least make sure the mower isn’t tilted on its side near the carburetor. Tilting the mower can cause fuel to leak into the engine.
Step 3: Let the engine cool down.
Don’t work on a hot mower. Wait at least 15 to 20 minutes after you shut off the engine. The blade, bolts, and engine parts all get extremely hot. Touching them will burn your skin.
Step 4: Secure the mower.
If you’re working under the mower, safety is everything. Place the mower on a flat, level surface. Use a jack to lift one side if needed. Always use jack stands or wooden blocks under the mower frame. Never trust a jack alone. Jacks can slip or fail.
For push mowers, you might not need to lift it much. You can tip it on its side carefully. Just make sure the carburetor side faces up. This keeps fuel from leaking into the engine.
Removing Your Old Blade
Now we get to the actual work. Follow these steps carefully.
Step 1: Locate the blade bolt.
Look under your mower deck. You’ll see the blade attached to a central shaft with a single bolt. This bolt holds everything together.
Step 2: Mark the blade.
Before you loosen anything, mark which side of the blade faces down. You can use marker, tape, or even scratch the blade. This helps you install the new blade facing the right way. Some blades are directional and won’t work properly if they’re backward.
Step 3: Loosen the bolt.
Use your wrench to loosen the bolt. Turn it counterclockwise. The bolt might be tight, especially if the mower is older. Take your time. Don’t force it.
If the bolt won’t budge, spray some penetrating oil around it. Let it soak for 5 to 10 minutes. Then try again. The oil helps dissolve rust and makes the bolt easier to move.
Step 4: Keep the blade still.
As you turn the wrench, the blade will want to spin. This makes loosening the bolt much harder. Ask a helper to hold the blade still. You can also use a blade holder tool. It clamps the blade so it can’t move while you work.
Step 5: Remove the bolt completely.
Once the bolt is loose enough, you should be able to turn it by hand. Remove it completely and set it aside somewhere safe.
Step 6: Take off the old blade.
Lift the blade off the shaft. Be careful. Even though it’s dull, the edges are still sharp. Wear your gloves. Don’t touch the sharp sides with bare hands.
Inspecting Your Blade and Shaft
Before you install the new blade, check a few things.
Look at the shaft. Is it bent or damaged? A damaged shaft can cause serious problems. The blade won’t sit right, and your mower will vibrate badly. If the shaft looks bad, you might need a professional to fix it.
Check the bolt. Is it stripped or worn? If the threads are damaged, you’ll need a new bolt. Bring your old bolt to the store and ask if you should replace it.
Clean off any grass clippings or dirt from the shaft area. A clean area helps the new blade sit properly.
Installing Your New Blade
Time to put the new blade on. This is where you need to pay attention to details.
Step 1: Position the new blade.
Look at your mark from earlier. Make sure the new blade faces the same direction as the old one did. If the blade has an arrow, that arrow should match the direction you marked.
Step 2: Slide it onto the shaft.
Carefully slide the blade onto the central shaft. Make sure the hole lines up perfectly. Push it on gently until it sits flat against the shaft.
Step 3: Insert the bolt.
Put the bolt back in through the blade hole into the shaft. Don’t tighten it yet. Just get it started so it holds the blade in place.
Step 4: Tighten the bolt.
Now use your wrench to tighten the bolt. Turn it clockwise. Make sure the blade doesn’t spin as you tighten. Use your helper or blade holder again to keep it still.
Tighten it firmly, but don’t overdo it. You want it snug and secure, not stripped. If you’re not sure how tight is enough, aim for the same tightness as the original bolt. The bolt should require good effort to turn, but you shouldn’t have to struggle.
Step 5: Double-check everything.
After you’ve tightened the bolt, try to move the blade by hand. It shouldn’t move at all. The blade should be solid and secure.
Special Cases: Riding Mower Blades
Riding mowers are trickier because they have multiple blades.
Most riding mowers have blades under different parts of the deck. Each one is set up the same way as a push mower blade. But you might need to remove the mower deck to access all of them.
Check your mower’s manual for specific instructions on removing the deck. Some mowers have bolts that hold the deck to the frame. Others use pins that slide out.
Once the deck is off or up, you can change each blade the same way we described above. Just remember to mark each blade so you install them all facing the right direction.
Some riding mowers have a spindle (the part that connects the blade to the deck). Inspect these carefully. If the spindle is damaged, the blade won’t work right.
Reconnecting Your Mower
Now that the new blade is installed, you’re almost done.
Step 1: Replace the spark plug wire.
Find the spark plug on your engine again. Push the wire cap back onto the plug. You’ll hear a small click when it’s seated correctly. Make sure it’s pushed all the way on.
Step 2: Fill the fuel tank.
If you emptied it earlier, fill it back up with fresh gasoline. Don’t overfill it. Leave a little space at the top.
Step 3: Let it sit for a minute.
Before you start the engine, let everything settle. Give the fuel a moment to reach the carburetor properly.
Testing Your New Blade
Now comes the moment of truth.
Step 1: Start the mower.
Pull the start cord or turn the key to start the engine. Listen carefully. Does it sound normal, or does it sound different?
Step 2: Check for vibration.
When the blade is spinning, does the mower vibrate? A little vibration is normal. But if it vibrates way more than before, something’s wrong. Stop the mower and check that the blade bolt is tight.
Step 3: Take a test cut.
Start with a small area of grass. Run the mower over it slowly. Watch how the blade cuts. The grass should look clean-cut, not torn or shredded.
If everything looks good, you’re done! Keep an eye on things over the next few uses. Make sure everything continues to work smoothly.
Blade Maintenance Tips
Once you’ve installed your new blade, you want it to last as long as possible.
Keep it clean. After each mowing session, let the mower cool down. Then take a cloth and wipe away grass clippings and dirt. Clean blades work better and last longer.
Watch for damage. Every few mowing sessions, look under your mower. Are there any new dents or bends? Hitting rocks is the most common cause of blade damage.
Check the sharpness. Even a new blade will dull over time. A sharpness check once a year isn’t a bad idea. If your blade is dull, you have two choices: sharpen it yourself or buy a new one.
Check the bolt regularly. Sometimes bolts loosen over time. Give the blade bolt a quick tightness check every month or so. It only takes a second.
Keep the shaft clean. Dried grass and debris can build up on the shaft. This affects how the blade sits and works. A quick wipe after each use keeps things running smooth.
When to Replace Instead of Sharpen
Your blade will eventually need replacing. Sharpening only works so many times before the blade gets too worn out.
Replace your blade if:
- It has large dents or bends
- It’s cracked or split
- The blade is too thin from years of sharpening
- It keeps hitting rocks and getting damaged
- It’s bent no matter how much you try to fix it
A new blade costs between $20 and $80, depending on your mower type. That’s pretty cheap insurance against equipment damage and a poorly cut lawn.
Troubleshooting Common Problems
The blade still vibrates after installation.
The bolt might not be tight enough. Tighten it more. If it’s already very tight, the shaft might be bent. You’ll need professional help.
The mower is harder to start.
Make sure the spark plug wire is fully connected. Check that you didn’t get fuel or dirt into the carburetor when you tilted the mower.
The blade still makes a strange sound.
That sound might be coming from something else, not the blade. Check for loose bolts elsewhere on the mower. Look for bent fins on the cooling system.
The grass still looks torn, not cut clean.
The blade might be backward. Check your mark and the blade direction. If it’s facing right, the blade might already be dull. New blades sometimes aren’t sharp enough out of the box.
Gas is leaking from the mower.
If you tipped the mower on its side on the carburetor side, fuel might have gotten into the engine. Stop using the mower. Let it sit for a day, then try starting it again. If it still leaks, take it to a professional.
Professional Help: When to Call Someone
You can handle most blade changes yourself. But sometimes you should call a professional.
Call a pro if:
- The shaft is bent or damaged
- You can’t loosen the blade bolt, even with penetrating oil
- The mower vibrates significantly and won’t stop
- You damage something while working on the mower
- Your mower is still under warranty (working on it yourself might void it)
- You feel uncomfortable working on your equipment
There’s no shame in asking for help. Sometimes a professional can fix things faster and safer than trying to do it yourself.
Frequently Asked Questions
How often should I change my blade?
It depends on how much you mow and how often you hit obstacles. Most homeowners change blades once a year. If you mow a lot or have a rocky yard, you might change it more often.
Can I sharpen my blade instead of replacing it?
Yes, you can sharpen a blade with a metal file or grinder. But sharpening takes more skill than replacing it. If you’re not confident, a new blade is safer and faster.
Do I need special tools to change a blade?
No, you probably already have what you need. A wrench is the main thing. Everything else is optional or stuff you might have at home.
Is it dangerous to change a blade?
It’s only dangerous if you ignore safety rules. Always disconnect the spark plug. Always wait for the engine to cool. Always secure the mower. Follow these rules and you’ll be fine.
My mower has two blades. Do I change them both at once?
You don’t have to, but it’s a good idea. If one blade is worn, the other probably is too. Changing both at once ensures your mower cuts evenly.
What size wrench do I need?
It depends on your mower. Most use bolts that take a half-inch, nine-sixteenths, or five-eighths wrench. If you don’t know, bring your mower to the store and try different sizes.
Can the blade go on backward?
Yes, and it will cause problems. The blade won’t cut properly. The mower might vibrate. Always check that the blade faces the right direction before you tighten the bolt.
How long does a blade change take?
If you’ve done it before, maybe 15 minutes. If it’s your first time, expect to spend an hour. There’s no rush. Taking your time is better than hurrying and making mistakes.
Do I really need to disconnect the spark plug?
Yes. This is the single most important safety step. Always disconnect it.
Conclusion
Changing a lawn mower blade is a task that seems scary at first. But once you do it, you’ll see how simple it really is. Thousands of homeowners change their own blades every year without any problems.
The key is to go slow, follow the safety steps, and be careful. Take your time. Use the right tools. Read your mower’s manual if you have one. And don’t hesitate to ask for help if something doesn’t make sense.
A new blade will make your lawn mower run better. Your grass will look healthier and greener. Your mower will be quieter and smoother. And you’ll save money by doing it yourself instead of paying a professional.
The next time your blade needs replacing, you’ll know exactly what to do. And that confidence in maintaining your own equipment is worth the effort right there.
Happy mowing!

Hi, I’m Mary, the founder of GardenCure.com. I’m passionate about creating healthy, beautiful gardens and well-kept lawns. I share practical experience and trusted advice on garden and lawn gear that truly works. With the support of my dedicated research team, our writers produce honest, in-depth reviews using reliable, authentic sources—helping you choose the right tools with confidence for your outdoor space.