How to Use Seed Starting Trays?
Starting seeds indoors feels like magic. You drop tiny seeds into soil, add some water and light, and boom—soon you have little green shoots ready to become full-size plants. Seed starting trays make this whole process way easier than you might think. If you’ve never grown plants from seeds before, don’t worry. This guide will walk you through everything you need to know to get started today.
In this article
What Exactly Are Seed Starting Trays?
Seed starting trays are shallow containers designed to hold seeds and help them grow into seedlings. These trays come in all kinds of shapes and sizes, but they all do the same basic job: give your seeds a cozy place to sprout and develop their first leaves.
You’ll find seed trays with different compartment sizes. Some have large cells for bigger seeds like squash or beans. Others have tiny cells perfect for small seeds like lettuce or petunias. The number of cells varies too—you might get a tray with six large cells or one with 72 tiny ones. It all depends on what you want to grow.
The nice thing about using a tray instead of just planting seeds directly outside is that you control everything. You manage the soil, moisture, temperature, and light. This gives your seeds the best shot at success before they face the real world.
Why Should You Even Use Seed Starting Trays?
You might be thinking, “Can’t I just plant seeds outside?” Sure, you can. But seed starting trays give you some real advantages that make gardening way more fun and productive.
Growing seeds indoors with trays lets you get a head start on spring. While frost still sits outside, your seedlings are growing strong and healthy under controlled conditions. This means you’ll have bigger, tougher plants to put in the garden when it’s warm enough.
Another big win is that you save money. Seeds are dirt cheap compared to buying full-size plants from a nursery. One packet of seeds costs just a few dollars but grows dozens of plants. Trays help you get the most out of every seed you plant.
You also get to pick exactly what you want to grow. Nurseries don’t always carry every variety of tomato or pepper. With seed trays, you can grow unusual heirloom varieties that taste incredible and look amazing.
Seed trays also protect your seeds from pests, harsh weather, and weeds. Everything stays clean and controlled until your seedlings are strong enough to tough it out in the real world.
Different Types of Seed Starting Trays
Not all seed trays are the same. Let’s look at the main kinds you’ll see when you start shopping.
Plastic Trays are the most common and affordable option. They’re durable, easy to clean, and last for years if you take care of them. Most plastic trays have draining holes in the bottom, which is crucial for keeping roots healthy. You can reuse plastic trays season after season, making them a solid investment.
Cell Pack Trays have individual compartments, usually six, 12, 24, or 72 cells depending on the size. Each cell holds one seed or seedling, which keeps everything organized and makes it easy to transplant when the time comes. Cell packs are super popular for starting vegetables and flowers.
Peat Pots are made from compressed peat moss. They break down in the soil, so you can plant the whole pot directly into the ground when transplanting. This means less root damage and less work for you. However, peat pots dry out faster than plastic, so you’ll need to water more often.
Seed Trays Without Cells are flat, shallow containers without individual compartments. You scatter seeds across the soil surface, and later you thin out the weak seedlings or transplant groups of them into individual pots. These work great for tiny seeds like lettuce or petunia.
Recycled Containers can work just fine too. Old yogurt cups, cardboard egg cartons, or newspaper pots all make decent seed starting containers. Just drill or poke drainage holes in the bottom, and you’re good to go. This is a budget-friendly option if you’re just starting out.
Getting Your Materials Together
Before you start, grab the things you’ll need. Don’t stress—most of this stuff is cheap and easy to find.
You’ll need seed starting mix, which is different from regular garden soil. Seed starting mix is lighter, fluffier, and has no nutrients. It drains well and doesn’t get crusty on top, which regular soil does. Good seed starting mix contains peat moss, perlite, or vermiculite. Some people make their own blend, but buying premade mix is easier and not much more expensive.
Get some seeds, obviously. Read the seed packet to see if they need any special treatment. Some seeds need to soak overnight, some need to be scratched with sandpaper, and others need cold treatment. Most seeds just go straight into moist soil and wait.
You need a water bottle or spray bottle that puts out a fine mist. This keeps soil moist without blasting your seeds away. Seedlings need consistent moisture, but not soaking wet soil that causes rot.
Grow lights or a sunny window keep your seedlings growing strong. Most windowsill light isn’t enough, so cheap LED grow lights are worth the money. Set them just a few inches above the seedlings and keep them on about 14 to 16 hours per day.
A heat mat is optional but really helpful. Seeds germinate faster in warm soil, usually between 65 and 75 degrees Fahrenheit. A heating mat cost $20 to $30 and speeds things up noticeably.
Some plant labels help you remember what you planted where. As silly as it sounds, seedlings look basically the same, and you’ll forget which ones are tomatoes and which are peppers without labels. Use popsicle sticks, plastic markers, or even cut-up yogurt containers.
Step-by-Step: How to Fill Your Seed Starting Trays
Let’s get down to business. Here’s how to fill your trays the right way.
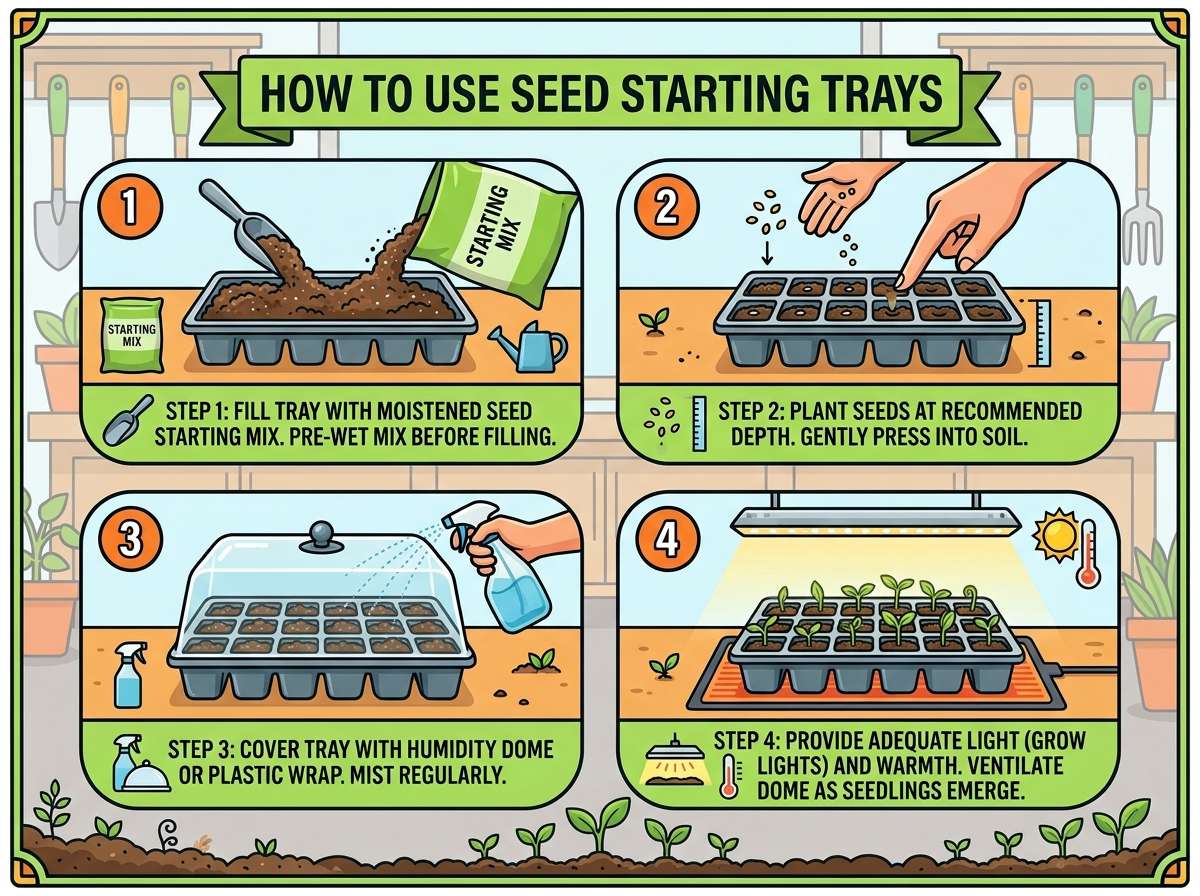
Start by dampening your seed starting mix before you put it in the trays. Dry mix doesn’t hold moisture well, and it’s harder to get wet once it’s already in the tray. Mix it up in a bucket with water until it feels like a wrung-out sponge. It should hold together when you squeeze it, but water shouldn’t drip out.
Pour the damp seed starting mix into your tray, filling each cell to the rim. Then gently press it down a tiny bit so it settles. Don’t pack it hard—you just want it snug, not squeezed. Leave the top smooth and level.
Now you’re ready for seeds. Every seed is different, so always read your seed packet. Some seeds go on top of the soil and barely press down. Others need to be covered with mix as deep as the seed is wide. A general rule is that tiny seeds go on top or just barely covered, while bigger seeds go deeper.
After placing your seeds, add a thin layer of seed starting mix on top if needed. Make sure the seeds stay moist but not waterlogged. Use your spray bottle to mist the soil surface gently.
Put a humidity dome or plastic cover over your tray. You can use a clear plastic cover that came with your tray, plastic wrap, or even a clear storage tub. This keeps humidity high so seeds don’t dry out while waiting to germinate. Once seedlings pop up, remove the cover so air can flow and prevent rot.
Watering Your Seedlings the Right Way
Watering seedlings is way easier than it looks, but getting it wrong causes more problems than anything else.
Your seedlings need consistently moist soil, but they hate sitting in water. The sweet spot is soil that feels like a wrung-out sponge—moist but not soggy. Check your trays daily by touching the soil surface. If it’s dry to the touch, it’s time to water.
Use your spray bottle or a small watering can with a gentle spout. Water slowly so the soil soaks it up instead of puddling on top. Water the soil, not the leaves, because wet leaves can develop fungal problems. Some folks water from below by setting the tray in a shallow container of water and letting the soil soak it up for a few minutes. This works great and prevents damping off, a fungal disease that kills seedlings.
Pay special attention right after germination. Once seeds sprout, they need even more careful watering. The roots are tiny and the seedlings are fragile. Too much water causes rot, but too little and they dry out fast.
As your seedlings get bigger and develop real leaves, they can handle a bit less fussing. But still keep that moist, not wet rule in mind.
Light: Helping Your Seedlings Grow Strong
Light is absolutely crucial for seedling success. Without enough light, seedlings get leggy and weak. Leggy means they grow tall and skinny trying to reach better light, and that’s not what you want.
If you have a bright south-facing window, your seedlings might get enough light there. But most home windows don’t provide enough light for healthy growth. Invest in grow lights—they’re really affordable and make a huge difference.
Set your lights just a few inches above the top of your seedlings. As they grow, adjust the lights higher so they stay close. Most seedlings need about 14 to 16 hours of light per day. Use a simple timer so you don’t have to remember to turn them on and off.
If your seedlings start getting tall and spindly with big spaces between leaves, they need more light. Move your lights closer or add another light source.
Temperature and Humidity Matter Too
Most seeds germinate best when soil stays warm, usually between 65 and 75 degrees Fahrenheit. A heat mat under your trays speeds up germination and helps more seeds sprout. Once seedlings emerge, you can lower the temperature a bit, though most seedlings still like it on the warmer side.
Humidity is your friend while seeds are germinating. That’s why a cover over your trays works so well. Once seedlings come up, you need some air movement to prevent disease. Crack open your cover or run a small fan in the room. The breeze strengthens the seedlings and keeps fungal problems away.
Thinning Out Weak Seedlings
Sometimes lots of seeds sprout in the same cell. You need to thin them out so each seedling has room to grow big and strong. Weak plants surrounded by strong competitors never catch up.
Thin seedlings when they have their first set of real leaves. Real leaves look like actual plant leaves, not the round seed leaves that come first. Snip off the weaker seedlings right at soil level with scissors. Pulling them out can disturb the roots of the plant you want to keep.
This feels mean, but you’ve got to do it. One big healthy seedling beats three skinny ones every time.
Fertilizing Your Young Plants
Seed starting mix has no nutrients, which is actually good for getting seeds to sprout. But once seedlings have their first real leaves and start growing, they need food.
Start feeding with a weak solution of all-purpose liquid fertilizer every week or two. Mix it half strength so you don’t burn the delicate plants. As seedlings get bigger, you can gradually increase the strength and frequency of feeding.
Some people prefer using diluted fish emulsion or seaweed extract for a gentler approach. Either works fine. Just don’t overdo it—weak and regular is better than strong and occasional.
Hardening Off: Preparing Seedlings for Outside
Seedlings grown indoors are a bit soft and delicate. If you move them straight outside into sun and wind, they’ll get shocked and might not recover. That’s where hardening off comes in.
Start hardening off about a week before you plan to transplant into the garden. Put your trays outside in a sheltered spot with filtered light and no wind. Leave them out for just an hour or two the first day. Each day, leave them out longer and give them a bit more direct sun. By the end of a week, they can handle full sun and wind.
Hardening off takes a bit of effort, but it makes the difference between seedlings that thrive and ones that sulk in the garden.
Transplanting Your Seedlings
Once your seedlings have a few sets of real leaves and their roots are filling out their cell, they’re ready to move up to bigger pots. You can tell it’s time when you see roots poking out the drainage holes or roots wrapping around inside the cell.
Gently remove each seedling from its cell, holding it by its leaves, not the stem. The stem is weak and breaks easy. Drop it into a pot of moistened potting mix, set it at the same depth it was growing, and pat the soil gently around it.
Give your transplanted seedlings some shade for a day or two so they recover. Then move them back to your grow lights and keep watering and feeding as before.
Common Problems and How to Fix Them
Growing seedlings is pretty forgiving, but things do go wrong sometimes.
Leggy seedlings mean your lights aren’t close enough or bright enough. Move your lights closer to the plants.
Damping off is when seedlings suddenly collapse at the soil line. It’s a fungal disease that loves wet conditions. Fix it by improving air flow, lowering humidity, watering from below instead of overhead, and using sterilized soil.
Yellow leaves usually mean you’re overwatering or your seedlings need fertilizer. Check soil moisture first, then start feeding if the soil is just moist.
Mold or algae on top of the soil means it’s too wet. Reduce watering frequency and improve air circulation.
Insects sometimes show up, but it’s rare indoors. If you spot any bugs, spray with an organic insecticide labeled safe for seedlings.
Tips for Success Every Time
Here are some simple things that make a real difference in your success rate.
Keep detailed notes about what you plant, when you plant it, and how long germination takes. This info helps you plan better next time.
Use fresh seed starting mix every time. Old, reused mix can harbor diseases. It’s cheap enough that there’s no reason to risk it.
Make sure your trays have good drainage holes. Soggy soil kills more seedlings than anything else.
Don’t start seeds too early. Count backward from your last frost date to figure out when to start each type of seed. Starting too early means leggy seedlings by the time it’s warm enough to plant outside.
Keep your hands clean when handling seedlings. Dirty hands can spread diseases.
Keep detailed records of which varieties did well and which didn’t. Over time you’ll figure out what works best in your situation.
What Seeds Should You Start with?
If you’re brand new to this, start with easy seeds that germinate quickly and grow like weeds. Tomatoes, peppers, basil, and squash are all beginner-friendly.
Avoid really tiny seeds like petunia or begonia until you’ve got a few successes under your belt. Those need more precise conditions and more patience.
Read the seed packet carefully before you plant. It tells you soil temperature for germination, how deep to plant, and how long germination takes. Following these instructions makes all the difference.
Reusing Your Trays
Once you’ve used your plastic seed trays, clean them and store them for next time. Wash them with hot water and a bit of bleach to kill any diseases. Dry them completely and stack them somewhere dry until next planting time.
Seed trays last for many years if you take care of them. Treating them right means you get years of use out of a small investment.
When to Move Seedlings Outside
Your seedlings are ready for the garden when they’ve been hardened off and your frost danger has passed. Check a local garden guide or search online for your last frost date.
At this point, your seedlings should be stocky, have several sets of real leaves, and look like miniature versions of the plants they’ll become. They’re ready to go out into the world.
Transplant in the evening or on a cloudy day if possible, so plants aren’t shocked by intense sun right away. Water them well after planting. Your hard work has just begun paying off.
The Bottom Line
Using seed starting trays is honestly one of the most satisfying things about gardening. You get to watch tiny seeds turn into robust plants. You save tons of money. You get to grow exactly what you want.
The process isn’t hard or complicated. Fill your trays with damp seed starting mix. Plant your seeds according to directions. Give them water, light, and warmth. Then watch the magic happen.
Start with easy seeds, keep things simple, and don’t stress about making mistakes. Every gardener kills seedlings sometimes. That’s just part of learning. Each time you try, you get a little better at it.
Before long, you’ll have more seedlings than you know what to do with. Your friends and family will want your extras. You’ll be the plant person. And it all starts with those simple seed starting trays sitting on a shelf with a light overhead.
So grab some trays, pick out some seeds, and get growing. Your garden starts here.

Hi, I’m Mary, the founder of GardenCure.com. I’m passionate about creating healthy, beautiful gardens and well-kept lawns. I share practical experience and trusted advice on garden and lawn gear that truly works. With the support of my dedicated research team, our writers produce honest, in-depth reviews using reliable, authentic sources—helping you choose the right tools with confidence for your outdoor space.