How to Build Fence for Garden?
Building a fence around your garden is easier than you think. You don’t need special skills or fancy tools. This guide will walk you through every step. By the end, you’ll have a sturdy, beautiful garden fence that protects your plants and looks great.
In this article
Why You Need a Garden Fence
A garden fence does so much more than look nice. It keeps animals out of your vegetables. Deer, rabbits, and other pests can destroy your garden overnight. A good fence stops them.
Your fence also creates privacy. You get to enjoy your outdoor space without neighbors staring in. It marks your property line too. Everyone knows where your garden begins and ends.
A fence also helps with wind protection. Strong winds can damage young plants. Your fence acts as a shield. It blocks harsh wind while letting air flow through.
Kids and pets stay safer inside a fenced area. You control what gets in and what stays out. This peace of mind is worth the effort.
Planning Your Garden Fence Project
Before you buy materials or dig holes, plan everything out. Good planning saves time and money.
Measure Your Space
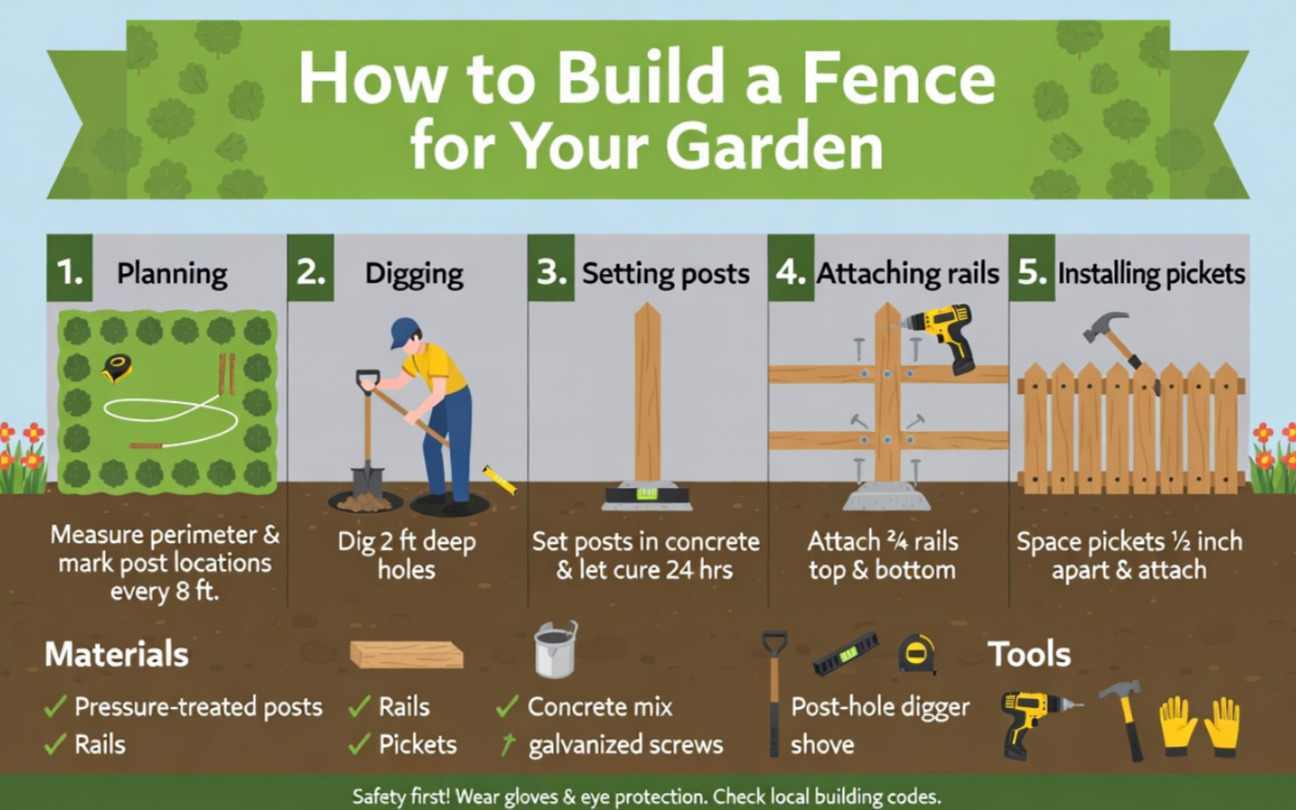
Walk around your garden and measure the perimeter. Use a long measuring tape. Mark corner spots with flags or stakes. Write down all measurements. Add them together to get total fence length.
Your measurements need to be accurate. Do this twice to make sure. Having the right amounts saves trips to the store.
Check Local Rules
Call your city or county office. Ask about fence rules in your area. Many places have height limits. Some areas require permits. Getting this wrong can mean tearing down your fence later.
Your neighbor’s property line matters too. Don’t put your fence on their land. Ask them where the line is. A simple conversation now prevents big problems later.
Pick Your Fence Style
Different fence types work for different gardens. Think about what you need.
Wood fences look natural and warm. They blend into the landscape. Wood works great for vegetable gardens. You can paint or stain them any color.
Wire or metal fencing lets light through. It doesn’t block views as much. This style works well if you want openness.
Vinyl fencing never needs painting. It’s clean and modern-looking. It costs more upfront but lasts forever.
Bamboo fencing looks elegant and natural. It fits garden themes well. Bamboo comes in panels ready to install.
Post and rail fences have open space. Animals can jump over these easily. Use them if you want a decorative border instead of protection.
Think about your garden style and goals. The right fence matches your vision.
Decide on Height
Garden fences usually stand four to six feet tall. Vegetables need a four-foot fence minimum. Deer jump high, so six feet is better if deer are a problem.
Shorter fences work for keeping out rabbits and small animals. They look less blocky too. Three feet stops most small creatures.
Write down your chosen height. This affects how much material you buy.
Gathering Your Tools and Materials
You don’t need a big tool collection. Most jobs use basic tools you might already own.
Essential Tools
A sturdy shovel digs post holes. Get one with a sharp blade. You’ll use it a lot.
A level keeps posts straight. This tool is crucial. Crooked posts ruin the whole fence.
A circular saw cuts wood quickly. Hand saws work too, but they’re slower. Safety glasses protect your eyes from flying wood.
A drill makes pilot holes for screws. It saves your hands and works faster.
A tape measure ensures accuracy. A measuring tape at least twenty-five feet long works best.
A pencil marks cutting lines and post positions.
String and stakes help you mark straight lines. Spray paint works too.
A hammer pounds nails. A screw gun or drill driver speeds up the job.
Work gloves protect your hands. Splinters hurt.
Materials to Buy
Posts support your entire fence. They’re the most important part. Four-by-four wood posts are standard. Space them six to eight feet apart.
Posts need to go deep. Two feet underground is minimum. Frozen ground doesn’t freeze as deep, so three feet is safer in cold areas.
Gravel and concrete hold posts in place. Gravel works fine for many projects. Concrete lasts longer and holds better.
Boards form the fence face. Two-by-six or two-by-eight boards are typical. They overlap vertically or horizontally depending on style.
Nails or screws fasten everything. Screws hold better than nails. Use exterior-grade fasteners that won’t rust.
Paint or wood stain protects wood from weather. Cedar and redwood resist rot naturally. Other woods need protection.
Metal brackets reinforce corners. They’re optional but helpful.
Preparing the Ground
Good groundwork makes installation so much easier.
Clear Your Path
Mow or cut down any weeds along your fence line. Remove large rocks and roots. You want clear ground for digging.
Mark your fence line with string. Tie string between corner stakes. This shows exactly where posts go.
Mark Post Locations
Space posts six to eight feet apart. Mark each spot with spray paint or a flag. Measure carefully between marks to keep spacing even.
Spacing affects fence strength. Closer posts mean stronger fences. Eight feet apart is common. Six feet is stronger.
Walk along the line and look at your marks. Make sure they look even and straight. This is your last chance to adjust before digging.
Digging Post Holes
This is hard work, but it’s doable. Take breaks if you need to.
Dig the Right Depth
Two feet deep is minimum. Three feet is better, especially in cold climates. Frost heaves push shallow posts up in winter.
Dig holes straight down. Use your level to check. Crooked holes lead to crooked posts.
Make Holes the Right Size
Posts need snug holes. A four-by-four post needs a hole slightly wider. Too wide and concrete won’t hold it well.
Digging by hand takes patience. A post hole digger makes it faster. You twist it down, then pull it up with dirt inside.
Some people rent power augers. These machine dig holes super fast. It’s worth renting one if you have many posts.
Setting Posts in the Ground
This step must be done right. Posts are the bones of your fence.
Position Your First Post
Put your first post in its hole. Have someone hold it straight with a level. Check it both ways. Forward and back. Side to side. Both must be level.
If your ground isn’t level, this is trickier. Taller spots get deeper holes. Shorter spots get shallower holes. Your tops should line up at the same height.
Secure Posts Properly
Once the post is level, you need to hold it there while you fill the hole.
Gravel works for casual fences. Pour gravel around the post. Tamp it down with a stick. Keep checking that the post stays level. Add more gravel until the hole is full.
Concrete is better for permanent fences. Mix concrete according to package directions. Pour it around the post in the hole. The concrete hardens rock solid. Your post won’t move ever.
Let concrete cure fully before continuing. Follow the bag’s instructions. Usually it takes 24 hours.
Set All Other Posts
Do the same for every post. Get them all in the ground and level before moving to the next step.
This sounds boring, but it’s important. A fence is only as good as its posts. Bad posts mean a bad fence.
Building the Frame
Now you add boards. This is where your fence starts looking like a fence.
Install Horizontal Supports
Posts stand alone. You need to connect them. Horizontal boards called rails connect posts together.
Rails go between posts. A fence usually has two rails. One near the top. One near the bottom.
Use a level again. Rails must be straight horizontally. Slanted rails look sloppy.
Measure the distance between posts. Cut rails to fit. They can be nailed or screwed on the outside of posts.
Some people mortise rails into posts. This means cutting slots in the posts where rails fit in. It looks cleaner but takes more skill.
Space Rails Right
Bottom rails should be two to three inches from ground. This prevents water damage to boards.
Top rails go six to twelve inches from the post top. This leaves room for privacy boards or fence boards.
Two rails work for standard four to six foot fences. Taller fences need three rails for strength.
Adding Fence Boards
Fence boards make the actual fence. They’re what everyone sees.
Attach Boards to Rails
Boards stand vertically between posts. Space them about a quarter inch apart. This leaves room for wood expansion.
Start at one post and work across. Use a spacer to keep gaps even. A piece of scrap wood works great.
Screw boards to the rails. Three screws per board holds well. Use exterior-grade screws so they don’t rust.
Nails work but screws are stronger. Screws don’t pop out over time like nails do.
Decide on Board Spacing
Tight spacing looks formal and provides privacy. Animals can’t see through at all.
Wider spacing looks more open. Light comes through. This works for less severe animal problems.
Spacing also affects cost. More boards cost more money. Wide spacing saves money.
Handle Height Variations
If your ground isn’t level, boards on one side will stick up higher than the other side.
Adjust board length as you go. Each board might be slightly different. This is normal. Your fence top won’t be level, but that’s okay.
Some people prefer level tops. If you want that, scribe each board to the slope of the ground below. Mark a line on each board following the ground contour. Then cut along that line.
Making Corners Look Good
Corners can be tricky. How you handle them affects the look of your fence.
Inside Corners
Inside corners are easier. Boards simply meet. You can overlap them or butt them together.
Overlapping looks nicer. One board wraps around the corner post. The next board starts fresh. This creates a smooth line.
Outside Corners
Outside corners are visible. Make them look good.
You can miter them. This means cutting boards at an angle. The two boards meet in a point. It’s fancy but hard to do.
You can overlap them the same as inside corners. This looks fine and is much easier.
Turning Corners
Use a level at corners. Make sure boards are still plumb. Plumb means straight up and down. It’s different from level, which is horizontal.
Corners affect your whole fence. Take time to get them right.
Adding Gates
If your garden is fenced, you need a gate. You want to get in and out easily.
Pick a Gate Location
Choose a spot that makes sense. Near the house is common. Pick a spot away from heavy foot traffic areas if possible.
Build a Frame for the Gate
A gate needs a sturdy frame. Use the same size posts and rails as your fence. The frame supports the gate.
Posts for the gate opening need to be stronger. They handle swinging forces. Set them extra deep. Use extra concrete around them.
Hang the Gate
Gate hinges bolt to the frame and the gate itself. Bolts are stronger than nails.
Use three hinges for stability. Two hinges work but three is better.
A gate should close easily. Hang it straight so gravity doesn’t pull it open.
Add a latch. Simple latches work fine. Self-closing latches are cool but cost more.
Swing the gate open and closed a few times. It should move smoothly. Adjust hinges if it catches or swings weird.
Finishing Touches
Your fence is almost done. Now make it look great and last long.
Paint or Stain Your Fence
Wood needs protection from sun and rain. Paint or stain stops rot.
Paint comes in every color. Stain shows the wood grain. Both protect the wood.
Apply paint or stain within the first year. Wait too long and wood starts rotting. Once rot starts, it spreads fast.
Let wood weather for a few months if possible. This makes paint stick better. Paint fresh-cut wood and you might get peeling later.
Paint two coats for best results. The first coat soaks in. The second coat protects.
Maintain Your Fence
Good fence maintenance makes it last decades. Bad maintenance means replacing it in ten years.
Paint or stain again every few years. This keeps wood protected.
Replace rotted boards quickly. Rot spreads to nearby boards. One bad board can ruin the whole fence if you wait.
Clear leaves and debris from around the fence bottom. They hold moisture and cause rot.
Check screws each year. Tighten any that have loosened.
Trim trees near your fence. Branches shouldn’t rest on it. They cause damage.
Dealing with Challenges
Some situations make fence building harder. Don’t give up. Solutions exist.
Sloped Ground
Sloped yards are tough. Posts need to be straight even when ground slopes.
You have two choices. Step your fence down the slope. Or scribe each board to follow the slope.
Stepping looks more formal. The fence goes down like stairs. Each section is level, but each section is lower than the last.
Scribed boards follow the ground smoothly. The fence top slopes with the ground. This looks more natural.
Rocky Soil
Rocky soil makes digging awful. You need to go deep into the rock.
A power auger helps. Hand tools struggle in rock. Rent a heavy-duty auger.
You can dig around rocks. Move your post location a few inches to avoid big rocks. A few inches doesn’t matter.
If rocks are everywhere, consider post footings. Use metal anchors that bolt to concrete pads on top of the ground. These work when digging is impossible.
Wet Ground
Wet ground causes post rot. Water doesn’t drain away from wood.
Dig deeper and add gravel under the post. This helps drainage.
Use concrete instead of gravel. Concrete repels water better.
Consider a higher fence to keep animals from jumping. If animals can’t get in, you don’t need a fence to stop them. A tall fence (six feet) can be effective.
Windy Areas
Wind pushes hard on fences. Tall fences in windy areas need extra strength.
Space posts closer together. Four feet instead of eight feet is stronger.
Use thicker posts. Six-by-six posts instead of four-by-four posts.
Add extra rails. Three or four rails instead of two.
Paint or seal all wood surfaces. Wind can’t dry wood out if it’s sealed. Unseal wood cracks and splits faster.
Budget and Cost Considerations
Fence costs vary wildly depending on many factors.
Average Costs
Wood fences run about fifteen to thirty dollars per linear foot. A hundred feet of fence costs fifteen hundred to three thousand dollars.
Vinyl fences cost more. Thirty to fifty dollars per linear foot is normal. The hundred foot fence costs three thousand to five thousand dollars.
Labor is often the biggest cost. Hiring people to build runs two thousand to five thousand dollars or more.
Building it yourself saves huge amounts. You put in the work instead of money.
Saving Money
Buy materials in off-season. Winter is slow for fences. Stores discount materials.
Compare prices at different stores. Home improvement stores and lumber yards have different prices.
Choose simpler designs. Fancy curves and angles cost more. A straight fence is cheapest.
Space posts farther apart to use fewer posts. Eight foot spacing instead of six foot spacing.
Skip the paint first year. You can paint later. New wood is fine for a year.
Timeline for Your Project
How long does a fence take to build?
Small Garden Fence
A hundred feet of simple fence by one or two people takes ten to twenty hours of work.
Setting posts takes the most time. Building the fence itself is faster.
This is spread over several days. Posts need twenty-four hours to cure before you add boards.
Larger Fences
Three hundred feet of fence takes thirty to sixty hours.
Weekend warriors spread this over three or four weekends.
This assumes decent digging conditions and no complications.
Complications Add Time
Rocky soil doubles digging time. Sloped ground adds complexity. Corners and gates take longer.
Plan for extra time. Build in slack. You won’t work full speed all day.
Tool Rental Options
You don’t need to buy every tool. Rent what you don’t have.
Power augers rent for forty to sixty dollars per day. If you have more than twenty holes, renting pays for itself.
Nail guns and screw guns rent cheap. Maybe fifteen dollars per day. This speeds up the job.
Some stores rent post hole diggers. For a small yard fence, the hand version works fine.
Renting beats buying tools you’ll use once. After your fence is done, you won’t use these tools again.
Safety First
Building a fence has hazards. Take them seriously.
Protect Yourself
Wear work gloves. Splinters are painful and can get infected.
Wear safety glasses. Wood bits fly when you cut. Protect your eyes.
Wear sturdy work boots. Your feet are under heavy posts. Proper boots protect them.
Sunscreen and a hat protect you from sun. You’ll be outside for hours.
Handle Heavy Items Safely
Posts are heavy. Lift with your legs, not your back. Get help for big items.
Concrete bags weigh fifty pounds. Don’t overdo it. Take breaks.
Be Careful with Tools
Circular saws are dangerous. Keep hands away from the blade. Wear glasses.
Drills can twist your wrist. Hold them firm. Expect them to twist.
Power augers want to rotate fast. Hold them tight. They can spin out of control.
Comparing Different Fence Types for Gardens
Different materials have different benefits.
Wood Fences
Best for: Vegetable gardens, privacy, natural look
Pros: Looks great, affordable, can paint any color, flexible for design
Cons: Needs maintenance, rots if not painted, can warp, needs refinishing
Metal or Wire Fencing
Best for: Small animals, lightweight installations, visibility
Pros: Lasts forever, low maintenance, light, see-through
Cons: Expensive, animals might get stuck, can rust if not galvanized
Vinyl Fencing
Best for: Modern gardens, no-maintenance situations, coastal areas
Pros: Never needs painting, lasts forever, looks clean
Cons: Very expensive, limited colors, hard to repair, hot in sun
Bamboo Fencing
Best for: Asian-style gardens, privacy, natural look
Pros: Looks beautiful, renewable material, lighter weight
Cons: Needs sealing, shorter lifespan than wood, harder to find
Composite Fencing
Best for: Gardens where you want something different, no maintenance needed
Pros: Lasts decades, no painting, looks good, eco-friendly option
Cons: Expensive, limited availability, can look plastic
When to Call a Professional
Sometimes hiring experts makes sense.
Call a pro if:
- Your ground is too rocky or difficult
- You have lots of slope in your yard
- You want perfect results with minimal effort
- You’re physically unable to do the work
- Your fence needs special permits or inspections
- You want something super fancy or complex
Pros handle problems fast. They have the right equipment. They know what to do.
But you can do basic fences yourself. Thousands of people do every year.
Common Mistakes to Avoid
Learn from others’ mistakes.
Spacing Posts Too Far Apart
Eight feet is the limit. Nine or ten feet and your fence will sag. The boards will bow outward. This looks terrible.
Closer spacing is always better. Six feet is ideal.
Not Setting Posts Deep Enough
Shallow posts heave up in winter. Come spring, your posts are tilted. Frost does this in cold areas.
Two feet is absolute minimum. Three feet is better.
Using the Wrong Fasteners
Cheap nails rust and stain wood. Use exterior-grade fasteners.
Galvanized or stainless steel don’t rust. They cost more but last.
Skipping the Level
Bent posts ruin the look. Use a level every time. It takes seconds.
Not Thinking About Drainage
Posts rotting at the bottom is common. Water sits around them.
Dig deeper or use concrete to shed water.
Painting Too Soon
Fresh wood expands and contracts a lot. Paint too soon and it peels.
Wait a few months or use a wood primer first.
Forgetting About Wind
Wind rocks fences. Strong wind can topple them.
Close spacing and extra rails prevent wind damage.
Slats instead of solid boards let wind through. Wind can’t push as hard on slats.
Seasonal Considerations
The season you build affects your process.
Spring and Fall
Perfect weather. Not too hot. Not freezing. These are ideal times.
Ground is usually moist but diggable. Concrete cures well.
Summer
Hot sun makes working miserable. Take breaks. Drink lots of water.
Dry ground is hard to dig. Water it first to soften it.
Concrete cures fast in heat. Watch it carefully so it doesn’t set too quick.
Winter
Frozen ground is almost impossible to dig. In cold climates, skip winter building.
Snow makes work dangerous. Your fence looks great on snow though.
Winter is great for planning next year’s project.
Maintaining Your Garden Fence Long-Term
After you finish building, maintenance keeps it looking good.
Every Spring
Walk your fence after winter. Look for damage from frost heave.
Check for rotted wood. Poke soft spots with a screwdriver.
Tighten loose screws and bolts.
Every Year
Paint or stain every three to five years. This is the key to longevity.
Clear leaves and debris away from the base.
Trim bushes and trees touching the fence.
As Needed
Replace rotted boards immediately. Don’t let rot spread.
Tighten hinges on gates. They loosen with use.
Touch up paint where it’s worn.
Alternatives to Traditional Fences
Not ready to commit to a fence yet?
Trellises and Vines
Grow climbing plants on frames. They block animals like a fence does.
Takes time for vines to grow thick. Quick solution? Go with a fence.
Hedges and Shrubs
Planting a thick hedge takes years to mature. But it’s natural and beautiful.
Plant in fall. Wait several seasons.
Combination Approach
Use a low fence plus a hedge. Or a fence plus climbing vines.
Many gardeners use multiple techniques together.
Summary
Building a garden fence is a big project but very doable. You now know the whole process from start to finish.
Start with good planning. Measure carefully. Check local rules. Know what style you want.
Gather good tools and materials. Don’t cheap out on posts.
Dig deep and set posts straight. This is the hard part but the most important part.
Build your frame and add boards. Take time to do this right.
Paint or stain your fence. This protects it and makes it beautiful.
Maintain it through the years. Good maintenance means your fence lasts decades.
You’ve got this. Your garden fence is within reach. Start this weekend.

Hi, I’m Mary, the founder of GardenCure.com. I’m passionate about creating healthy, beautiful gardens and well-kept lawns. I share practical experience and trusted advice on garden and lawn gear that truly works. With the support of my dedicated research team, our writers produce honest, in-depth reviews using reliable, authentic sources—helping you choose the right tools with confidence for your outdoor space.