How to Use Seedling Heat Mat?
Starting seeds indoors is one of the most rewarding ways to grow your garden. There’s something magical about watching tiny seeds transform into healthy, green seedlings right on your windowsill. But here’s the thing: most seeds need warmth to germinate. That’s where a seedling heat mat comes in handy. This simple tool can make the difference between seeds that sprout quickly and seeds that sit dormant in your soil. Let me walk you through everything you need to know about using one.
In this article
What Is a Seedling Heat Mat?
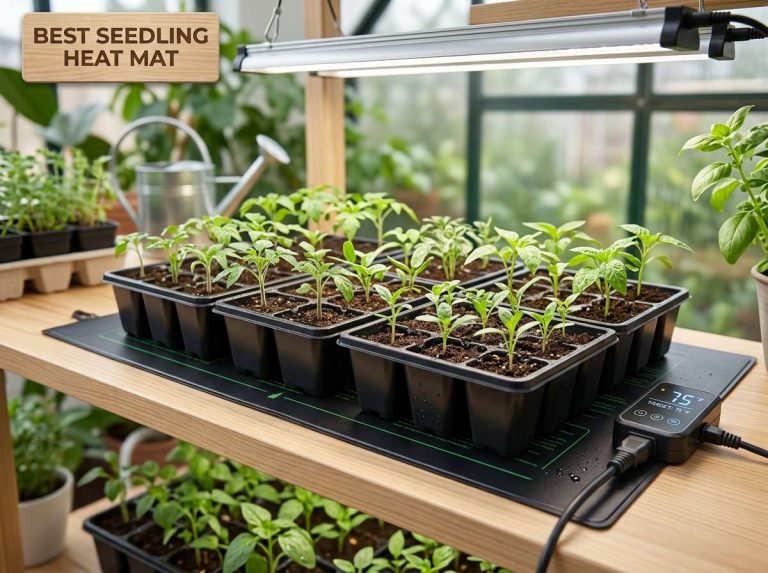
A seedling heat mat is basically an electric heating pad designed for seed starting. It’s a flat, flexible mat that warms up when you plug it in. The heat from the mat goes directly into your seed trays or pots, giving your seeds the warmth they need to germinate fast and strong.
Think of it as a cozy blanket for your seeds. Just like you feel better and sleep more soundly in a warm bed, seeds respond really well to consistent warmth during their germination phase. The mat sits under your seed trays and radiates heat upward, creating the ideal environment for seeds to crack open and send out their first roots.
Why Your Seeds Need Heat
Seeds are smart little packages. They contain an entire baby plant tucked inside, but they won’t wake up and grow unless conditions are just right. Temperature is one of the biggest triggers for germination. Most vegetable and flower seeds need soil temperatures between 70 and 80 degrees Fahrenheit to sprout reliably.
Without a heat mat, your indoor space might sit at a cool 65 to 68 degrees. That temperature works for some seeds, but many popular plants like peppers, eggplants, and tomatoes get grumpy and grow slowly. Some seeds won’t germinate at all in cooler conditions. A heat mat bumps that temperature up to the sweet spot, and seeds respond by sprouting faster and more reliably.
When you provide consistent warmth, you’ll see seedlings emerge in days instead of weeks. That means you’re ready to move them to grow lights sooner, giving you stronger plants by the time spring planting arrives.
Choosing the Right Heat Mat for Your Needs
Heat mats come in different sizes, and picking the right one makes your seed starting setup run smoothly. A small mat, around 10 by 20 inches, works great if you’re starting just a few flats of seeds. These mats typically cost less and use minimal electricity.
If you’re planning bigger plantings, go with a larger mat, usually around 48 inches long. These standard-sized mats fit perfectly under standard seed trays and can warm multiple containers at once. You’ll see them commonly in garden centers and online.
Look for mats with built-in thermostats. These controllers automatically turn the mat on and off to keep your soil at a set temperature. Without a thermostat, your mat stays on constantly, which can actually overheat the soil and stress your seeds. The thermostat does the work for you, maintaining steady, safe warmth.
Pay attention to the wattage too. Most home heat mats use between 15 and 20 watts, which is safe to run indoors and won’t spike your electric bill. You don’t need anything more powerful for seed starting.
Setting Up Your Heat Mat Properly
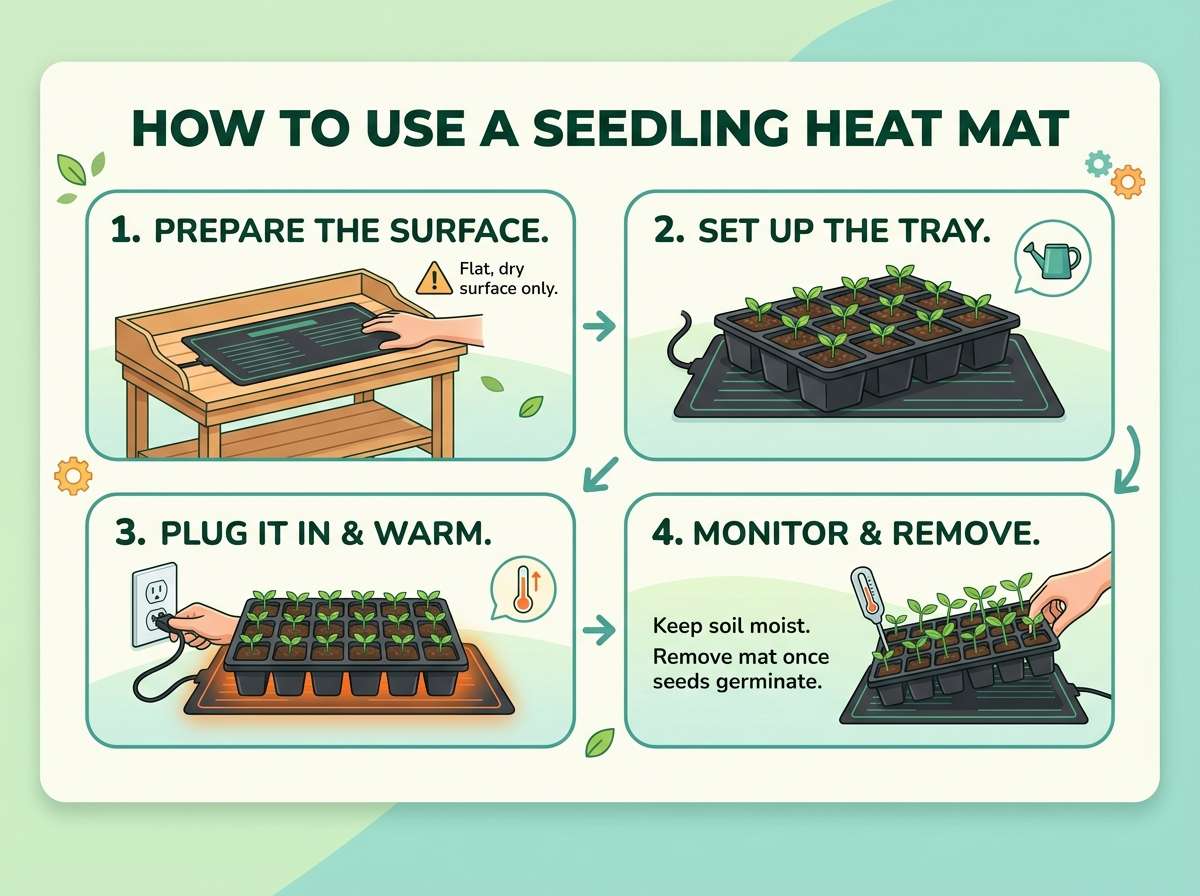
Getting your setup right takes just a few minutes, but it makes a huge difference in your results. Start by finding a stable, waterproof surface to place your mat. A shelf, table, or even the floor works fine, as long as it’s close to an outlet. Never place a heat mat on carpet or fabric where heat could build up underneath.
Put the mat in place and then arrange your seed trays on top. Your trays should sit directly on the mat’s surface so the heat transfers efficiently into the soil. If you’re worried about water damage to the mat, place a waterproof tray underneath everything. This catches any drips when you water your seedlings.
Next, plug in your thermostat controller. If your mat came with a temperature probe, insert it into the soil of one of your trays. The probe measures actual soil temperature, so the thermostat knows when to kick on and off. Set the dial to your target temperature, usually around 75 degrees Fahrenheit for most seeds.
The thermostat cord should lay safely where you won’t trip over it. Keep the mat away from water sources, and never use it in areas where water might splash on the outlet. Safety first always makes sense when using electric appliances around plants and water.
Watering Seeds on a Heat Mat
Watering becomes even more important when you use a heat mat. The warmth speeds up moisture loss from your seed trays. You’ll notice the soil dries out faster than it would at room temperature, so you need to check your trays regularly.
Water your seeds gently before you place them on the mat. The soil should be moist but not soggy. Think of the consistency of a wrung-out sponge. Too much water and seeds rot. Too little water and they can’t germinate properly. You want that perfect middle ground.
After germination, continue checking the soil regularly. The best way is to stick your finger about an inch into the soil. If it feels dry at that depth, water gently. Use a spray bottle with a fine mist setting. This prevents you from washing away tiny seeds or damaging fragile seedlings.
Most people water in the morning. This gives excess moisture time to evaporate during the day and keeps humidity levels balanced. If the mat is warming things up nicely, you might need to water every day or two instead of every few days.
Managing Humidity Around Your Heat Mat
Heat mats warm the soil, but they also increase evaporation. Dry air and warm soil together can stress your seedlings. That’s why many growers use humidity domes or clear plastic covers over their trays during the germination phase.
A humidity dome traps the moisture in the air right above your soil. This keeps seeds from drying out while they’re working to germinate. Once your seedlings sprout and develop their first true leaves, you can remove the dome to increase air circulation and prevent fungal issues.
If you don’t have a dome, plastic wrap works too. Stretch it loosely over your seed tray and secure it with a rubber band. Check under the plastic daily. You want to see condensation forming on the underside, which means moisture is staying in the soil. If you see standing water or mold growing, crack the plastic open a bit to let some air in.
Monitoring Temperature Accurately
A thermostat controller takes the guesswork out of temperature, but you should still keep an eye on things. Some seeds need specific temperatures to germinate best. Peppers like it really warm, around 80 to 85 degrees. Lettuce and spinach prefer cooler soil around 70 degrees. Tomatoes are pretty flexible at 75 degrees.
If your mat has a built-in thermostat with a temperature display, check it daily for the first few days. Make sure it’s actually reaching your target temperature. Sometimes the room is so cold that the mat runs constantly but still can’t hit the desired temp. This tells you that you might need a more powerful mat or a warmer room location.
A separate thermometer stuck in your soil gives you a second data point. Dollar stores and garden centers sell cheap soil thermometers. Stick one in a tray and compare what it reads to what your thermostat says. They should match pretty closely. If they don’t, your thermostat probe might need adjusting.
Timing Your Heat Mat Use
You don’t need to run your heat mat forever. The whole point is to get seeds to sprout. Once seedlings emerge, you can turn the heat down or even turn it off entirely.
Many gardeners run their heat mats for one to three weeks, depending on what they’re growing. Fast-sprouting seeds like squash and beans might only need ten days. Slow seeds like peppers might need four weeks. Check the seed packet for estimated germination time and add a few days as a cushion.
Some growers like to keep the mat on even after sprouting but lower the temperature to around 65 degrees. The gentle warmth helps young seedlings develop strong roots without the risk of overheating. Others turn it off completely and rely on grow lights to energize their seedlings.
Either approach works. Just pay attention to how your seedlings look. Leggy, pale seedlings that stretch toward light need grow lights more than heat. Seedlings that look sturdy and dark green are doing fine with whatever setup you have.
Common Heat Mat Mistakes to Avoid
Even with good intentions, beginning gardeners sometimes run into problems. The most common mistake is running the mat too hot. If your soil temperature climbs above 85 degrees consistently, seeds can actually refuse to germinate or rot in the soil. It’s like boiling an egg instead of incubating it. Always use that thermostat to keep things in a safe range.
Another mistake is leaving the mat on too long after seeds sprout. Seedlings that get too much bottom heat become weak and leggy as they stretch searching for light. They prefer cooler temperatures once they’re growing above soil. Turn down the heat or move seedlings to a cooler shelf to encourage sturdy growth.
Uneven water distribution causes problems too. If one side of your tray gets more water than the other, some seeds won’t sprout while others do. Pour water evenly across all your trays, or use a water tray beneath your seed containers. This bottom watering method lets soil absorb moisture evenly from below.
Don’t forget to clean your mat between seasons. Dirt and debris can reduce heat transfer efficiency. A simple wipe-down with a damp cloth keeps it working great. Let it dry completely before storing it away.
Combining Heat Mats with Other Tools
A heat mat works best as part of a complete seed-starting system. You’ll get the fastest germination and strongest seedlings when you combine several elements.
Grow lights are the natural partner for heat mats. While the mat provides bottom warmth for germination, grow lights provide the light seedlings need to grow stocky and strong once they’ve sprouted. Position lights about three inches above your seedlings and run them for 14 to 16 hours daily.
A waterproof tray or growing tray underneath everything catches drips and protects your floor or table. This is especially important if your mat is sitting on a surface you care about. Most garden centers sell plastic growing trays designed to work with standard seed trays.
Seed-starting soil makes a difference too. Regular garden soil is too heavy and doesn’t drain well for seed starting. Use a light, fluffy seed-starting mix that’s been sterilized. This gives seeds the perfect medium for sprouting and rooting without disease issues.
Real Results from Heat Mats
People who use heat mats consistently report amazing results. Germination rates jump dramatically. Where you might get 50 percent of your seeds to sprout without heat, you often see 90 percent germination with a mat. That means more seedlings to pot on and fewer wasted seeds.
Seedlings also grow faster and stronger. Instead of waiting three or four weeks for germination and then having weak, slow-growing plants, you get vigorous seedlings ready to move under lights in two weeks. They develop thicker stems and healthier root systems from day one.
Many gardeners say they can’t imagine starting seeds without a heat mat anymore. Once you experience the speed and reliability they provide, doing it the old way feels impossible.
Heat Mat Safety Reminders
Always treat your heat mat with respect. Keep it dry and away from direct water spray. Moisture and electricity don’t mix, so keep the mat and its cord away from wet areas.
Never leave your mat running unattended for long periods, especially overnight, if it doesn’t have a thermostat. Heat mats are designed for temporary use during seed germination, not continuous operation. A thermostat-controlled mat is much safer for overnight operation.
Use a power strip with an outlet that has a ground fault circuit interrupter (GFCI). This safety feature shuts off power instantly if it detects a problem. It adds a layer of protection for you and your seedlings.
Don’t step on your mat or put heavy objects on top of it beyond your seed trays. The mat is flexible, but rough handling can damage it. Store it carefully when not in use, rolled loosely rather than creased sharply.
Getting Started Today
Using a seedling heat mat isn’t complicated or expensive. A basic mat with thermostat costs between twenty and fifty dollars, depending on size. For that investment, you get faster germination, stronger seedlings, and the joy of watching your garden grow from tiny seeds.
Start with a mat that fits your space and planting plans. Set it up in a warm location, add your seed trays, fill them with seed-starting soil, plant your seeds, and water gently. Turn on the mat, set your thermostat to 75 degrees, and wait for the magic to happen.
Within days, you’ll see soil starting to crack as seedlings push through. Within two weeks, you’ll have strong, sprouted plants ready for grow lights and the next phase of growth. By spring planting time, you’ll have robust, healthy seedlings that give your garden the best possible start.
That’s the power of a simple heating mat. It takes something that takes forever to happen on its own and speeds it up dramatically. Your seeds germinate faster, your seedlings grow stronger, and you get to start your garden season ahead of schedule. That’s why so many serious gardeners won’t start another season without one.
Get your heat mat set up now and join thousands of gardeners who’ve discovered this simple secret to seed-starting success. Your garden will thank you for it.

Hi, I’m Mary, the founder of GardenCure.com. I’m passionate about creating healthy, beautiful gardens and well-kept lawns. I share practical experience and trusted advice on garden and lawn gear that truly works. With the support of my dedicated research team, our writers produce honest, in-depth reviews using reliable, authentic sources—helping you choose the right tools with confidence for your outdoor space.