How to Propagate Succulents?
Succulents are some of the easiest plants to grow. They store water in their thick leaves and stems, so they forgive a few mistakes. Best of all, you can make new plants from the ones you already own. This process is called propagation, and you do not need fancy tools or a green thumb to do it.
In this article
In this guide, you will learn what propagation means, the main ways to propagate succulents, and exactly how to do each one. You will also find tips for caring for your new plants and a list of common mistakes to avoid. Let’s get started.
What Does Propagation Mean?
Propagation means growing a new plant from a piece of an existing plant. Some plants grow from seeds, but many succulents grow just as well from a leaf, a stem, or a small baby plant that grows at the base of the mother plant. Each new plant is a clone of the original, so it looks and grows just like its parent.
Propagating succulents saves money. A single healthy plant can give you dozens of new ones over time. It also makes a great gift for friends who love plants. You can fill a small pot, a windowsill, or a whole garden bed with plants you grew yourself.
The Main Ways to Propagate Succulents
You have three simple methods to try. Each one works well, and each one takes a slightly different amount of time.
Leaf propagation is the most popular method. You pull a healthy leaf off the plant and let it grow roots and a new rosette. Echeveria, Graptopetalum, and Sedum often work well this way.
Stem cuttings work for succulents that grow tall or sprawl across the soil, such as Jade plants and some Crassula varieties. You cut a piece of stem, let it dry, and then plant it.
Offsets, also called pups, are small baby plants that grow around the base of a mature plant. You gently pull them away and replant them. Aloe, Haworthia, and many Echeveria plants produce offsets. This method gives you the fastest results because the pups already have roots or a head start.
Seeds are another option, but they take much longer to grow and need more care. Most beginners find the first three methods easier and more rewarding.
What You Need Before You Start
You do not need many supplies. Gather these items before you begin:
- A healthy mother plant with firm, plump leaves
- A clean, sharp knife, scissors, or pruning shears
- Well-draining soil or a cactus and succulent mix
- Shallow pots or trays with drainage holes
- A spray bottle for light misting
- A bright spot with indirect sunlight
Clean your tools before you cut. Wipe the blade with rubbing alcohol. This step prevents germs from entering the fresh cut and causing rot. Clean tools also help the cut heal faster.
Step-by-Step: Propagating Succulents from Leaves
Leaf propagation takes patience, but the steps are easy to follow.
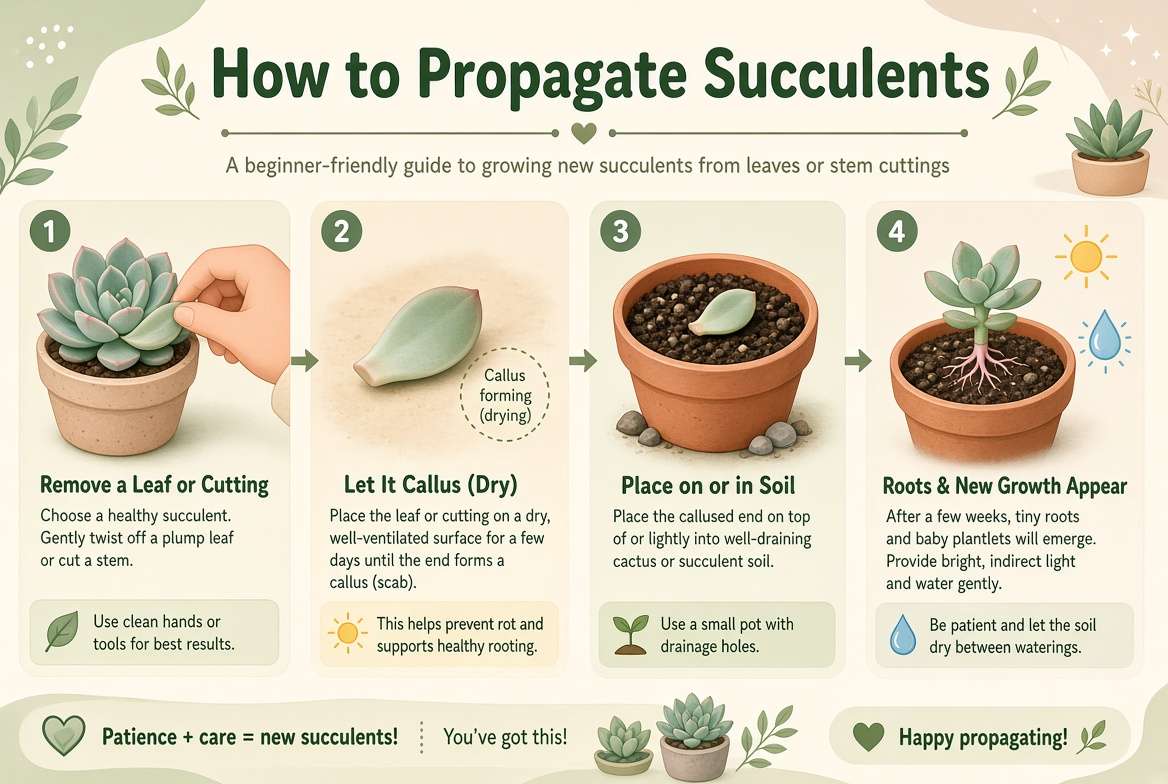
Step 1: Pick the right leaves. Look for healthy leaves that feel firm and full of water. Avoid soft, wrinkled, or damaged leaves. Choose leaves from the bottom or middle of the plant. These leaves usually detach more cleanly than the young leaves near the center.
Step 2: Remove the leaf. Hold the stem of the plant with one hand. With your other hand, gently twist the leaf from side to side until it pops off. Try to pull the whole leaf, including the small base where it joins the stem. A clean base gives the best chance of growing roots. If the leaf breaks, you can still propagate it, but the success rate drops a little.
Step 3: Let the leaf callus. Place the leaves on a dry paper towel or in a dry, shaded spot. Leave them alone for two to four days. The cut end will dry out and form a hard layer called a callus. This layer protects the leaf from rot when you place it on soil. Skip this step, and the leaf will often turn mushy.
Step 4: Set the leaves on soil. Fill a tray with dry succulent soil. Lay each leaf on top, with the cut end touching the soil. Do not bury the leaf. Set it gently so it rests on the surface.
Step 5: Wait for roots and babies. Keep the tray in bright, indirect light. Mist the soil lightly once every few days. Do not soak it. After a few weeks, you will see tiny roots growing from the base. Soon after, a small baby rosette will form at the base of the leaf. The old leaf will slowly shrivel as the new plant feeds from it. This is normal. Let it dry up on its own.
Leaf propagation can take several weeks to several months, depending on the plant and the weather. Be patient, and resist the urge to dig up the leaf to check on roots.
Step-by-Step: Propagating Succulents from Stem Cuttings
Stem cuttings give you a taller plant much faster than leaves do.
Step 1: Cut the stem. Use your clean knife or shears to cut a piece of stem about three to five inches long. Cut just below a leaf node, which is the point where a leaf joins the stem. New roots grow best from these nodes.
Step 2: Remove the lower leaves. Pull off the leaves near the bottom of the cutting. Leave enough leaves at the top to keep the plant growing. Bare stem sitting in soil will rot quickly.
Step 3: Dry the cutting. Place the cutting in a dry, shaded area for about three to seven days. The cut end should look dry and slightly hard before you plant it.
Step 4: Plant the cutting. Push the dry end about an inch into well-draining soil. Stand the cutting upright so it does not lean. If it wobbles, you can add a small stick or a few pebbles around the base to hold it steady.
Step 5: Water carefully. Wait about a week before you give the first light watering. The roots need time to form. After that, water only when the soil feels completely dry. New roots will grow within three to six weeks.
Step-by-Step: Propagating Succulents from Offsets
Offsets are the fastest and easiest method for beginners.
Step 1: Find a mature pup. Look at the base of your plant for small baby rosettes. Wait until the pup is about one-third to one-half the size of the mother plant. Pups that are too small may struggle to survive on their own.
Step 2: Remove the pup. Hold the mother plant firmly at its base. Gently wiggle the pup until it comes loose. If it has roots attached, pull it away carefully so you keep them intact. If it does not have roots, you can still remove it with a clean cut.
Step 3: Let it callus. If the pup has no roots, let the cut end dry for one to two days. If it already has roots, you can plant it right away.
Step 4: Plant the pup. Place the pup in a small pot with fresh, well-draining soil. Press the soil gently around the base. Keep the plant in bright, indirect light.
Step 5: Give it time. Water lightly after a few days. Within a few weeks, the pup will settle in and start to grow.
Caring for Your New Succulents
Once your new plants start to grow, they need a few simple habits to thrive.
Give them plenty of bright light. A sunny window works well for most succulents. If the light is weak, the plants stretch and turn pale. This stretching is called etiolation. If you see it, move the plant to a brighter spot.
Water with care. Overwatering kills more succulents than anything else. Soak the soil when you water, then let it dry out completely before you water again. In cool or cloudy weather, you may need to wait even longer.
Use the right soil. Regular garden soil holds too much water and can cause rot. Use a cactus mix or add perlite, pumice, or coarse sand to regular potting soil. Good drainage keeps the roots healthy.
Choose pots with drainage holes. Water needs a way to escape. A pot without holes traps moisture around the roots and invites rot.
Keep air moving. Good airflow helps the soil dry faster and keeps pests away. Avoid crowding your new plants too closely together.
Common Mistakes to Avoid
Even experienced growers make a few mistakes, so do not feel bad if something goes wrong. These are the most common problems beginners face.
Watering too soon. Water can rot a fresh cut or a leaf that has not formed roots. Wait until you see roots before you water heavily.
Skipping the callus step. Fresh cuts that go straight into soil often turn mushy. Let every cutting dry first.
Burying the leaves. Leaves that sit deep in soil rot quickly. Keep the cut end just touching the surface.
Using the wrong soil. Heavy, wet soil suffocates roots. Always use a gritty, fast-draining mix.
Giving too little light. Plants in dim corners stretch and weaken. Move them to a bright window.
Rushing the process. Some plants take months to show roots. Check gently, but do not dig up your cuttings to see what is happening underneath.
Troubleshooting: What to Do When Things Go Wrong
Sometimes a leaf or cutting does not grow. Look for these signs and act quickly.
If the leaf turns black and mushy, rot has set in. Throw it away and start again with a fresh, dry leaf. Make sure the next one dries for several days before planting.
If the leaf shrivels but stays firm, it may simply need more time. Many leaves shrink as they feed the new plant. Keep it in good light and wait.
If the soil smells sour or looks moldy, reduce watering and improve airflow. Remove any moldy pieces of soil and add fresh, dry mix.
If your new plant leans or falls over, it may not have enough roots yet. Support it with a small stake or pebbles, and water less often.
If you see tiny webs or small bugs, check for mealybugs or spider mites. Wipe them off with a cotton swab dipped in rubbing alcohol. Keep the plant isolated until the pests are gone.
Tips to Get Better Results Faster
A few small habits can make your propagation work more smoothly. Propagate during the warm part of the year, when plants grow most actively. Warmth speeds up root growth. Keep your tools clean every time you use them. Label your trays or pots with the plant name and the date you started, so you can track progress. Also, take several leaves or cuttings at once. Not every one will succeed, so extra cuttings give you a better chance of ending up with a healthy group of plants.
If you have a warm, bright room, you may see results sooner. If your home stays cool or dim, expect the process to take longer. Your plants will still grow, just at a slower pace.
Frequently Asked Questions
How long does it take to propagate succulents?
Offsets often root within two to four weeks. Stem cuttings usually take three to six weeks. Leaves can take one to three months or more before a new plant appears.
Can I propagate succulents in water?
You can root some succulents in water, but soil works better for most types. Water can cause rot if the leaf or stem stays wet for too long. If you try water, change it every few days and keep the cut end just touching the surface.
Do I need rooting hormone?
No. Most succulents root easily without it. Rooting hormone can help with woody stems, but it is not necessary for beginners.
Why is my leaf not growing roots?
Some leaves take longer than others. Make sure the leaf is healthy, the cut end dried properly, and the soil stays slightly moist but not wet. Patience also matters a lot.
Can I propagate any succulent?
Most succulents can be propagated, but some respond better than others. Echeveria, Sedum, Crassula, and Haworthia are great choices for beginners.
What should I do after the new plant grows?
Once the new plant has a few inches of growth and a solid root system, move it to a slightly larger pot if needed. Continue with normal care, and enjoy watching your new plant grow.
Final Thoughts
Propagating succulents is one of the most satisfying hobbies you can try. You start with one healthy plant and end up with a whole collection. The process takes a little patience, but the steps are simple. Clean your tools, let your cuttings dry, use gritty soil, and water with care. Soon you will have new plants to share, decorate your home, or give as gifts.
Start small. Pick one method, such as offsets or leaves, and try it on a few plants. As you gain confidence, experiment with the other methods. Every plant you grow teaches you something new. So grab a healthy succulent, find a sunny window, and start your very first propagation today. Your new garden is waiting.

Hi, I’m Mary, the founder of GardenCure.com. I’m passionate about creating healthy, beautiful gardens and well-kept lawns. I share practical experience and trusted advice on garden and lawn gear that truly works. With the support of my dedicated research team, our writers produce honest, in-depth reviews using reliable, authentic sources—helping you choose the right tools with confidence for your outdoor space.