How to Adjust Hunter Sprinkler Heads?
Your lawn needs water. Your sprinkler system delivers that water. But what happens when some spots get too much and other spots stay dry? That’s where sprinkler head adjustment comes in. If you own a Hunter irrigation system, you’re in luck—these sprinklers are known for being reliable and easy to adjust.
In this article
This guide walks you through everything you need to know about adjusting Hunter sprinkler heads. We’ll cover the basics, the tools you need, and step-by-step instructions that even beginners can follow.
Why You Need to Adjust Your Sprinkler Heads
Your lawn is not perfectly flat. Some areas sit higher than others. Some spots get more shade. Trees and buildings block water from reaching certain zones. When you first install your sprinkler system, the sprinkler heads might not be positioned or angled correctly for your specific landscape.
This is why adjustments matter. A sprinkler head that points the wrong way wastes water and leaves dry patches. A head that sprays too far hits sidewalks instead of grass. One that doesn’t spray far enough leaves gaps in coverage.
Adjusting your sprinkler heads does several important things:
Your lawn gets even water distribution. Every area gets what it needs—no more and no less. Your water bill goes down because you’re not wasting water. Your grass looks healthier and greener. You save time because you’re not constantly fussing with brown spots. Your irrigation system works as designed.
Think of sprinkler head adjustment as fine-tuning. The system works fine out of the box, but it works great when you spend a little time getting it just right.
Types of Hunter Sprinkler Heads
Hunter makes several types of sprinkler heads. Knowing what you have helps you adjust it correctly.
Rotary Sprinklers
Rotary heads turn as they spray. They cover large circular or partial areas. These work well for open lawn spaces with nothing in the way. They rotate slowly, which means water has time to soak into the ground instead of running off. Rotor sprinklers typically cover between 30 and 60 feet.
Fixed Spray Heads
Fixed spray heads shoot water in one direction without rotating. They cover a set spray pattern. These work best for small areas, planter beds, and tight corners. Fixed sprays are quick and work well in areas where a rotating head would hit a wall or fence.
Drip Systems
Drip irrigation delivers water slowly right where plants need it. These are less common in basic lawn sprinkler systems but show up in gardens and landscaped beds.
Pop-Up Sprinklers
Most residential systems use pop-up heads. The sprinkler sits underground until water pressure activates it. The head pops up, sprays, then retracts back down. This keeps them safe from mowers and foot traffic.
For this guide, we focus on pop-up rotary and fixed spray heads, which are what most homeowners have.
Tools and Supplies You’ll Need
Adjusting sprinkler heads doesn’t require much. In fact, many adjustments need no tools at all. Here’s what might come in handy:
Screwdrivers
You might need a flathead or Phillips head screwdriver. Many Hunter adjustments use screws, but many don’t. Check your specific head type.
Sprinkler Head Wrench
This tool helps you rotate adjustment collars on some heads. It looks like a small wrench with notches. Honestly, you can often do this by hand if you grip firmly.
Clean Cloth
Dirt and debris get into everything. A cloth helps you clean the head before adjusting.
Bucket of Water
Pour this over the area to test spray patterns after adjustment. You’ll see exactly where water goes.
Adjustment Tool or Key
Some Hunter heads come with a special tool for adjusting throw and pattern. These are small and fit right in your pocket.
Water Pressure Gauge (Optional)
This measures water pressure at the sprinkler head. Most people skip this, but it’s useful if you have serious coverage problems.
How to Access Your Sprinkler Heads
Before you can adjust anything, you need to see what you’re working with.
Run your sprinkler system. Watch the heads pop up. This tells you where they are and whether they’re positioned right. Note which heads seem to spray at odd angles or miss spots.
Turn off the system. Let the ground dry out a bit—working with muddy ground sucks. A few hours is fine.
Gently dig around the edge of a sprinkler head. You don’t need to dig deep. Just expose the top part where you’ll make adjustments. Most pop-up heads sit only a few inches below the surface.
If your head is stuck, water the area well. Soft soil is easier to dig than hard, packed earth. Don’t yank hard on the sprinkler body. You might break the connection below ground.
Once the head is exposed, you can see it clearly and start making adjustments.
Adjusting the Spray Distance on Rotary Heads
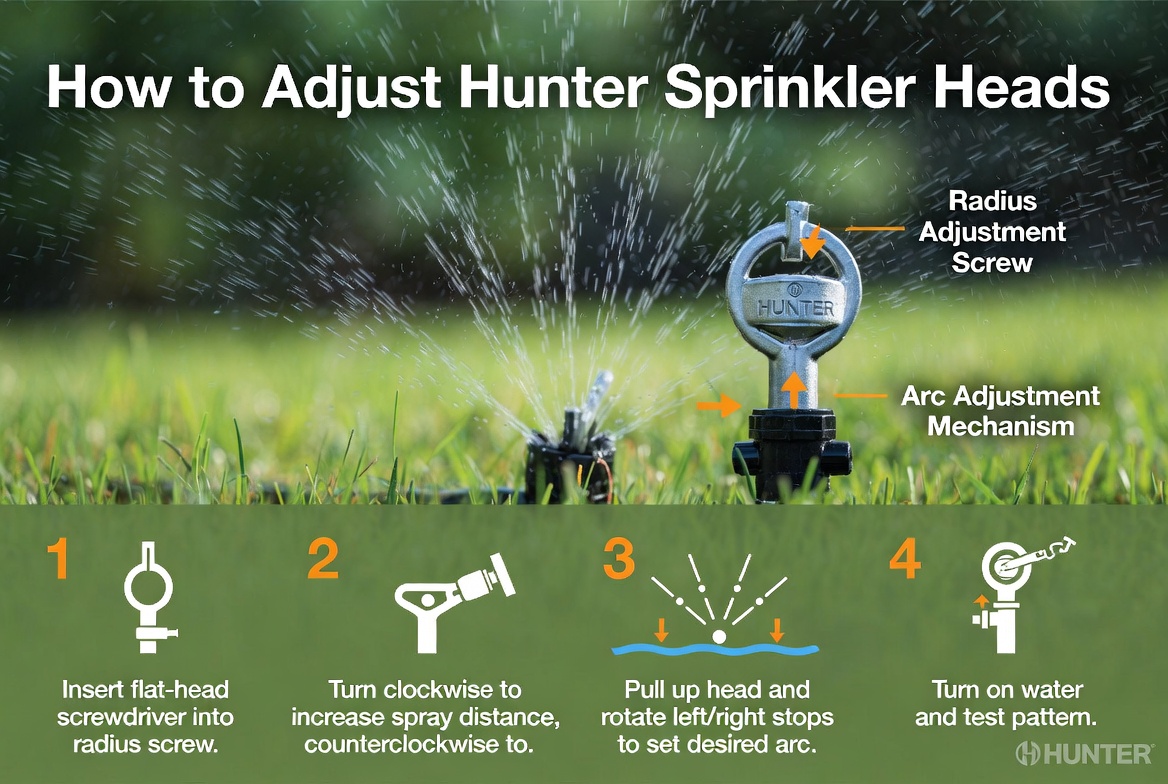
Rotary heads spray in a rotating motion. They cover large areas, but they spray too far or too short sometimes. Adjusting the distance is called adjusting the “throw” or “radius.”
Finding the Adjustment Screw
Look at the top of your rotary head. You’ll see a screw on the top. This screw controls how far the water sprays. Turn it one way to increase distance. Turn it the other way to decrease distance.
Making the Adjustment
Use a screwdriver or the Allen key that came with your system. Turn the screw slowly. Don’t crank hard—these screws aren’t meant for rough treatment.
Start by turning the screw a quarter turn. This small adjustment often makes a big difference.
Testing Your Adjustment
Run the system again. Watch the spray pattern. Does it reach where it should? Does it stop before hitting the driveway?
Keep adjusting in small increments. A quarter turn, test, adjust again, test again. This gradual approach saves you from overshooting the mark.
General Guidelines
Most Hunter rotary heads spray between 25 and 55 feet at standard water pressure. If you’re at the edge of your adjustment range and still don’t have the coverage you need, you might have a water pressure problem instead of a head problem. Check if other sprinklers in the system work better or worse.
Adjusting the Spray Pattern on Rotary Heads
Beyond distance, you can adjust the pattern that a rotary head covers. Most rotary heads spray in a full circle, but sometimes you need them to spray only in a wedge shape.
Understanding Pattern Adjustment
A rotary head spraying 360 degrees covers a full circle. A head spraying 180 degrees covers only a half circle. A 90-degree pattern covers a quarter circle. This is useful when your sprinkler sits near a wall or fence.
Finding the Pattern Adjustment
Look closely at your rotary head. You’ll see markings or notches around the body. These indicate the spray pattern angles. Some heads have a collar that you rotate. Others have a screw that you adjust.
Check your sprinkler manual if you’re unsure. Hunter sprinklers usually come with basic instructions that show exactly where to make this adjustment.
Making the Adjustment
Decide what pattern you need. If your sprinkler is in a corner, you probably want a 90-degree pattern. If it’s along a fence line, 180 degrees works better.
Use the wrench or your fingers to rotate the collar to the right angle. The head will only spray in that pattern when it activates.
Common Pattern Settings
90 degrees: Quarter circle, perfect for corners. 180 degrees: Half circle, good for fence lines and edges. 270 degrees: Three-quarters circle, used for spots with just one obstacle. 360 degrees: Full circle, the standard setting for open lawn.
Adjusting Fixed Spray Heads
Fixed spray heads point in one direction and spray in one pattern. They’re simpler than rotary heads but still have adjustments.
Pop-Up Height
Fixed spray heads sometimes don’t pop up high enough. They get blocked by grass that grows around them. Check if the head sits flush with ground level or if it pops up enough to clear the grass.
If it doesn’t pop up far enough, you might need to adjust the pop-up stem. This is usually done by turning a screw on the head body. Turn it counterclockwise to increase pop-up height.
Spray Distance on Fixed Heads
Just like rotary heads, fixed spray heads have an adjustment for how far they spray. Look for a screw on the top or side of the head.
Turn this screw to adjust the distance. Clockwise usually decreases distance. Counterclockwise usually increases it. Always check your specific model manual.
Spray Pattern Direction
This is where fixed heads differ most from rotary heads. You need to point them in the right direction.
Turn the entire head body to change where it sprays. You might need to loosen a collar or just twist the head itself. Some heads twist easily. Others need a tool.
Turn the head until it points where you want the spray to go. Tighten it if there’s a collar. Make sure it doesn’t shift when pressure pushes against it.
Adjusting for Slope and Elevation
Not all lawns are flat. Sloped areas need special attention.
Heads on Downslopes
Water flows downhill naturally. A sprinkler on a slope needs to spray less far downhill than it does uphill. Otherwise, water pools at the bottom and doesn’t reach the top.
Adjust rotary heads pointing downhill to spray a shorter distance. Adjust heads pointing uphill to spray farther.
This takes some trial and error. Run the system and watch carefully. You want water to reach everywhere equally, despite the slope.
Heads at Different Elevations
If one sprinkler sits higher or lower than others in the same zone, it might get more or less water pressure. Higher heads often spray less far. Lower heads spray farther.
You might adjust the spray distance on the higher head to reach farther, and reduce distance on the lower head. Again, the goal is even coverage.
Sprinklers in Valleys
Valleys are low spots where water naturally pools. These areas often get overwatered. You might reduce the spray distance on sprinklers in valleys to give them less water.
Adjusting Pop-Up Height
Grass grows tall. Weeds surround your sprinklers. Dirt and debris pile up. A sprinkler that doesn’t pop up high enough gets blocked by this stuff.
Checking Pop-Up Height
Run your system. Watch the heads. If the head barely clears the grass, you have a problem. The grass blocks part of the spray.
Making the Adjustment
Most Hunter pop-up heads have a collar below the main body. This collar controls pop-up height. Loosen this collar by turning it counterclockwise.
Pull the stem straight up. This extends the pop-up height. Pull gently—you’re not trying to extract it completely.
Once you’ve got the height you want, tighten the collar by turning it clockwise. Make sure it’s snug.
What’s the Right Height
Your sprinkler should pop up high enough to clear grass and weeds around it. Usually, this means the sprinkler body sits about 4 inches above ground level. Some people prefer higher. Some use lower. It depends on your grass and how much it grows.
Dealing with Overlapping Coverage
The ideal sprinkler system has slight overlap between sprinkler patterns. This ensures no dry spots in between heads.
Overlap is good. It solves small coverage gaps and accounts for wind pushing water slightly off target.
But too much overlap wastes water. Some areas get twice as much water as they need.
Finding Overlap Problems
Run the system. Watch the patterns. Do two nearby heads create an area where both spray? That’s overlap.
Some overlap is fine—maybe 10 to 20 percent of the coverage area. More than that is wasteful.
Fixing Too Much Overlap
Reduce the spray distance on one or both heads. Move the sprinklers farther apart if possible (though this requires digging).
Adjust the spray pattern on one head so it avoids the other head’s coverage area.
Fixing Too Little Overlap
Increase the spray distance on the heads. This closes gaps between them. Just make sure you don’t create runoff or spray sidewalks.
Addressing Uneven Water Pressure
Sometimes your sprinklers don’t work right because water pressure is wrong, not because the heads need adjustment.
Signs of Water Pressure Problems
All your sprinklers spray much shorter than they should. Some sprinklers work fine but others are weak. Water pools in some zones but barely reaches other zones. The system makes strange sounds.
Checking Water Pressure
Your main water line should have a gauge. Check the pressure there. Most residential systems run between 50 and 80 PSI (pounds per square inch). Hunter sprinklers work best between 60 and 65 PSI.
If pressure is too low, you might have a leak or a valve issue. If it’s too high, you might need a pressure regulator.
Pressure in Different Zones
Pressure can vary from one zone to another. The first zone might work fine while the last zone struggles.
This usually means there’s a leak or blockage somewhere. Call a professional if you can’t find it easily.
Quick Pressure Fixes
Make sure all valves are fully open. Check that your main water line isn’t kinked or bent. Look for visible leaks in the system. Clear any debris from sprinkler inlets.
Cleaning Your Sprinkler Heads
Dirt gets everywhere. Sand, bugs, and debris can jam a sprinkler head.
Basic Cleaning
Turn off the system. Dig around the head as you would to access it.
Gently pull the head up to expose the body. Use a cloth to wipe away dirt and debris.
Look inside the opening where water comes out. If you see sand or dirt, carefully remove it with your cloth or a small tool. Be gentle—sprinkler heads have delicate parts.
Push the head back down. Make sure it sits at the right pop-up height.
Deep Cleaning
For heads that seem clogged or spray unevenly, more thorough cleaning helps.
Remove the nozzle or filter if your head has one. These are usually small parts that twist off. Rinse them under water to clean out particles.
Soak the nozzle in clean water for a few minutes. This helps dissolve mineral deposits if you have hard water.
Rinse everything thoroughly before reassembling.
Put the nozzle back on and test the sprinkler.
Common Mistakes When Adjusting Sprinklers
People make these mistakes all the time. Knowing about them helps you avoid them.
Adjusting by Too Much at Once
Turn a screw a full turn instead of a quarter turn, and you’ve gone too far. You’ll need to adjust back. Make small changes. Test. Adjust again.
Forgetting to Test
Don’t just make an adjustment and assume it’s right. Run the system. Watch what happens. Make sure water goes where it should.
Not Checking Pressure First
Sometimes the problem isn’t the head. It’s the water pressure. Always rule that out before you start fiddling.
Adjusting During Dry Spells
Adjust your system when everything is dry. Don’t adjust in mud or wet ground. You’ll make bad decisions based on wet conditions.
Ignoring the Manual
Hunter includes instructions with their sprinkler heads. They’re usually short and helpful. Look at them before adjusting.
Breaking Something While Digging
The sprinkler head sits above ground, but the water line sits below. Be gentle when you dig. Water lines are fragile.
When to Call a Professional
Most adjustments are DIY-friendly. But sometimes you need an expert.
Call a professional if:
You find a leak in your main water line. Water pressure is very low and you can’t find the problem. A sprinkler head is broken or doesn’t pop up. Your system doesn’t work even after you adjust everything. You want to add new sprinkler zones. Your water bills are high and you can’t figure out why.
A professional can diagnose issues quickly and make sure everything is set up correctly.
Seasonal Adjustments
Your sprinkler system might need different adjustments at different times.
Spring Setup
After winter, your system might have debris from freezing and thawing. Clean heads thoroughly.
Grass is growing but isn’t full yet. You might need longer spray distances than you did last year.
Summer Running
Heat and drought might mean your lawn needs more water. But don’t just run longer. Make sure your coverage is even first.
This is a good time to look for problem areas and adjust them.
Fall Adjustments
Trees drop leaves. This debris can block sprinkler heads. Clean them more often.
Your lawn needs less water as temperatures drop. Adjust spray distances down.
Winter Prep
In freezing climates, you need to blow out your system to prevent ice damage. This isn’t an adjustment, but it’s important.
Check all heads are working correctly before winter arrives.
Maintenance Tips
Regular maintenance keeps your sprinklers working well and reduces the need for adjustments.
Monthly Check
Run your system and watch for dry spots or areas with too much water.
Check pop-up heights. Make sure grass hasn’t grown over them.
Listen for strange sounds. Hissing or grinding might mean problems.
Quarterly Deep Dive
Clean all sprinkler heads thoroughly.
Check for leaks.
Test water pressure.
Make small adjustments as needed.
Annual Inspection
Once a year, do a full system check.
Look at every sprinkler head.
Check all valves and lines.
Run a full system test.
Fix anything that’s broken.
Understanding Water Pressure and Spray Patterns
Water pressure drives everything in your sprinkler system. Understanding it helps you adjust correctly.
Pressure and Spray Distance
Higher pressure means water shoots farther. Lower pressure means shorter distance. This relationship is not perfectly linear, but it’s pretty close.
If your pressure drops suddenly, one reason might be a leak somewhere else in the system.
Spray Pattern Basics
Most pop-up heads come with multiple nozzles you can swap. Different nozzles spray different patterns.
Some spray full circles. Some spray half circles. Some spray specific degree patterns like 90 or 180 degrees.
If you need a different pattern than your current nozzle provides, you might be able to swap nozzles instead of adjusting screws.
Wind Effects
Wind pushes water around. On windy days, your sprinkler pattern won’t look like it does on calm days.
Adjust your system on calm days. Watch it on windy days to see how it changes.
You might find that overlap you planned for actually saves you on windy days.
Troubleshooting Specific Problems
Sometimes you face specific issues. Here are solutions for common problems.
Dry Patches in Your Lawn
A sprinkler isn’t reaching far enough. A sprinkler is broken. Water pressure is too low. Sprinklers are blocked by grass or debris.
Start by checking if a sprinkler is blocked. Clean it. Check pop-up height. Run the system again.
If that doesn’t help, increase the spray distance on the head serving that area.
If that doesn’t work either, check water pressure.
Soggy Spots
A sprinkler is spraying too far and overlapping heavily. A sprinkler is stuck and sprays continuously. Water pressure is very high.
Reduce the spray distance on the offending head first.
If that doesn’t help, check if the head is stuck. It shouldn’t spray when the system isn’t running.
Sprinklers Spraying Sidewalk or Driveway
The spray distance is too long. The pattern is pointed wrong.
Reduce the distance or repoint the head away from the hard surface.
Low Pressure Throughout the System
Leak in the main line. Valve not fully open. Filter is clogged. Pressure is set too low at the controller.
Check all these things in order. The leak is hardest to fix, so save that for last if you haven’t found the problem yet.
Final Tips for Success
Adjusting Hunter sprinkler heads is not complicated, but it takes patience.
Do small adjustments. Rushing leads to mistakes.
Test everything. Your eyes tell you if something works.
Keep notes. Write down what adjustments you made and what happened. Next time, you’ll remember what worked.
Don’t be afraid to experiment. Sprinkler heads are tough. You won’t break anything by trying.
Look at your manual. It’s a friend, not an enemy.
Enjoy your healthy, green lawn once everything is adjusted correctly. You earned it.
Conclusion
Hunter sprinkler heads are designed to be adjusted easily. You have the knowledge now. You know what tools you need, how to access your sprinklers, and how to make each type of adjustment.
Your lawn doesn’t have to have dry spots or soggy areas. Your water bill doesn’t have to be high because you’re wasting water. Your grass can be green and healthy with even coverage.
Start with one problem area. Make a small adjustment. Test it. Move on to the next problem. Before long, your whole system will be working perfectly.
Take pride in learning this skill. Many people call professionals for jobs they could do themselves. You’re different. You’re taking control of your lawn’s health.
Now go get your sprinklers dialed in. Your lawn is waiting.

Hi, I’m Mary, the founder of GardenCure.com. I’m passionate about creating healthy, beautiful gardens and well-kept lawns. I share practical experience and trusted advice on garden and lawn gear that truly works. With the support of my dedicated research team, our writers produce honest, in-depth reviews using reliable, authentic sources—helping you choose the right tools with confidence for your outdoor space.