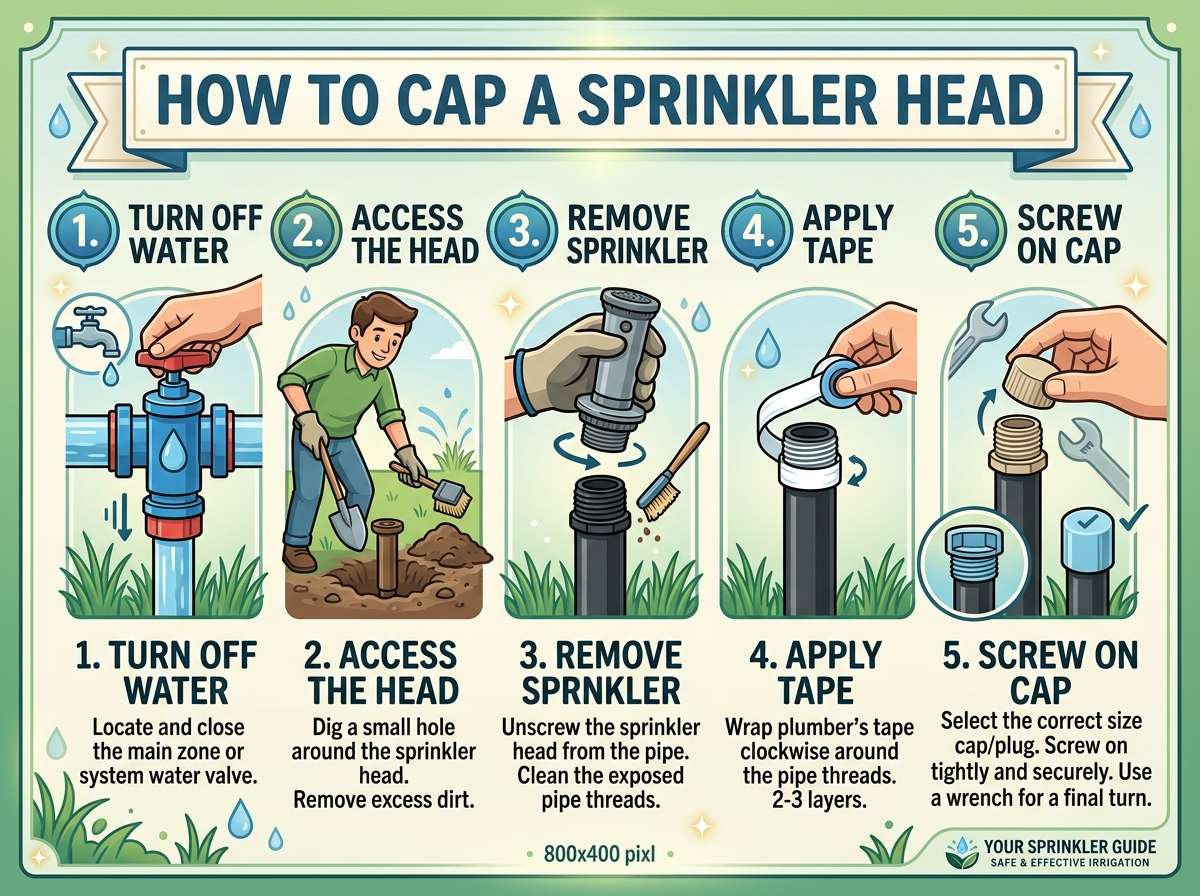
How to Cap a Sprinkler Head?
Sprinkler heads are great. They water your lawn and garden so you don’t have to. But sometimes you need to cap one. Maybe you moved it to the wrong spot. Maybe you want to take out that section of irrigation. Or maybe it’s broken and you just want to block it off for now.
In this article
The good news? Capping a sprinkler head is easy. You don’t need fancy tools or years of experience. In fact, most people can do this job in less than fifteen minutes.
This guide walks you through everything you need to know. We’ll cover why you’d cap a head. We’ll show you what tools you need. And we’ll break down the steps so anyone can follow along.
Why Would You Cap a Sprinkler Head?
Let’s start with the basics. Why do people cap sprinkler heads in the first place?
You might cap a head because it waters the wrong area. Maybe it sprays your driveway instead of your grass. Or it hits your porch or deck. When a spray head is in the wrong place, water gets wasted. It also damages things it shouldn’t touch.
You might also cap a head when you remove part of your watering system. If you redo your landscaping and don’t need that zone anymore, you cap the head. This keeps the water flowing through other parts of your system.
Broken heads are another reason. If a pop-up sprinkler gets stuck or cracked, capping it is faster than replacing it. You can cap it now and fix it later.
Some people cap heads when they test their sprinkler system. They cap certain areas to see how water flows in other zones. This helps them figure out if their system works right.
Then there are seasonal reasons. In cold climates, you might cap heads for part of the year. You close off certain zones when you don’t need them. This saves water and prevents damage from frozen pipes.
What You Need to Cap a Sprinkler Head
The good news about this project? You don’t need much. In fact, you might have everything already at home.
The main thing you need is a cap. These are small plastic or metal pieces that fit right on top of a sprinkler head. They’re cheap. You can grab them at any home improvement store. They cost just a few dollars. Online stores sell them too if you want to order them.
You need to know what size cap fits your head. Most heads come in standard sizes. The two most common are half-inch and three-quarter-inch. Look at the threads on top of your sprinkler head. Check the side of the head for a size marking. If you’re not sure, bring a photo to the store and ask for help.
You’ll also want to have a wrench handy. A regular adjustable wrench works great. You might need it to unscrew the head or tighten the cap. Some people use a pair of pliers instead. Either tool works fine.
A bucket or container is useful too. When you unscrew a head, a little water might spill out. Having something to catch it keeps your shoes dry.
If the threads are dirty or cracked, you might grab some plumber’s tape. This white tape wraps around threads to make a better seal. It’s optional but helpful. It costs less than two dollars.
That’s really it. You don’t need expensive gear. You don’t need special training. Just a cap, a wrench, and a few minutes of your time.
Different Types of Sprinkler Head Caps
Not all caps are the same. Let’s talk about the different kinds you’ll find.
The most common type is a threaded cap. These have threads that screw right onto the top of your sprinkler head. They’re super easy to use. You just twist them on by hand or with a wrench. The threads match the threads on your head. They create a tight seal.
Then there are snap caps. These don’t screw. Instead, they snap right onto the head. They’re even faster to put on. Just push down and they lock in place. They’re great if you want something quick and temporary.
You’ll also see dust caps sometimes. These are simpler caps that just sit on top. They don’t seal as tight as threaded ones. Use these if you just want to keep dirt and bugs out. They’re not the best choice if you want to stop water flow completely.
For underground irrigation, there are flush caps. These sit just above ground level. They keep dirt out while looking neat. These are common in landscaping designs.
Some people use ball caps. These are round caps with a hole you can open or close. They’re useful if you think you’ll use the sprinkler head again soon. You can open the hole and the head works again. Close it, and it stops.
For temporary capping, end caps work. These are super cheap and super simple. They block off the end of a pipe. If you’re just blocking water flow for a short time, these are fine.
The threaded cap is your best bet for most situations. It seals tight. It lasts a long time. And it’s hard to knock off by accident.
Step-by-Step: How to Cap Your Sprinkler Head
Okay, let’s get to the main event. Here’s how to actually cap your sprinkler head.
Step One: Turn Off Your System
Before you touch anything, turn off your irrigation system. Go to your timer or main control. Switch it to off. If you don’t have a timer, find the main valve and turn it off.
Why? Because water will shoot out if the system is on. You’ll get wet. Your lawn will flood. It’s just not fun.
Let the system depressurize. Wait a minute or two. This lets any water in the pipes drain out.
If your head is a pop-up type, it will go down into the ground. That’s fine. That’s what should happen.
Step Two: Locate the Sprinkler Head
Find the head you want to cap. Look at the top of it. You’ll see threads. These are the grooves that screw things on and off.
Check what size threads you have. Most are half-inch or three-quarter-inch. If you’re not sure, you can try a cap on for size. It should fit snug but not super tight.
If the head is dirty, brush off any loose dirt with your hand. Don’t worry about making it perfectly clean. Just get the big chunks off.
Step Three: Prepare Your Tools
Grab your wrench and your cap. Place your bucket nearby just in case.
If the threads look rough or corroded, tear off a small piece of plumber’s tape. Wrap it clockwise around the threads two or three times. This creates a waterproof seal. The tape is stretchy, so pull it a bit as you wrap.
Step Four: Position the Cap
Hold the cap up to the head. Line up the threads. The cap should go on smooth and straight. Don’t force it at an angle.
Start turning it clockwise by hand. Turn slowly at first. Feel for any resistance. If the cap won’t turn easily, stop and check the threads. Make sure they’re lined up right.
Once you get one or two full turns by hand, you can use your wrench. Grab the cap with the wrench. Tighten it more. You don’t need to squeeze super hard. Tight enough to hold is perfect.
Step Five: Tighten Fully
Use your wrench to give the cap a final quarter turn. This locks it in tight. A quarter turn is all you need. If you over-tighten, you can crack the cap or strip the threads.
The cap should sit flush on top of the head. It shouldn’t wobble or spin.
Step Six: Test for Leaks
Turn your system back on. Let it run for a minute. Watch the capped head. Does water spray out? Does it leak?
A little moisture is okay. Sometimes condensation forms. But you shouldn’t see water spraying or streaming out.
If water does spray out, turn the system off. Try tightening the cap a bit more. Turn it another quarter turn and test again.
If it still leaks, the threads might be damaged. You might need to replace the head. But that’s a different project.
Step Seven: Clean Up
You’re done. Put your tools away. Your capped head is now secure.
Dealing with Stuck or Difficult Heads
Sometimes capping a head isn’t straightforward. The threads might be stuck. The head might be corroded. Let’s talk about fixing these problems.
If the cap won’t tighten, the threads might be damaged. You might see cracks or rough spots. If the cap spins without tightening, try using plumber’s tape. Wrap more tape than usual. Sometimes extra tape fills gaps and creates a seal.
If that doesn’t work, you might need a new head. It’s worth getting a professional to look at it if you’re not sure.
Sometimes caps get stuck after sitting a long time. Corrosion can make them hard to remove. If you need to remove an old cap, put your wrench on it and turn slowly. Don’t force it hard at once. Steady, slow pressure works better. If you really can’t budge it, spray some penetrating oil around the threads. Let it sit for an hour. Then try again.
Sediment can also block things up. If your water has a lot of minerals or dirt, this stuff can build up. Use a damp cloth to clean the head and cap. Wipe away any grit or buildup. Then try again.
If a sprinkler head is leaking before you even cap it, that’s a separate issue. You might need to replace the head first. Check online for guides on swapping out heads.
Pop-Up Heads vs. Rotor Heads
Different sprinkler types need different attention.
Pop-up heads are the small ones that hide below ground level. When water runs, they pop up. When they turn off, they sink back down. These are common in residential yards.
To cap a pop-up head, you work with the top portion that pops up. You just screw the cap on the threads at the top. The process is the same as what we described above.
Rotor heads are bigger. They shoot water in a long arc. They rotate back and forth. These are common in bigger yards or commercial settings.
Rotor heads also have threaded tops. You cap them the same way. Just make sure you have the right size cap.
Gear-driven heads are another type. They look similar to rotors. They work about the same way. Capping them is also the same process.
Drip irrigation heads are smaller and different. They emit water slowly instead of in a spray. Some have screw-on caps. Others don’t. Check your specific drip head to see if it even has threads.
For almost all types, the capping process is identical. Find the threads. Screw the cap on. Tighten it. Test it. Done.
Common Mistakes to Avoid
Let’s talk about what not to do.
Don’t forget to turn off your system. This is the biggest mistake people make. Water will spray everywhere. You’ll be soaked. Just turn it off first.
Don’t use a cap that’s the wrong size. It won’t seal. Water will leak. Check your measurements before you buy.
Don’t over-tighten the cap. People think harder is better. It’s not. A firm quarter turn is all you need. If you squeeze too hard, you’ll crack plastic caps. You’ll strip threads. You’ll damage the head.
Don’t cap a head with damaged threads. If the threads are cracked or broken, a cap won’t help. You need a new head. Forcing a cap onto bad threads wastes time and money.
Don’t skip the plumber’s tape if the threads look rough. It’s cheap insurance. A little tape prevents leaks later.
Don’t ignore leaks. If your capped head leaks when the system is on, fix it now. Water waste adds up fast. Plus, leaks can cause damage.
Don’t cap a head without testing afterward. Always turn the system back on and watch for problems. A quick test saves headaches later.
Alternative Solutions to Capping
Sometimes capping isn’t the right answer. Let’s look at other options.
If you want to reuse the area later, a ball cap is better than a regular cap. Ball caps have a valve you can open. You just shut the valve instead of capping the head.
If you want to hide the head, you can cover it with a cap that matches your landscaping. Some caps look like rocks or decorative pieces. These blend into your yard better.
If the head itself is broken, replacing it might make more sense than capping. A new head costs twenty to thirty dollars. Installation takes thirty minutes. If you plan to use that area again, replacement is smarter.
If you’re having water pressure issues across your whole system, capping one head might not solve it. You might need to adjust your valve settings or check for leaks elsewhere. That’s a bigger project.
If you want to reduce water in one area without capping, you can install a lower-flow head. This uses less water but still functions. It’s good if you like the idea of watering that zone, just less.
If you’re doing seasonal work, you might shut off that whole zone at the main valve instead of capping individual heads. This is faster if you have many heads to stop.
Maintaining Your Capped Sprinkler Head
Once your head is capped, is it done? Mostly yes. But here are a few maintenance tips.
Check your cap every couple months. Look for cracks or damage. If the plastic gets brittle or breaks, swap it out for a new cap. This only takes a minute.
If you live in a freezing climate, cap exposed heads before winter. This prevents ice from forming inside. Ice can damage your whole system if water freezes.
In spring, check all your capped heads when you turn your system back on. Make sure the caps are still tight. Winter can cause them to loosen.
If you’re capping a head long-term, check for corrosion twice a year. Wipe the head and cap clean. This prevents rust and mineral buildup.
If you plan to eventually remove the cap and use the head again, document which head it is. Take a photo. Mark it on your system map. This saves confusion later.
When to Call a Professional
You can cap a head yourself in most cases. It’s simple and quick. But sometimes you need help.
Call a professional if the threads are badly damaged. Stripped threads won’t hold a cap. A pro can replace the head properly.
If your whole system is leaking and you can’t find the source, a pro can diagnose it. They have special tools to find problems.
If you’re not comfortable working with your system, just ask for help. There’s no shame in calling a professional. They do this all day.
If you cap a head and it still leaks badly, a pro can figure out why. It might be a damaged valve or seal inside the head. It’s not always just the cap.
Quick Tips for Success
Here’s a fast checklist for capping a sprinkler head.
Turn off your system first. Always.
Identify your head size. Know if it’s half-inch or three-quarter-inch.
Get the right cap. Match your size.
Use plumber’s tape on rough threads.
Hand-tighten the cap first.
Use a wrench for the final tightening.
Give just a quarter turn with the wrench.
Turn the system back on and test.
Watch for leaks for a full minute.
If water sprays, tighten more.
Clean up and you’re done.
Most people finish in ten minutes or less.
FAQs About Capping Sprinkler Heads
Can I cap a sprinkler head permanently?
Yes. Caps are designed to last years. Check them now and then, but they’re fine long-term.
What if I cap the wrong head?
Turn the system back on. You’ll see water spray where you didn’t expect it. Just unscrew the cap and put it on the right head.
Do I need a professional to cap a head?
No. This is a beginner-friendly job. Anyone can do it with a cap and a wrench.
How much does a cap cost?
Most caps cost two to five dollars. Some are cheaper. Fancy ones might cost more.
What if the head keeps leaking after capping?
Try tightening more. Add plumber’s tape. If it still leaks, the head might be damaged. You might need a new one.
Can I cap a head that’s running?
No. That’s dangerous. You’ll get sprayed. Turn off your system first.
Do all caps fit all heads?
No. Check your size first. Half-inch caps don’t fit three-quarter-inch heads.
What’s the difference between capping and replacing?
Capping blocks flow through an existing head. Replacing removes the old head and installs a new one.
Can I uncap a head later?
Yes. Just unscrew the cap and remove it. The head works normally again.
Does capping reduce water pressure on other heads?
No. Capping one head doesn’t affect others in a properly designed system.
Conclusion
Capping a sprinkler head is one of the easiest yard projects you can do. It takes minutes. It costs just a few dollars. And you don’t need any special skills.
Just follow the steps we covered. Turn off your system. Grab the right cap. Screw it on. Tighten it. Test it. Done.
If you make a mistake, it’s not a big deal. You can unscrew the cap and try again. Water won’t hurt anything. Your cap just came loose.
Whether you’re dealing with a broken head, rearranging your landscaping, or just trying something new, capping is the answer. It’s the right choice for anyone who wants a quick, simple fix.
Now you know how to do it. Go cap that sprinkler head. Your yard will thank you.

Hi, I’m Mary, the founder of GardenCure.com. I’m passionate about creating healthy, beautiful gardens and well-kept lawns. I share practical experience and trusted advice on garden and lawn gear that truly works. With the support of my dedicated research team, our writers produce honest, in-depth reviews using reliable, authentic sources—helping you choose the right tools with confidence for your outdoor space.