How to Grow Sweet Potatoes?
Growing sweet potatoes at home is easier than you might think. They’re delicious, nutritious, and fun to grow. Best of all, you don’t need to be an expert gardener to succeed. Let me walk you through everything you need to know.
In this article
Why Grow Sweet Potatoes at Home?
Sweet potatoes are fantastic plants to grow in your garden. They give you a huge harvest from just a small space. You’ll get amazing orange, purple, or white roots that taste incredible.
When you grow them yourself, you know exactly what went into them. No weird chemicals. No mystery ingredients. Just pure homegrown goodness.
They’re also tough plants. They handle hot weather really well. They don’t need a ton of attention once they get going. Even if you’re a beginner, you can grow sweet potatoes successfully.
The best part? You can grow them almost anywhere. They work in gardens, containers, raised beds, and even in small yard spaces.
What Do You Need Before Starting?
Before you plant anything, let’s talk about what makes sweet potatoes happy.
Sweet potatoes love warmth. They’re tropical plants at heart. They need warm soil and warm air to really thrive. If you live somewhere cold, don’t worry. You can still grow them. You just need to plan ahead.
You’ll also need space. Sweet potato plants spread out a lot. They create vines that crawl along the ground. Give them room to roam, and they’ll reward you with tons of potatoes.
Good soil is important too. Sweet potatoes aren’t picky, but they do better in loose, well-draining soil. Heavy clay soil can work, but you’ll get better results if you mix in some compost.
Sun is essential. These plants are sun lovers. Plant them where they get at least six hours of direct sunlight each day. Eight hours is even better.
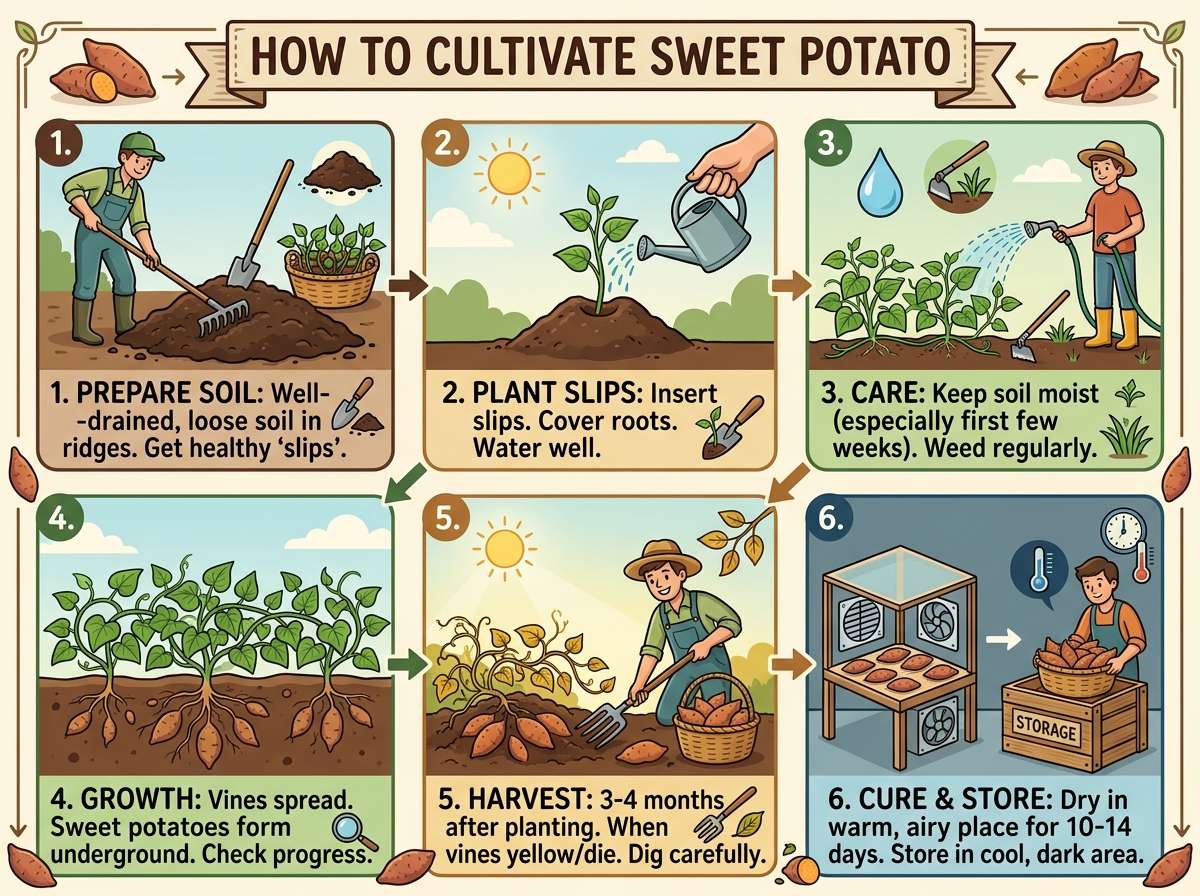
Getting Your Soil Ready
The right soil setup makes a huge difference in your harvest.
Start by testing your soil if possible. You want it to be slightly acidic. The ideal pH is around six to seven. If your soil is too acidic, add some lime. If it’s too basic, add sulfur.
Mix in plenty of organic matter. Compost is your friend here. Add three to four inches of compost into your planting area. Work it into the top eight to ten inches of soil. This makes the soil loose and easy for sweet potatoes to grow through.
Sweet potatoes also like loose soil because they need room to expand. Dense, compacted soil creates misshapen potatoes. Nobody wants those. Loose soil creates long, smooth, beautiful potatoes.
If you have clay-heavy soil, this is even more important. Break it up as much as you can. Add perlite or sand if needed. The goal is soil that crumbles in your hand and lets roots push through easily.
Make raised beds if your native soil is really bad. Fill them with a mix of topsoil and compost. Your sweet potatoes will love you for it.
Choosing Your Planting Material
You can’t just stick a regular sweet potato in the ground. You need to grow slips instead.
Slips are little shoots that grow from a sweet potato. These become your plants. You can buy slips from seed companies. They come in bundles and ship right to your door. This is the easiest route for most beginners.
You can also make your own slips if you want to save money. Get some sweet potatoes from the grocery store. Place half of each potato in water in a jar. Keep the jar on a sunny windowsill. In three to four weeks, shoots will appear. When they’re three to four inches long, twist them off the potato. Plant the slip in soil. Roots will develop quickly.
Think about what variety you want. The orange ones are most common. They’re sweet and versatile. But you can also grow purple, white, or red varieties. Try a few different kinds if you have space.
Timing Is Everything
When you plant matters a lot.
Sweet potatoes need warm soil to grow. Plant them only when soil temperature hits at least 65 degrees. Better yet, wait for 70 degrees or warmer. Cold soil will just sit there. The slips might rot before they take off.
In most places, this means waiting until spring has really settled in. No more frost. No more cold snaps. The danger of cold weather should be completely gone.
If you live in a cool climate, you can use black plastic mulch to warm up your soil before planting. Lay it down a few weeks early. The sun beating down through it will heat the soil underneath.
Plan for a long growing season. Sweet potatoes need at least 90 to 120 days of warm weather to produce good harvests. Longer is better. Calculate backward from your first expected frost. Make sure you’ll have enough warm time.
Planting Your Slips
Here’s where the real action starts.
Space your slips about twelve inches apart. Some people do eighteen inches, which gives them a bit more room. Either way works fine.
Dig a small hole. Make it deep enough that you can bury the slip up to its first set of leaves. Bury the stem but leave the leaves above ground.
Pat the soil gently around each slip. Water it well. This helps the slip settle in and start making contact with the soil.
If you’re using black plastic mulch, cut X-shaped holes in it. Push the slip through each hole. The plastic will continue warming the soil all season long.
In the first week or two, your slips might look a bit sad. That’s normal. They’re recovering from transplant shock. Water them if the soil feels dry. In a week or so, they’ll perk up and start growing like crazy.
Watering Your Sweet Potatoes
Sweet potato plants need water, but they don’t want to be soaking wet.
Water deeply when you do water. You want moisture to reach down to the roots. Light surface watering doesn’t help much.
But don’t overwater. These plants can handle some dryness. In fact, too much water can cause problems. Wet soil can lead to disease. It can also make the potatoes less sweet and less flavorful.
A good rule of thumb is to water when the top inch of soil feels dry. Push your finger into the soil. If it feels moist an inch down, wait another day or two. If it feels dry, water thoroughly.
In really hot spells, you might water twice a week. In cooler periods, once a week might be plenty.
Use a soaker hose or drip irrigation if you can. This delivers water right to the soil where roots can reach it. Avoid getting the leaves wet. Wet foliage invites fungal diseases.
Feeding Your Plants
Sweet potatoes aren’t super hungry plants. Too much fertilizer can actually backfire.
If you worked plenty of compost into your soil before planting, you might not need any other fertilizer. The compost releases nutrients slowly as it breaks down.
If you want to give them a boost, apply a balanced fertilizer like 10-10-10 once a month. Don’t go overboard. Too much nitrogen makes the plants focus on leaves instead of roots.
Organic options are great. Compost tea, fish emulsion, or seaweed extract all work well. They give your plants what they need without overdoing it.
Stop fertilizing by midsummer. Let the plants focus their energy on making big potatoes, not making more leaves.
Managing Pests and Diseases
The good news? Sweet potatoes don’t have many serious problems.
Watch for Japanese beetles. They eat the leaves but usually don’t kill the plants. If you see them, pick them off by hand or use an organic insecticide.
Spider mites can show up in dry weather. They make the leaves look speckled. A strong spray of water usually sends them packing. If it’s really bad, use neem oil.
Sweet potato weevils are a problem in some regions. They’re dark insects that lay eggs in the potatoes. If you see them, remove affected potatoes and destroy them. Use row covers if they’re a big problem in your area.
For diseases, good drainage is your best defense. Well-draining soil prevents most fungal problems. Don’t overwater. Don’t splash water on leaves.
If you see signs of rot or fungal disease, remove affected leaves or plants right away. Don’t let the disease spread.
Dealing With Vines
The vines grow long. Really long. This can actually be a good thing or a problem, depending on what you want.
If you have plenty of space, let them sprawl out. The more leaf area you have, the more energy your plants make. More energy means bigger potatoes.
If space is tight, you can trim the vines. Trimmed vines won’t hurt the crop. You can even eat the young vine tips. They’re tender and nutritious.
One thing to watch for is vines that try to root where they touch the soil. This can happen, and it’s not necessarily bad. If you don’t want extra plants popping up, trim those vines or move them around.
When to Harvest
Harvesting is the best part. This is when all your work pays off.
Sweet potatoes are ready about 90 to 120 days after planting. You’ll know they’re close when the vines start to die back naturally. Before the first frost, dig them up.
Actually, you want to dig them before frost hits. Frost kills the vines and damages the potatoes. Once the temperature hits 50 degrees or lower, the potatoes get mushy and bad.
Dig carefully. Use a fork or shovel, and go slow. You don’t want to stab your potatoes. Work around each plant and gently lift everything out.
The potatoes might be way bigger than you expected. That’s wonderful. That’s what you’ve been working toward.
Storing Your Harvest
Proper storage keeps your potatoes fresh for months.
Let them cure first. This is important. Leave them in a warm, humid place for about two weeks. Temperatures should be between 80 and 85 degrees. This helps the skin harden and heal any small cuts.
After curing, move them to storage. A cool place is best. Ideal temperature is between 55 and 60 degrees. Keep humidity moderate. Too wet and they rot. Too dry and they shrivel.
Many people store them in a basement or pantry. Some use a root cellar if they have one. Cardboard boxes with some newspaper between layers work well.
Check them now and then. Remove any that are starting to go bad. One bad potato can spoil its neighbors.
Under good conditions, they’ll keep for three to five months or longer.
Saving Seed Potatoes
Want to grow sweet potatoes again next season? Save some of the best ones for seed.
Pick the nicest, most disease-free potatoes. Store them as described above. Come spring, use them to make new slips.
This saves you money. Once you’ve done it once, you can keep growing your own potatoes year after year without buying new slips.
Just be aware that some sweet potato varieties don’t breed true from saved seed. But slips made from potatoes definitely carry on the genetics. That’s why this method works so well.
Growing in Containers
Don’t have garden space? No problem. Sweet potatoes grow great in containers.
Use a large pot or bucket. It needs to be at least five gallons. Bigger is better. A large plastic storage container works great too.
Fill it with a mix of potting soil and compost. Leave a few inches of space at the top. Plant your slips the same way you would in the ground.
Containers dry out faster than garden soil. You’ll need to water more often. Check daily during hot spells. Keep the soil moist but not waterlogged.
One slip per large container is a good rule. You can sometimes fit two in a really big container, but one plant is easier to manage.
Containers work great for trying different varieties. You can grow several different types in various spots around your yard.
Vertical Growing
If you’re really short on space, grow them vertically.
Install a sturdy trellis or fence. As the vines grow, gently tie them to the trellis using soft ties or strips of cloth. They’ll climb upward instead of spreading out.
This saves tons of space. Vertical growing also improves air circulation, which reduces disease problems.
The only downside is that you might get slightly smaller potatoes because the plant’s energy is split between growing up and making tubers. But you’ll still get a decent harvest.
Common Problems and Solutions
Not everything always goes perfectly. Here’s how to handle common issues.
Potatoes are too small. This usually means the plant didn’t get enough nutrients or water. Next time, water more consistently and add a bit of balanced fertilizer. Make sure they get plenty of sun.
Roots are hard and woody. They’re too old or the soil was too dry while they were growing. Harvest earlier next time and keep soil moisture consistent.
Vines look pale and yellow. They might need nitrogen. Apply a light fertilizer. Or they might not have enough sun. Make sure they’re in a sunny spot.
Potatoes taste bland. They might have gotten too much water. Or they might not have ripened long enough. Sweet potatoes actually taste better the longer they sit after harvest. Try storing them a few weeks before eating.
Plants keep dying. Too much water is the most common cause. Let soil dry out a bit between waterings. Make sure drainage is good.
Growing in Different Climates
Sweet potatoes do best in warm climates. But you can grow them almost anywhere.
In hot climates, plant early so they have time to mature before it gets too hot. Use shade cloth if summer gets brutally hot. Keep them well-watered.
In cool climates, start as early as possible. Use black plastic mulch to warm the soil. Choose varieties that mature faster. Build a low tunnel or cold frame to extend the season.
In humid climates, space plants farther apart for better air circulation. Watch for fungal diseases. Avoid overhead watering.
In dry climates, mulch around plants to keep moisture in. Water more often. Consider drip irrigation.
Varieties to Try
The classic orange varieties are popular for good reason. They’re sweet, reliable, and widely available.
Purple varieties are stunning. They’re packed with antioxidants. Beauregard is a popular purple type that stores well.
White or cream-colored varieties are less sweet but still delicious. They have a different texture. Some people prefer them for certain recipes.
Red varieties exist too. They’re harder to find but worth looking for.
Try a few different kinds if you can. You’ll discover which ones you like best.
Companion Planting
Some plants grow well near sweet potatoes.
Plant them near beans or peas. These nitrogen-fixing plants actually improve the soil for sweet potatoes.
Marigolds planted nearby can deter some pests. Herbs like thyme and oregano make good neighbors too.
Avoid planting them right next to brassicas like cabbage or broccoli. These compete for similar nutrients.
Extending Your Growing Season
If you live in a cool area, extend the season and get bigger harvests.
Start slips indoors early. Get them growing inside while it’s still too cold outside. Move them outside once soil is warm.
Use black plastic mulch. It warms the soil and extends the season on both ends.
Build a low tunnel using plastic sheeting over hoops. This creates a mini greenhouse around your plants.
In fall, cover plants with blankets or frost cloth when frost threatens. This can buy you extra weeks of growing time.
Making the Most of Your Space
Sweet potato vines take up room. But you can work with that.
Plant quick-growing crops between them. Lettuce, spinach, and radishes grow fast. They’ll be done before the sweet potato vines take over the space.
Use interplanting. Plant the sweet potatoes with other crops that have different root depths. Shallow-rooted plants like lettuce won’t compete with deep-rooted sweet potatoes.
Plant in succession. Instead of planting everything at once, plant slips every few weeks. This spreads out your harvest.
Preparing for Winter
If you live where it freezes, protection is key.
Dig all your potatoes before frost. Even one frost will ruin them. Check the forecast regularly in fall.
Cure and store them properly as described earlier.
Save some good potatoes for slips next season. This keeps your variety going.
Some people leave a few potatoes in the ground and let them freeze over winter. In spring, they’ll sprout again. This works in some climates but is risky.
Your First Season Tips
If this is your first time, keep it simple.
Start with just a few slips. Maybe six to twelve. This is enough to learn what you’re doing without getting overwhelmed.
Grow the orange varieties. They’re the most forgiving. They grow reliably and taste great.
Water consistently. This is the key to success. Keep soil moist but not soggy.
Watch your plants. Get to know them. See how they respond to sun, water, and nutrients. This experience teaches you more than any guide can.
Don’t stress about being perfect. Even if things aren’t ideal, you’ll probably get a harvest.
Fun Facts About Sweet Potatoes
Sweet potatoes are packed with amazing nutrients. They have tons of beta-carotene, which your body converts to vitamin A.
They’re completely different from regular potatoes. They’re not even related botanically. True potatoes are nightshades. Sweet potatoes are morning glories.
They were cultivated thousands of years ago. They came from the Americas originally. Now they’re grown all over the world.
One slip can produce six to ten potatoes or sometimes more. That’s an amazing return on investment.
They’re extremely versatile. Bake them, roast them, fry them, mash them, put them in casseroles, desserts, soups, and smoothies. The options are endless.
Harvesting More Than Once
Some gardeners get multiple harvests from the same plant.
You can carefully dig around a plant and harvest the biggest potatoes while leaving smaller ones to keep growing. Fill soil back in around the plant and let it keep producing.
This works best earlier in the season. As you get closer to fall, you want to dig everything.
Cooking Your Harvest
The whole point of growing sweet potatoes is eating them.
Baked sweet potatoes are simple and delicious. Slice them, wrap in foil, and roast at 400 degrees for 45 to 60 minutes.
Make fries. Cut them into strips, toss with oil and spices, and bake until crispy.
Roast them with other vegetables. Cubed sweet potatoes roast beautifully alongside carrots, onions, and peppers.
Make soup. Roasted sweet potatoes blend into a creamy, delicious soup.
Add them to casseroles, stews, and curry dishes.
Or simply cut one in half and eat it with a spoon right out of the skin.
Troubleshooting Your Harvest
Sometimes the harvest doesn’t look perfect. That’s okay.
Misshapen potatoes taste just fine. They’re still delicious. Don’t throw them away just because they look weird.
Small potatoes happen. They’re actually sweeter sometimes. Use them for roasting or frying.
Damaged potatoes should be used right away. Don’t try to store them. Use them within a week or two.
Next Steps
Once you’ve grown sweet potatoes once, you’ll want to keep doing it.
Try new varieties. Experiment with different growing methods.
Grow more than you need so you can share with friends and family.
Save your best potatoes for next season’s slips.
Keep notes about what works. Track which varieties you like best. Remember how long they took to mature. Note which pests or problems showed up.
Final Thoughts
Growing sweet potatoes is rewarding and surprisingly simple. You’ll get amazing fresh food straight from your garden. You’ll learn valuable gardening skills. You’ll probably get way more than you expected from a small space.
Start with just a few slips this season. Give it a try. You’ll be amazed at what you can grow.
Sweet potatoes are forgiving plants. They’re tough. They’re productive. They taste amazing.
Most importantly, you’ll have fun. Watching those plants grow from tiny slips into full plants producing piles of delicious potatoes is exciting. It never gets old.
Get your hands dirty. Plant some sweet potatoes. Enjoy the journey. Harvest your crop. And then plan for next season because once you start, you won’t want to stop.
Happy growing!

Hi, I’m Mary, the founder of GardenCure.com. I’m passionate about creating healthy, beautiful gardens and well-kept lawns. I share practical experience and trusted advice on garden and lawn gear that truly works. With the support of my dedicated research team, our writers produce honest, in-depth reviews using reliable, authentic sources—helping you choose the right tools with confidence for your outdoor space.