How to Do Indoor Composting?
If you live in an apartment, don’t have a backyard, or just want to reduce trash, indoor composting is your answer. It’s easier than you think, and it doesn’t smell like you’d expect. In fact, a well-managed indoor compost system barely smells at all. Let me walk you through everything you need to know to start your own indoor composting journey right from your home.
In this article
What Exactly Is Indoor Composting?
Composting is the process of breaking down organic waste into nutrient-rich soil that you can use for plants, gardens, or houseplants. The magic happens when bacteria, fungi, and tiny organisms work together to decompose food scraps and other organic materials. Indoors, you’re doing the exact same thing, just on a smaller scale and in a controlled environment.
The beauty of indoor composting is that it turns waste into something useful. Instead of throwing food scraps in the trash where they sit in a landfill, you’re giving them new life as compost. This cuts down on garbage, reduces methane emissions, and gives you free fertilizer for your plants. It’s a win-win situation.
Why Should You Start Indoor Composting?
There are so many reasons to begin composting inside your home. First, it’s incredibly sustainable. Every banana peel, eggshell, and coffee ground you compost is one less thing taking up space in a landfill. Over time, this really adds up.
You’ll also save money. Instead of buying expensive potting soil or fertilizer, you’ll have your own nutrient-dense compost to use. If you have even a few houseplants, you’ll appreciate this benefit right away.
Indoor composting is also perfect for small spaces. You don’t need a huge backyard or special outdoor setup. A small container in a closet, under the sink, or in a corner works just fine. The process is quiet, manageable, and fits into any living situation, whether you’re in a studio apartment or a house.
Finally, composting helps you stay connected to your food waste. When you actively compost, you become more aware of how much waste you produce and might even eat less food that ends up going bad.
Different Methods for Indoor Composting
You have several great options when it comes to indoor composting systems. Each one works differently, so pick the one that fits your lifestyle and space.
Vermicomposting (Worm Bins)
Vermicomposting is one of the most popular indoor composting methods. You use red worms (called red wigglers) in a bin to eat your food scraps and turn them into compost. The worms do all the work for you, and the process is surprisingly clean and odor-free.
You can buy a ready-made worm bin, or build your own using storage containers. The worms live in bedding material (usually shredded paper or coconut coir) and munch on your kitchen scraps. In a few months, you’ll have finished compost at the bottom of your bin.
The best part about worm bins is that they’re compact and don’t require electricity. Worms are also forgiving—they’ll tolerate a range of conditions and are hard to kill if you follow basic guidelines.
Bokashi Bins
Bokashi is a fermentation process that comes from Japan. You layer your food scraps with a special bran that contains microbes, which ferment your waste instead of decomposing it like traditional composting. This method is super fast—your bucket fills up and is ready to go in about two weeks.
Bokashi bins are excellent because they can handle foods that regular compost can’t, like meat, dairy, and oils. The fermented material is odor-controlled and takes up much less space than regular compost.
The downside is that bokashi needs that special bran to work, which you have to buy. It’s not expensive, but it’s an ongoing cost. Also, after fermenting, you still need to bury the material in soil or add it to a garden to finish the composting process.
Electric Composters
If you want compost fast, an electric composter might be your best bet. These machines chop up your food scraps, heat them, and sometimes use air circulation to speed up decomposition. Some models can produce finished compost in as little as three to four hours.
Electric composters are convenient and don’t smell. They’re also great if you have limited space. However, they’re the most expensive option, use electricity, and the compost they make isn’t quite as nutrient-rich as traditional methods since the process is so rapid.
Traditional Compost Bins
You can also use a simple, unheated compost bin indoors. This works best if you have a garage, basement, or balcony. These bins rely on natural decomposition, so they take longer than other methods (usually three to six months), but they’re cheap to set up and don’t require any special supplies.
Getting Started: Step-by-Step Setup
Ready to begin? Here’s how to set up your indoor composting system.
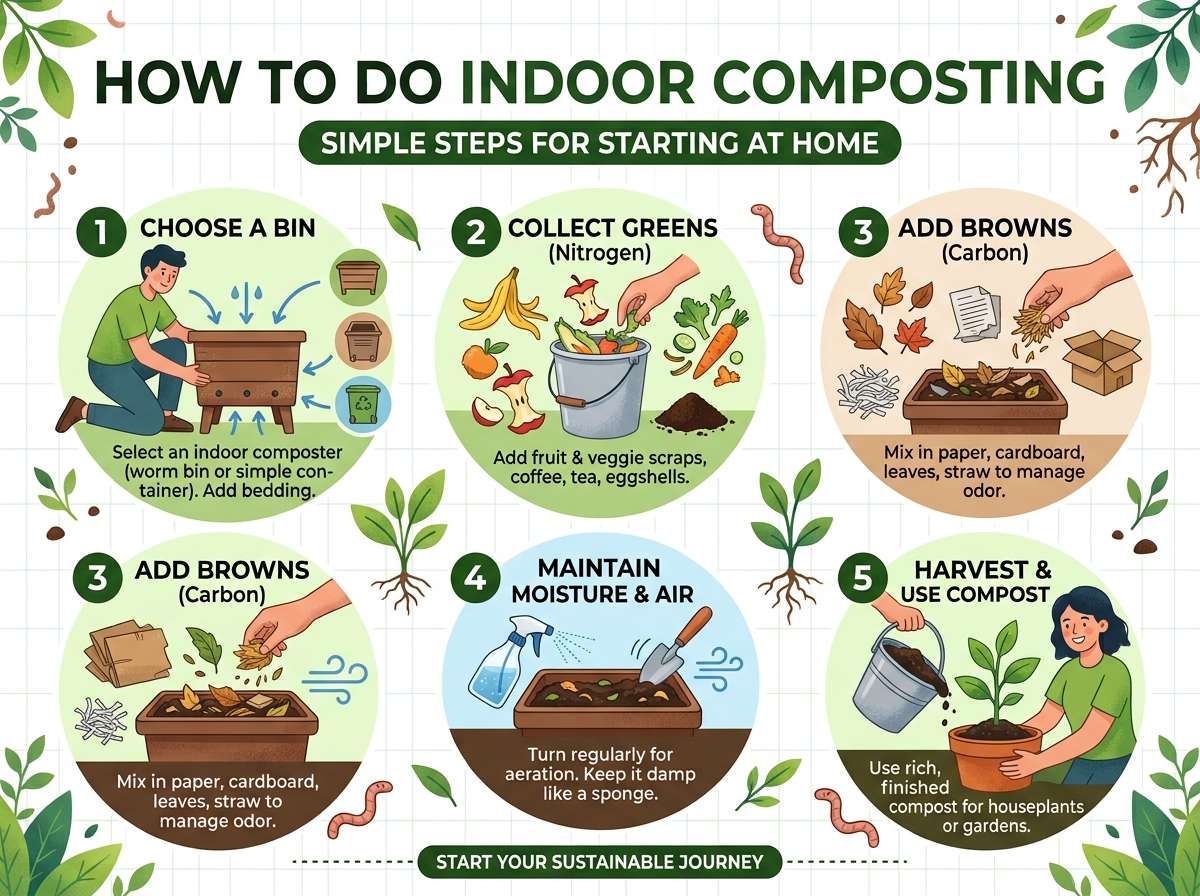
Choose Your Container
For vermicomposting, use a plastic storage bin with a lid or buy a worm bin. You want something dark (worms don’t like light) and with good drainage. Drill holes in the bottom and sides if your bin doesn’t already have them.
For bokashi, buy a proper bokashi bucket with a tight seal and a drain valve at the bottom.
For an electric composter, follow the manufacturer’s instructions for setup.
For a basic bin, a large plastic container or wooden box works fine.
Prepare Your Bedding (for Worm Bins)
If you’re doing vermicomposting, you need bedding for your worms. Shred newspaper, cardboard, or use coconut coir. Wet it so it’s damp like a wrung-out sponge, then fluff it up. Fill your bin about halfway with this bedding.
The bedding gives worms a comfortable home and helps break down the food. It also keeps things from getting too wet or smelly.
Add Your Worms (if Using a Worm Bin)
Order red wigglers online or buy them from a local garden center. You’ll need about one pound of worms for a standard bin, which is roughly a thousand worms. This sounds like a lot, but they’re tiny and will all fit.
Spread the worms on top of the bedding and let them burrow down on their own. They’ll get to work right away.
Start Adding Scraps
Begin feeding your compost system slowly. Add a small amount of food scraps and cover them with bedding. The idea is to not feed them faster than they can eat. If you pile in too much too fast, things get smelly and attract pests.
Good foods to compost include fruit and vegetable scraps, coffee grounds, tea bags, crushed eggshells, and paper products. Avoid meat, dairy, oils, and pet waste.
What Can and Can’t Go in Indoor Compost
Knowing what to compost is crucial for keeping your system healthy and smell-free.
Great Things to Compost
Fruit scraps like apple cores, banana peels, and orange rinds break down quickly and are worm favorites. Vegetable scraps from carrots, lettuce, peppers, and onions work great. Coffee grounds and tea (without the bag) are excellent. Crushed eggshells add calcium. Shredded newspaper and cardboard provide carbon. Grass clippings, leaves, and plant trimmings also work if they’re not diseased.
Never Compost These Items
Meat, fish, and bones take forever to break down and attract rodents and flies. Dairy like cheese, milk, and yogurt smell terrible when they decay indoors. Oils and fats don’t decompose well and create odor problems. Diseased plants spread disease. Pet waste carries harmful bacteria. Glossy paper, colored ink, and plastic don’t belong. Treated wood and synthetic materials won’t break down.
Keeping Your Compost Healthy and Odor-Free
The key to successful indoor composting is balance. You’re looking for the right mix of “browns” (carbon-rich materials like paper and cardboard) and “greens” (nitrogen-rich materials like food scraps and grass).
Aim for a ratio of about three parts browns to one part greens. If your bin smells bad, you probably have too many greens and not enough browns. Add shredded paper or cardboard to fix it.
Keep your compost moist but not waterlogged. Think of a wrung-out sponge. If it’s too dry, decomposition slows down. If it’s too wet, you’ll get odor and mold problems. If liquid pools at the bottom (called leachate), drain it out.
Turn your pile occasionally if you’re using a basic bin. This adds air and speeds things up. With worm bins, you don’t need to turn anything—the worms do the work.
Temperature matters too. Most indoor composting works best between 55 and 75 degrees. If your home is cold, decomposition slows. If it’s too hot, things can dry out or smell.
Monitor your bin regularly. Check moisture, smell your compost (it should smell earthy, not rotten), and make adjustments as needed.
How Long Until You Have Finished Compost?
This depends on your method. Worm bins typically produce finished compost in three to four months. Bokashi takes about two weeks to ferment, but then you need another month or two in soil to fully finish it. Electric composters work in hours but need to sit for a day or two before use. Traditional bins take three to six months or longer.
You’ll know your compost is done when it looks like dark, crumbly soil and smells earthy and sweet. You shouldn’t see any original food scraps or recognize the materials you put in.
Using Your Compost
Once your compost is ready, you can use it anywhere. Mix it into potted plant soil to boost nutrition. Top-dress your houseplants with a layer. Blend it into your garden beds if you have outdoor space. Use it as a base for starting seeds.
Homemade compost is like magic for plants. You’ll notice they grow faster, look healthier, and produce more flowers or fruit.
Troubleshooting Common Problems
Bad smell: Too many greens or too much moisture. Add browns and let it dry out a bit.
Fruit flies: Cover food scraps with bedding immediately. The flies need exposed food to reproduce.
Mold: This is usually fine and just part of decomposition. If it bothers you, add more browns and improve air flow.
Slow decomposition: Your bin might be too cold. Worms might also be stressed. Check that conditions are right and give it time.
Worms escaping: They’re unhappy. Check moisture, temperature, and pH. Make sure they’re not too wet or too acidic.
Tips for Success
Start small. You don’t need a huge system when you’re learning. A basic worm bin or bokashi bucket is perfect for beginners.
Be patient. Good things take time. Rushing the process leads to problems.
Keep a compost journal if you’re new to this. Write down what you add, when you feed your system, and any issues you notice. This helps you learn what works.
Don’t be afraid to experiment. If one method isn’t working, try another. Composting is flexible.
Connect with other composters. Online communities and local gardening groups are full of helpful people who love sharing tips and tricks.
Final Thoughts
Indoor composting is one of the easiest ways to live more sustainably without a ton of effort. You’re taking something that would normally be trash and turning it into something valuable. That’s pretty amazing.
Whether you choose worms, bokashi, or an electric composter, you’re making a positive impact. You’re reducing waste, creating natural fertilizer, and learning about the cycles of nature in your own home.
Start today. Pick your method, set up your bin, and begin composting. Your plants—and the planet—will thank you.

Hi, I’m Mary, the founder of GardenCure.com. I’m passionate about creating healthy, beautiful gardens and well-kept lawns. I share practical experience and trusted advice on garden and lawn gear that truly works. With the support of my dedicated research team, our writers produce honest, in-depth reviews using reliable, authentic sources—helping you choose the right tools with confidence for your outdoor space.