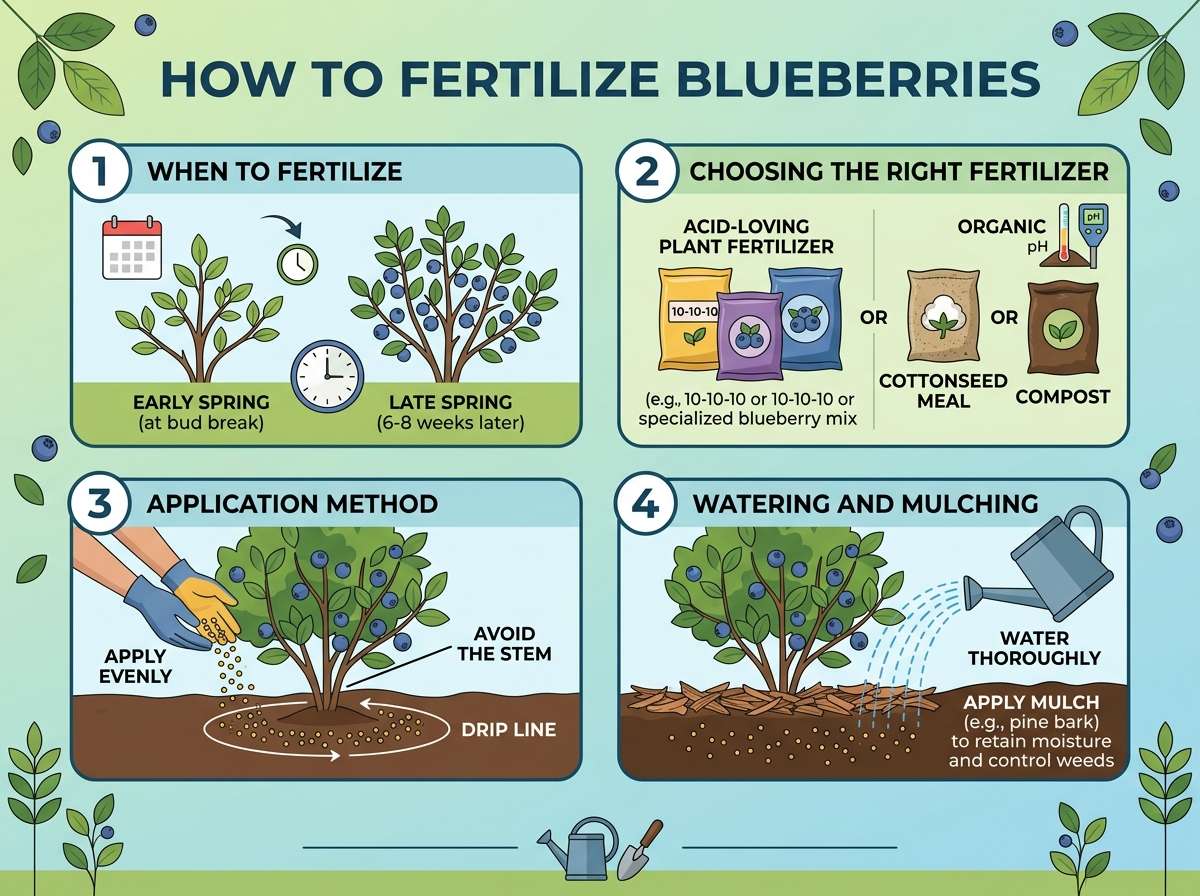
How to Fertilize Blueberries?
Blueberries are some of the easiest berries to grow in a home garden. These little blue gems pack a punch of flavor and nutrition. But here’s the thing: they need proper feeding to thrive. If you want healthy plants that produce tons of delicious berries, you need to understand blueberry fertilization.
In this article
This guide breaks down everything you need to know about feeding blueberries. I’ll keep it simple, skip the confusing jargon, and give you real tips you can use right away.
Why Your Blueberries Need Fertilizer
Before you grab a bag of fertilizer, let’s talk about why your blueberries need feeding in the first place.
Blueberries are hungry plants. They drink up nutrients from the soil as they grow new leaves, create flowers, and produce berries. Over time, the soil loses these nutrients. Without replenishing them, your plants weaken. They produce fewer berries. The berries taste less sweet. The leaves look dull and yellowed.
Think of fertilizer like vitamins for your plants. Just like you need vitamins to stay healthy and strong, blueberries need nutrients to grow big and produce heavy crops.
The right fertilizer makes a huge difference. Plants fed well have:
- Deeper green leaves
- More flowers in spring
- Larger, sweeter berries
- Stronger root systems
- Better disease resistance
- More vigorous growth
Skip feeding your blueberries, and you’ll notice stunted growth, pale leaves, and disappointing harvests. That’s not the goal, right?
Understanding Blueberry Soil Needs
Here’s something crucial: blueberries are picky about soil. They need acidic soil to thrive.
Most garden soils run neutral or slightly alkaline. Blueberries hate that. They like soil with a pH between 4.5 and 5.5. This acidic soil helps blueberries absorb nutrients properly.
When soil pH is wrong, even if you add plenty of fertilizer, your plants can’t use it. The nutrients lock up in the soil. This is called a nutrient deficiency, and it’s frustrating because you’re feeding your plants, but they’re still hungry.
Before you fertilize, test your soil pH. You can buy a simple soil test kit at any garden center. Just follow the instructions and find out what you’re working with.
If your soil is too alkaline, you have options:
- Add sulfur to lower the pH
- Use acidifying fertilizers
- Mix in peat moss or pine bark
- Add coffee grounds to the soil
Once your soil pH is right, your blueberries can actually use the nutrients you’re giving them. This is the foundation of good blueberry care.
Types of Blueberry Fertilizers
Not all fertilizers are the same. You have several options to feed your blueberries.
Granular or Dry Fertilizers
These are solid fertilizers you scatter on the soil around your plants. You water after applying, and the nutrients release slowly into the soil. Granular fertilizers work well for blueberries because they feed the plants over a longer time period.
Look for fertilizers made specifically for acid-loving plants like blueberries. These blends lower the soil pH while feeding your plants. Brands often label them as “blueberry fertilizer” or “acid plant fertilizer.”
The benefit of granular fertilizers is simple: you use them once or twice a season, and they keep working. No constant mixing or spraying. Just spread and water.
Liquid Fertilizers
Liquid fertilizers go straight into the soil or spray on the leaves. They work fast. Your plants absorb them quickly. This is great if your blueberries show signs of hunger right now.
However, liquid fertilizers don’t last as long as granular ones. The nutrients wash away faster, especially with rain or watering. You’ll need to apply liquid fertilizers more often.
For beginners, granular fertilizers are easier to use. Liquid fertilizers are better when you spot a problem and need quick results.
Organic vs. Synthetic Fertilizers
Organic fertilizers come from natural sources. Think fish meal, bone meal, compost, or manure. They break down slowly and feed your soil’s living organisms. Over time, organic fertilizers improve soil structure and health.
Synthetic fertilizers are made in a lab. They release nutrients fast. Your plants get fed quickly, but the effects don’t last as long. Synthetic options give you more control over exactly how much nitrogen, phosphorus, and potassium your plants get.
Both work for blueberries. Organic fertilizers are great if you want to improve your soil long-term. Synthetic fertilizers help if you need quick results or want precise nutrient control.
Many gardeners use a mix of both. They apply organic fertilizers in spring and fall to build soil health, then use synthetic fertilizers in summer if the plants need a boost.
NPK Numbers Explained
When you look at a fertilizer bag, you’ll see three numbers. Like 10-5-5 or 8-8-8. These numbers stand for NPK.
N = Nitrogen P = Phosphorus
K = Potassium
These are the three main nutrients all plants need.
Nitrogen helps plants grow leaves and stems. It makes foliage green and lush. Blueberries need good nitrogen for healthy leaf growth.
Phosphorus supports root development and flower production. It helps your blueberries set fruit. Without enough phosphorus, you get fewer berries.
Potassium strengthens plant tissue and helps with overall plant health. It improves disease resistance and berry quality.
For blueberries, you want a fertilizer with higher nitrogen in spring (to push leaf growth) and balanced NPK in summer and fall. A ratio like 10-5-5 works well for feeding blueberry bushes.
Some fertilizers also include sulfur. Sulfur acidifies the soil, which blueberries love. So look for a blueberry-specific blend that includes sulfur in the mix.
How Much Fertilizer Do Blueberries Need?
This is where many beginners go wrong. They either under-feed or over-feed their blueberries.
Here’s the basic rule: use about one tablespoon of balanced fertilizer per plant each time you feed. For young plants (under three years old), use half that amount.
But here’s the real talk: the exact amount depends on your specific fertilizer. Check the bag. The instructions will tell you how much to use based on plant size.
A common recommendation is to apply fertilizer at a rate of one-quarter pound of nitrogen per plant each year. That sounds like a lot of math. Let me simplify it.
For most home gardeners, this means:
- First application in early spring: 2-3 tablespoons per plant
- Second application in late spring: 2-3 tablespoons per plant
- Stop feeding in mid-summer to avoid pushing new growth late in the season
- Optional light feeding in fall: 1-2 tablespoons per plant
This schedule keeps your blueberries fed without overdoing it.
Too much fertilizer causes problems. Your plants grow lots of leaves but few berries. The stems get soft and weak. Disease problems increase. So don’t think “more is better.” Stick to the recommendations.
When to Fertilize Blueberries
Timing matters when you’re feeding blueberries.
The best time to start feeding is early spring when new growth appears. This is when your blueberries wake up from dormancy and start using energy. A feed at this point pushes healthy leaf and flower development.
Give your plants a second feeding in late spring, about six weeks after the first application. By this time, flowers are finishing and fruits are setting. This feeding supports berry development.
Stop fertilizing by mid-summer. If you keep feeding into summer and fall, you push new tender growth. This new growth doesn’t have time to harden off before cold weather. Soft new stems get damaged by frost and die back.
In mild climates, you can give a light fall feeding after berries finish. This helps the plant prepare for dormancy and next season’s growth. But only do this if you live somewhere that doesn’t get hard freezes.
Never fertilize in late fall or winter. Your plants are resting. Feeding them at this time causes confusion and stress.
The simple timeline:
- Early spring: Feed
- Late spring: Feed again
- Summer and fall: No more feeding
- Winter: Let plants rest
Application Methods for Blueberry Fertilizers
How you apply fertilizer matters. You have a few options.
Scatter and Water Method
This is the easiest way for beginners. Spread the granular fertilizer on the soil around your plant. Keep it a few inches away from the main stem. Then water thoroughly. The water carries the nutrients into the soil where roots can use them.
This method works great for granular fertilizers. Just scatter, water, and you’re done.
Side Dressing
Side dressing is just a fancy way of saying “put the fertilizer on the side.” Instead of spreading it in a circle around the plant, you make a shallow trench or line on one side. Pour the fertilizer into it. Cover lightly with soil. Water.
This concentrates the nutrients in one spot, so your plant roots find them easily. It also looks neater because the fertilizer isn’t spread everywhere.
Diluted Liquid Application
If you’re using liquid fertilizer, dilute it according to package directions. Pour the mixture around the base of your plant. Avoid getting it on the leaves and stems. Water thoroughly after.
Liquid applications work fast because the nutrients are already dissolved. Your plants absorb them quickly.
Foliar Feeding
This means spraying a diluted liquid fertilizer on the leaves. The leaves absorb nutrients directly. This works in a pinch when plants show signs of hunger. But don’t rely on foliar feeding as your main fertilizer method. It doesn’t feed the roots.
If you spray, do it in early morning or late evening. Never spray in hot sun. The droplets can burn the leaves.
Organic Fertilizer Options for Blueberries
If you prefer organic methods, plenty of natural options work great for blueberries.
Compost
Homemade or purchased compost is one of the best things you can give blueberries. Mix compost into the top few inches of soil each spring. It adds nutrients slowly, improves soil structure, and feeds beneficial microorganisms. Your blueberries love it.
Peat Moss
Peat moss feeds blueberries while also making the soil more acidic. They’re a perfect match. Mix peat moss into the soil at planting time and add more as mulch each spring.
Coffee Grounds
Used coffee grounds are acidic and contain nitrogen. Scatter them around your blueberry plants. They feed the plants and lower soil pH. Coffee shops often give away used grounds for free.
Fish Meal and Fish Emulsion
Fish products are packed with nitrogen. Fish emulsion is a liquid you mix with water and apply to the soil or spray on leaves. Fish meal is a dry product you work into the soil. Both feed blueberries well.
Blood Meal
Blood meal is dried animal blood. It’s high in nitrogen and acidifies soil. Add it to the soil in spring. A little goes a long way.
Bone Meal
Bone meal is ground bones. It’s high in phosphorus, which supports flowering and fruiting. Add it to the soil at planting time or work it in around established plants.
Holly-Tone or Similar Products
Products labeled “holly-tone” are made specifically for acid-loving plants. They contain a mix of natural ingredients including sulfur. These work perfectly for blueberries.
Common Blueberry Nutrient Problems and Fixes
Sometimes your blueberries show signs that they’re hungry for specific nutrients. Learn to spot these problems.
Nitrogen Deficiency
Symptoms: Old leaves turn yellow while veins stay green. New growth is pale and weak. Plants look stunted.
Fix: Apply a nitrogen-rich fertilizer. Fish emulsion or blood meal work well. Your plants should green up within a few weeks.
Phosphorus Deficiency
Symptoms: Leaves look dark red or purple, especially on new growth. Few flowers appear. Plants don’t produce many berries.
Fix: Add bone meal or a fertilizer higher in phosphorus (the middle NPK number). This takes longer to fix than nitrogen problems, so be patient.
Potassium Deficiency
Symptoms: Leaf edges look scorched or brown. The edges of older leaves turn color first. Overall growth is weak.
Fix: Apply a fertilizer with higher potassium (the third NPK number) or add wood ash around the plants. Potassium problems also need time to improve.
Iron Deficiency
Symptoms: New leaves turn yellow while veins stay green, but this happens on young growth (not old growth like nitrogen deficiency). Plants look weak and pale.
Fix: Check your soil pH first. Iron problems often happen because soil pH is too high. Acidify the soil with sulfur or iron sulfate. You can also apply chelated iron directly to the leaves.
Magnesium Deficiency
Symptoms: Yellow stripes appear between the leaf veins. Lower leaves are affected first. Veins stay green while tissue between them yellows.
Fix: Apply magnesium sulfate (Epsom salt) diluted in water. Spray it on the leaves or pour it around the base of the plant. Repeat every two weeks if needed.
If you spot any of these problems, don’t panic. They’re all fixable. Start by checking your soil pH. Often, wrong pH is the real culprit. Then apply the right fertilizer, water well, and wait. Your blueberries bounce back.
Best Fertilizers to Buy
If you want specific product recommendations, here’s what works well for blueberries:
Espoma Holly-Tone – This is an all-purpose organic fertilizer made for acid-loving plants. It contains sulfur to lower soil pH. It’s my top pick for organic feeding. Use according to package directions.
Jobe’s Organics Fruit & Citrus Fertilizer Spikes – These are solid fertilizer sticks you push into the soil. They release nutrients slowly over time. Simple to use and effective.
Scotts Osmocote Smart-Release – A synthetic option that releases nutrients over months. You apply it once in spring and it feeds all season. Great for hands-off feeding.
Miracle-Gro Shake ‘n Feed – Mix this granular fertilizer into the top layer of soil. It feeds for up to three months. Easy to use and reliable.
Sulfur-Coated Urea – This is a technical fertilizer high in nitrogen and acidifying. It’s inexpensive and very effective if you follow directions. Not as beginner-friendly as other options, but it works great.
All these products work. Pick one that fits your style (organic or synthetic) and your budget. Follow the package directions and you’ll see good results.
Mulching Helps Fertilizers Work Better
Here’s a bonus tip: mulch helps your fertilizer do its job better.
Apply 2-3 inches of mulch around your blueberry plants. Use pine bark, pine needles, or wood chips. These break down slowly and acidify the soil. They also keep roots cool, retain moisture, and prevent weeds.
When you mulch properly, you need less fertilizer. The mulch feeds the soil as it breaks down. It also keeps moisture consistent, so nutrients stay available to roots.
Apply fresh mulch each spring. Pull back the old mulch, add a new layer, and your plants will thank you.
Fertilizing Blueberries in Pots
Container-grown blueberries need more frequent feeding than ground plants. Pots have less soil, so nutrients leach out faster with watering.
For potted blueberries, apply liquid fertilizer every two weeks during the growing season. Or use granular slow-release fertilizer that lasts three months, and reapply when it runs out.
Otherwise, follow the same timing rules: feed in spring and early summer, stop in late summer.
Use a high-quality potting mix made for acid-loving plants. This gives your container blueberries the right pH from the start.
When NOT to Fertilize
Avoid feeding blueberries at these times:
- Right after planting – Let the root system settle in first. Feed after six weeks.
- During drought – Water first to help roots use the fertilizer. Don’t apply dry fertilizer when soil is parched.
- After heavy pruning – Wait a few weeks for the plant to recover before feeding.
- In late summer or fall – New growth won’t have time to harden off before cold.
- During disease outbreaks – Fix the disease first. Fertilizing weak, diseased plants stresses them more.
- When plants are already showing fertilizer burn – Flush the soil with water and wait before feeding again.
Simple Fertilizing Schedule for Beginners
Here’s a dead-simple schedule you can follow:
Early Spring (when new growth appears):
- Spread 2-3 tablespoons of blueberry fertilizer around each plant
- Water thoroughly
Late Spring (six weeks later):
- Repeat the application
- Water thoroughly
Summer and Fall:
- No feeding
- Just water as needed
Winter:
- Leave plants alone
- They’re dormant
That’s it. Follow this simple schedule and your blueberries will thrive.
Troubleshooting Fertilizer Problems
Sometimes things go wrong. Here’s how to handle it.
Over-fertilizing
If you applied too much fertilizer, you might see:
- Brown or burned leaf tips
- Weak, soft growth
- Salt crust on the soil surface
Fix: Flush the soil with water. Pour water slowly around the plant until it drains out the bottom. This washes away excess fertilizer. Stop feeding for several weeks. Resume with smaller amounts.
Under-fertilizing
If your plants aren’t getting enough nutrients:
- Yellowing leaves
- Stunted growth
- Few or small berries
Fix: Start feeding according to the schedule above. You might not see improvement for several weeks. Be patient. The plant needs time to use the new nutrients and grow.
Fertilizer Not Working
If you’re feeding your plants but they still look hungry:
- Check soil pH first. Wrong pH locks up nutrients.
- Make sure you’re watering enough. Dry soil prevents nutrient absorption.
- Look for pest or disease problems. These prevent healthy growth regardless of fertilizer.
Address these issues and your fertilizer will work better.
Quick Tips for Success
Here are my best blueberry fertilizing tips:
- Test your soil pH before you start. Right pH is everything.
- Use a fertilizer made for acid-loving plants. It acidifies while feeding.
- Don’t over-fertilize. Stick to the schedule. Less is more.
- Water after applying fertilizer. This activates it and carries nutrients to roots.
- Apply mulch. It improves soil and reduces how much fertilizer you need.
- Stop feeding by mid-summer. New growth that appears late doesn’t harden off properly.
- Feed established plants more than young plants. Younger plants need less.
- Organic fertilizers are great but work slower. Synthetic options work faster.
- Mix organic and synthetic methods for best results.
- Watch your plants. They’ll tell you if they’re hungry or overwhelmed.
Conclusion
Fertilizing blueberries doesn’t have to be complicated. Remember these key points:
Blueberries need acidic soil and regular feeding to produce great berries. Start by testing your soil pH. Then apply a blueberry-specific fertilizer twice in spring – once in early spring and once in late spring. Stop feeding by mid-summer. Use either organic or synthetic fertilizers based on your preference.
Watch for signs of nutrient problems like yellowing leaves. These are easy to fix once you know what to look for. Don’t over-fertilize. Stick to the schedule. Apply mulch to improve soil and reduce fertilizer needs.
With proper feeding, your blueberry plants will produce abundant crops of delicious berries. You’ll look forward to picking big handfuls of sweet blueberries straight from your own garden. That’s the goal, and you can achieve it with the tips in this guide.
Start simple. Pick a good fertilizer. Follow the schedule. Your blueberries will reward you with years of great harvests.
Happy growing!

Hi, I’m Mary, the founder of GardenCure.com. I’m passionate about creating healthy, beautiful gardens and well-kept lawns. I share practical experience and trusted advice on garden and lawn gear that truly works. With the support of my dedicated research team, our writers produce honest, in-depth reviews using reliable, authentic sources—helping you choose the right tools with confidence for your outdoor space.