How to Fertilize Potatoes?
Growing potatoes in your garden is one of the most rewarding experiences you can have. There’s something magical about planting tiny seed potatoes and watching them turn into a pile of delicious food. But here’s the thing: potatoes are hungry plants. They need proper nutrition to grow big, healthy, and abundant. That’s where fertilization comes in.
In this article
If you want to grow potatoes that are actually worth eating, you need to feed them well. A good fertilization plan can make the difference between a mediocre harvest and one that leaves your neighbors asking for your secrets. Let’s walk through everything you need to know about fertilizing potatoes from start to finish.
Why Potatoes Need Fertilizer
Potatoes are nutrient-hungry crops. They pull a lot of food from the soil as they grow. When you plant seed potatoes, they need energy to sprout, develop roots, and send up shoots. As the plant grows, it needs even more nutrients to bulk up those tubers underground.
Think of fertilizer as a buffet for your potatoes. Different nutrients do different jobs. Some help the plant grow leaves and stems. Others help develop the roots. And some work specifically on making those potato tubers grow big and starchy.
If you don’t give your potatoes enough food, you’ll get smaller yields. The potatoes that do grow might be weak or misshapen. Your plants might be more prone to diseases too. Proper potato fertilizer and nutrition prevent all these problems.
The good news is that you don’t need to be a soil scientist to get this right. We’ll break down exactly what you need to do.
The Three Main Nutrients Your Potatoes Need
Potatoes, like all plants, need three primary nutrients. You’ve probably seen them listed on fertilizer bags as NPK. Let’s talk about what each one does.
Nitrogen (N)
Nitrogen is all about leafy growth. It helps your potato plants grow big, green, and strong. A healthy potato plant needs lots of foliage above ground to power the tuber development below.
When your potato plants first sprout, they especially need nitrogen to get established. Strong leaf growth early on sets the stage for good tuber production later. Think of nitrogen as the fuel that powers the green machinery of your plant.
Phosphorus (P)
Phosphorus is the root builder. It helps potatoes develop strong root systems and contributes to overall plant health. This nutrient is especially important early in the season when the plants are still establishing themselves.
Phosphorus also helps with energy transfer in the plant. It makes sure nutrients and water move around effectively. Without enough phosphorus, your potatoes might struggle to grow well.
Potassium (K)
Potassium is the tuber builder. This is the nutrient that actually helps develop those potatoes you’re waiting to harvest. It strengthens plant tissues, helps move water and nutrients around, and improves the overall quality of your harvest.
Potassium also helps potatoes resist diseases and stress. If your plants are under any kind of pressure, good potassium nutrition helps them bounce back.
Soil Testing: Your Secret Weapon
Before you buy a single bag of fertilizer, test your soil. This is honestly the best investment you can make. A soil test tells you exactly what nutrients are already in your soil and what you need to add.
Here’s why this matters: if your soil is already rich in certain nutrients, adding more is wasteful and potentially harmful. On the flip side, if your soil is deficient in something, you’ll want to know so you can fix it. Soil testing takes the guesswork out of fertilization.
You can get a soil test done through your local agricultural extension office. It usually costs just a few dollars and takes a week or two to get results. The results will tell you your pH level, your nutrient levels, and recommendations for potato cultivation in your specific soil.
Types of Potato Fertilizers
Now let’s talk about the actual fertilizers you can use. There are lots of options, and they all work a bit differently.
Synthetic or Chemical Fertilizers
Synthetic fertilizers are manufactured products made from mineral salts and chemicals. They’re called “fast-release” because plants can access the nutrients quickly. If your soil is deficient in something and you need quick results, synthetic fertilizers are your friend.
A common ratio for potatoes is something like 5-10-10 or 10-10-10. These numbers refer to the NPK content. For example, a 10-10-10 fertilizer contains 10 percent nitrogen, 10 percent phosphorus, and 10 percent potassium.
Synthetic fertilizers are usually affordable and easy to find. They come in dry granular form or liquid form. Both work well for potatoes.
Organic Fertilizers
Organic fertilizers come from natural sources like animal waste, plant materials, and rock minerals. They release nutrients more slowly than synthetic options. This slow-release action means your potatoes get steady nutrition over time rather than quick bursts.
Some great organic options for potatoes include:
Compost is broken-down plant and animal material. It’s full of beneficial microorganisms and nutrients. Work it into your soil before planting.
Manure from horses, chickens, or cows adds nitrogen and organic matter. Well-aged manure is best because fresh manure can burn plants. Mixed manure compost works great for potatoes.
Fish emulsion is made from fish waste. It’s high in nitrogen and minor nutrients. You dilute it in water and apply it as a liquid feed.
Bone meal is ground animal bones. It’s high in phosphorus, perfect for root and tuber development. Work it into the soil before planting.
Kelp or seaweed is rich in potassium and micronutrients. You can buy dried kelp to mix into soil or liquid kelp to spray on leaves.
Wood ash from untreated wood contains potassium and other minerals. Use it sparingly because it also raises soil pH.
Blended Fertilizers
Some gardeners make their own custom blends. You might mix bone meal for phosphorus, sulfate of potash for potassium, and blood meal for nitrogen. This gives you total control over what goes into your soil.
How Much Fertilizer Do Your Potatoes Need?
The amount of fertilizer you need depends on several things. Your soil test results will give you specific recommendations, but here’s a general approach.
Most potato growers apply a balanced fertilizer before planting. You might work 2 to 3 pounds of a balanced fertilizer like 10-10-10 into the soil for every 100 square feet of growing space.
Then, as the plants grow, you’ll apply more fertilizer. Many growers do a “side dress” application about 4 to 6 weeks after planting, when the plants are blooming or right after. This boosts nutrition during the important tuber-building phase.
For organic approaches, work in 2 to 3 inches of compost before planting. Then add another inch or two as a side dressing during the growing season.
With liquid fertilizers, follow the package directions carefully. Apply every 2 to 3 weeks during the growing season. Always dilute liquid fertilizers in water as directed.
When to Apply Potato Fertilizer
Timing is everything with potato fertilization. Here’s a simple timeline to follow.
Before Planting
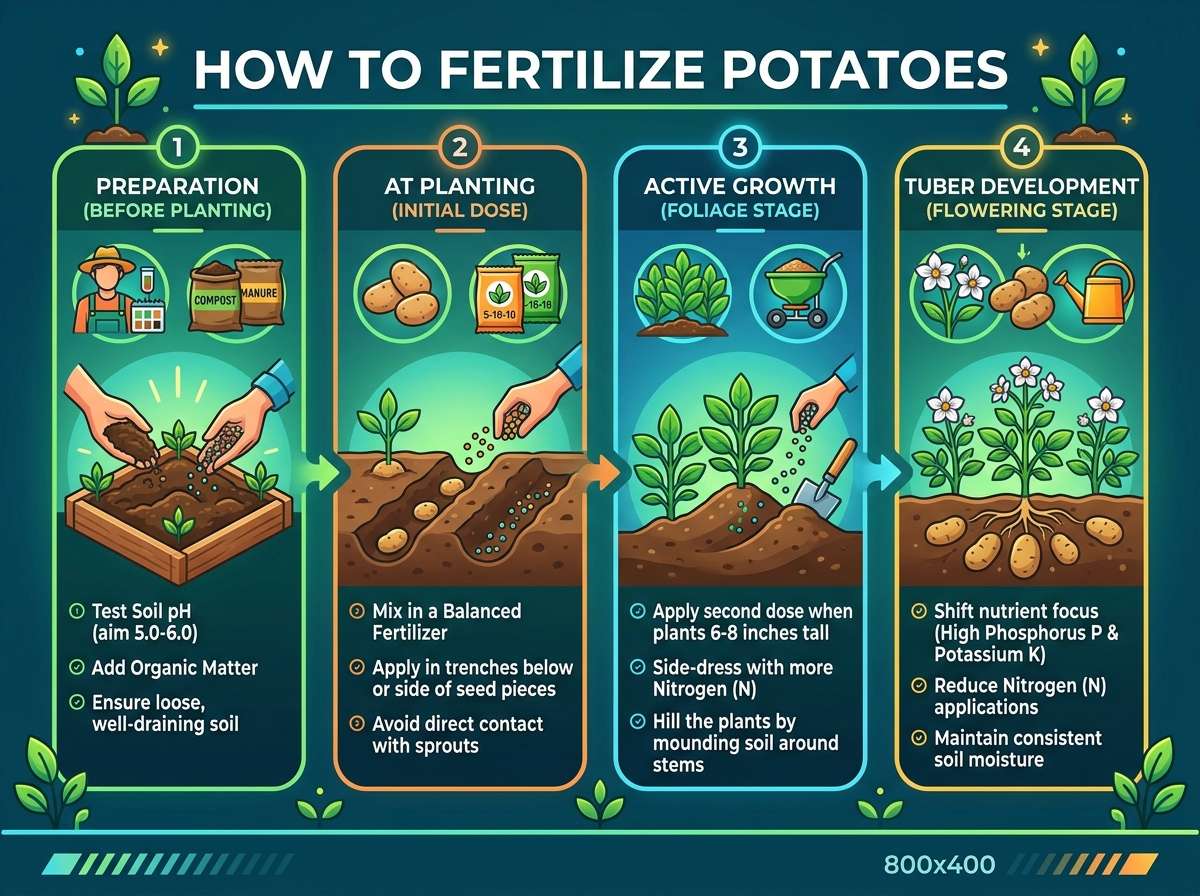
Prepare your soil 1 to 2 weeks before planting. Work organic matter like compost into the top 8 to 10 inches of soil. If you’re using synthetic fertilizer, work it into the soil at this time too.
This early application gives nutrients time to integrate into the soil and become available to roots as they develop.
At Planting Time
Some gardeners apply a small amount of balanced fertilizer right at planting time. You can sprinkle some bone meal or compost directly in the seed potato furrow. The developing roots will access this nutrition right away.
Don’t overdo this though. Too much fertilizer in the planting hole can sometimes damage tender roots. A light application is better than a heavy one.
During Growth (Side Dressing)
This is the most important application for potato production. When your plants are 6 to 8 inches tall, or when they start blooming, apply a side dressing of fertilizer. This timing coincides with the big tuber-building phase of the plant’s growth.
Spread the fertilizer around the base of each plant, about 4 to 6 inches away from the stem. For dry fertilizer, water thoroughly after applying. For liquid fertilizer, apply directly according to package instructions.
Late Season Applications
Once flowers appear on your potato plants, ease off on nitrogen fertilizer. Your plants don’t need lots of leafy growth anymore. You just want to keep building those tubers. Switch to a fertilizer higher in potassium, or simply reduce applications.
Stop fertilizing about 4 weeks before your expected harvest. This lets the potato skins toughen up, which helps with storage.
Application Methods
You have several ways to get fertilizer to your potatoes. Different methods work better in different situations.
Broadcasting
Broadcasting means spreading fertilizer across the soil surface before planting and working it in. This method distributes nutrients evenly. It’s great for preparing beds before you plant.
Side Dressing
Side dressing is applying fertilizer along the rows or around individual plants during the growing season. It’s simple and effective. Just spread the fertilizer in a line along the plant row, or make a circle around each plant. Keep the fertilizer a few inches away from the stems to avoid burning them. Water it in well.
Foliar Feeding
Foliar feeding means spraying diluted liquid fertilizer directly on the leaves. Plants can absorb nutrients through their leaves surprisingly well. This method works fast and is great for quick nutrient boosts. Use a liquid fertilizer diluted as directed and spray in the evening or on cloudy days to avoid leaf burn.
Soil Injection
Some gardeners use special equipment to inject liquid fertilizer directly into the soil around their plants. This method gets nutrients right to the roots. It’s more technical but very effective if you have the equipment.
Compost Mulching
Apply a layer of compost around your plants as they grow. As it breaks down, it adds nutrients to the soil. This is organic, easy, and has the bonus of helping retain soil moisture.
Fertilizing Different Soil Types
Different soils have different nutrient retention. You might need to adjust your approach based on what you’re working with.
Sandy Soils
Sandy soils don’t hold nutrients well. They drain fast, which means nutrients wash away quickly. If you have sandy soil, you’ll need to apply fertilizer more often in smaller amounts. Split your fertilizer into 3 or 4 applications instead of 1 or 2 big ones.
Adding organic matter like compost helps sandy soils hold nutrients better. Work in 3 to 4 inches of compost before planting to improve nutrient retention.
Clay Soils
Clay holds nutrients tightly, which is good and bad. The good news: nutrients stick around longer. The bad news: they might not be available to plants easily. Clay-heavy soils often benefit from organic matter too. Compost loosens clay and improves nutrient availability.
You can usually get away with fewer fertilizer applications in clay soils, but make sure those applications actually happen.
Loamy Soils
Loamy soil is the goldilocks soil. It holds nutrients without being too tight, and it drains well without losing everything. If you’re lucky enough to have loamy soil, standard fertilization schedules work great. Follow the guidelines above and you’ll be in good shape.
Signs Your Potatoes Need More Fertilizer
Sometimes plants tell you they’re hungry. Learn to read these signs.
Pale or Yellowing Leaves
Yellow leaves, especially on older leaves, often mean nitrogen deficiency. The plant is pulling nitrogen from older foliage to feed new growth. Feed with nitrogen and you should see improvement quickly.
Slow Growth
If your potato plants are growing slowly and look weak, they probably need food. Weak plants might also be more prone to disease. A boost of balanced fertilizer usually helps them perk up.
Poor Tuber Development
If you harvest small potatoes despite the plants looking okay, nutrition was probably the issue. This is why side dressing at the right time matters so much.
Purple or Red Foliage
While some potato varieties naturally have colored foliage, unexpected purple or reddish tints can indicate phosphorus deficiency. Phosphorus deficiency is less common than nitrogen issues, but it happens. Bone meal or other phosphorus sources help.
Common Fertilization Mistakes to Avoid
Now let’s talk about what not to do.
Over-Fertilizing
Too much fertilizer, especially nitrogen, creates soft, weak plants. Over-fertilized potatoes are more prone to disease. The tubers might crack or develop hollow centers. More fertilizer is not better. Follow recommended rates and resist the urge to add more.
Using Fresh Manure
Fresh manure is hot and can burn plants. It also tends to encourage disease. Always use well-aged manure compost that’s been sitting for at least 6 months.
Inconsistent Applications
Potatoes do better with steady nutrition than with feast-and-famine cycles. Plan your fertilizer schedule and stick to it. Regular applications beat occasional heavy applications.
Ignoring Soil pH
Nutrients in soil are only available to plants if the pH is right. For potatoes, aim for a pH between 5.0 and 7.0. Too acidic or too alkaline, and your plants can’t use nutrients even if they’re present. Get a soil test done.
Skipping the Organic Matter
Fertilizer alone doesn’t build good soil. Organic matter like compost creates a living soil ecosystem that helps make nutrients available to plants. Don’t skip this step.
Organic Potato Fertilization Plan
If you prefer the organic approach, here’s a complete plan.
Before planting: Work in 2 to 3 inches of finished compost. Add bone meal at the rate recommended on the package. You can also add kelp meal if you want extra potassium and micronutrients.
At planting: Sprinkle a small amount of bone meal directly in the seed potato furrow. This gives early roots a nutrition boost.
At 6-8 inches tall: Apply a side dressing of compost or composted manure. You can also apply fish emulsion every 2 to 3 weeks as a liquid feed.
Mid-season: When plants are blooming, apply another inch of compost. Spray leaves with diluted kelp solution for potassium and micronutrients.
Late season: Stop applying nitrogen-heavy materials. If you want to add potassium, use wood ash or kelp.
This plan provides steady, organic nutrition throughout the season.
Synthetic Fertilization Plan
If you’re using synthetic fertilizers, here’s how to organize it.
Before planting: Work in 2 to 3 pounds of balanced fertilizer like 10-10-10 per 100 square feet. Work it into the top 8 inches of soil.
At planting: Optional light application of granular fertilizer in the seed potato furrow.
At 6-8 inches tall: Side dress with balanced fertilizer at the rate of 1 to 1.5 pounds per 100 feet of row. Water thoroughly.
Mid-season: Apply another side dressing when plants are blooming. At this point, switch to a lower nitrogen ratio like 5-10-10 to support tuber development.
Late season: Stop applications 4 weeks before harvest.
This schedule gives you flexibility to adjust based on how your plants look.
Special Considerations for Container Potatoes
Growing potatoes in containers is fun and rewarding. Container soil drains faster than ground soil, and containers have less total soil volume. This means container potatoes often need more frequent fertilizer applications.
Start with high-quality potting soil mixed with compost. This gives you a nutrition-rich starting point. Then apply liquid fertilizer every 2 weeks during the growing season. Or use granular fertilizer with more frequent applications (every 3 to 4 weeks instead of every 4 to 6 weeks).
Container potatoes also benefit from a weekly kelp spray for micronutrients. The extra nutrition helps them thrive in the limited soil space.
Fertilizing Seed Potatoes vs. Storage Potatoes
Some potatoes are grown specifically for seed. Others are grown for eating and storage. The fertilization approach is slightly different.
For seed potatoes, you want balanced nutrition throughout the season. You’re not trying to maximize the biggest tubers. You just want healthy, disease-free seed potatoes to save for next season.
For eating potatoes, you can be more aggressive with side dressing, especially during tuber development. You want big, healthy potatoes for your kitchen.
Storage potatoes benefit from that late-season potassium boost we talked about. It toughens the skin and improves storage life.
Budget-Friendly Fertilization Ideas
Fertilizing potatoes doesn’t have to be expensive. Here are some budget-friendly approaches.
Make your own compost from garden waste and kitchen scraps. This is free fertilizer that works great for potatoes. Even a small compost pile produces usable compost.
Use grass clippings as a nitrogen source. Layer them in a compost pile or use them as mulch around your plants. They break down and add nitrogen.
Save animal waste from chickens, rabbits, or other livestock. Pile it up and let it age for at least 6 months before using. Well-aged animal manure is excellent and free if you have animals.
Gather leaves and compost them. Leaf compost is perfect for potato beds. Shred them first to speed breakdown.
Ask local breweries, coffee shops, or restaurants for their spent materials. These often have good nutrients and many businesses give them away. Spent grain from breweries is high in nitrogen, and used coffee grounds are too.
Potato Fertilizer and Common Problems
Sometimes potato plants develop problems related to nutrition and fertilization.
Scab
Potato scab is a disease that causes rough spots on the potato skin. It’s partly a soil pH issue and partly a disease issue. Acidic soil (below pH 5.0) and inconsistent moisture actually discourage scab. Some say avoiding fresh manure also helps. This isn’t directly a fertilizer problem, but soil management affects it.
Hollow Heart
Hollow heart is when potatoes develop a hollow space inside. This is often caused by inconsistent water and fertilizer. Keep moisture steady and fertilize regularly, and you’ll likely avoid this issue.
Weak Plants
Weak, spindly plants usually need more fertilizer, especially nitrogen early in the season. Also make sure they’re getting 6 to 8 hours of sunlight daily.
How to Know When You’ve Got It Right
A healthy, well-fed potato plant looks amazing. The stems are thick and sturdy. The leaves are deep green and abundant. The plant looks vigorous and happy. When you dig up those potatoes, they’re big, uniform, and healthy.
That’s what good fertilization looks like. Your plants tell you when they’re happy.
Final Thoughts on Potato Fertilization
Fertilizing potatoes is not complicated. You’re basically doing three things: testing your soil so you know what it needs, applying balanced nutrition before planting, and giving your plants a boost during the important tuber-building phase.
Whether you go organic or synthetic, the principles are the same. Feed your potatoes well, and they’ll reward you with a great harvest. Neglect them, and you’ll get disappointing results.
Start with a soil test. Follow a simple fertilization schedule. Adjust based on what your plants tell you. That’s honestly all there is to it.
Next season, try keeping notes about what you did and how it worked. Over time, you’ll dial in the perfect fertilization plan for your specific garden. Before you know it, you’ll be the one that neighbors ask for advice.
Happy growing, and enjoy those delicious, home-grown potatoes.

Hi, I’m Mary, the founder of GardenCure.com. I’m passionate about creating healthy, beautiful gardens and well-kept lawns. I share practical experience and trusted advice on garden and lawn gear that truly works. With the support of my dedicated research team, our writers produce honest, in-depth reviews using reliable, authentic sources—helping you choose the right tools with confidence for your outdoor space.